Table of Contents
The Best s’mores cookie bars – Chilled two‑layer chocolate‑marshmallow fill
I still remember the first time I was a child in Tangier, the scent of fresh dough drifting through the market stalls, and the taste of roasted almonds and honey in the evening air. Years later, plying my trade in the kitchens of Paris, I learned how butter’s molecules carry flavor, and now in my energetic Brooklyn kitchen, I combine those lessons to create the perfect s’mores cookie bars. My signature twist? A chilled two‑layer construction that locks the goo in place so every bite is a molten moment. This isn’t just a nostalgic snack; it’s a crispy, chocolate‑packed, marshmallow‑filled delight that’s going to make your next gathering unforgettable.
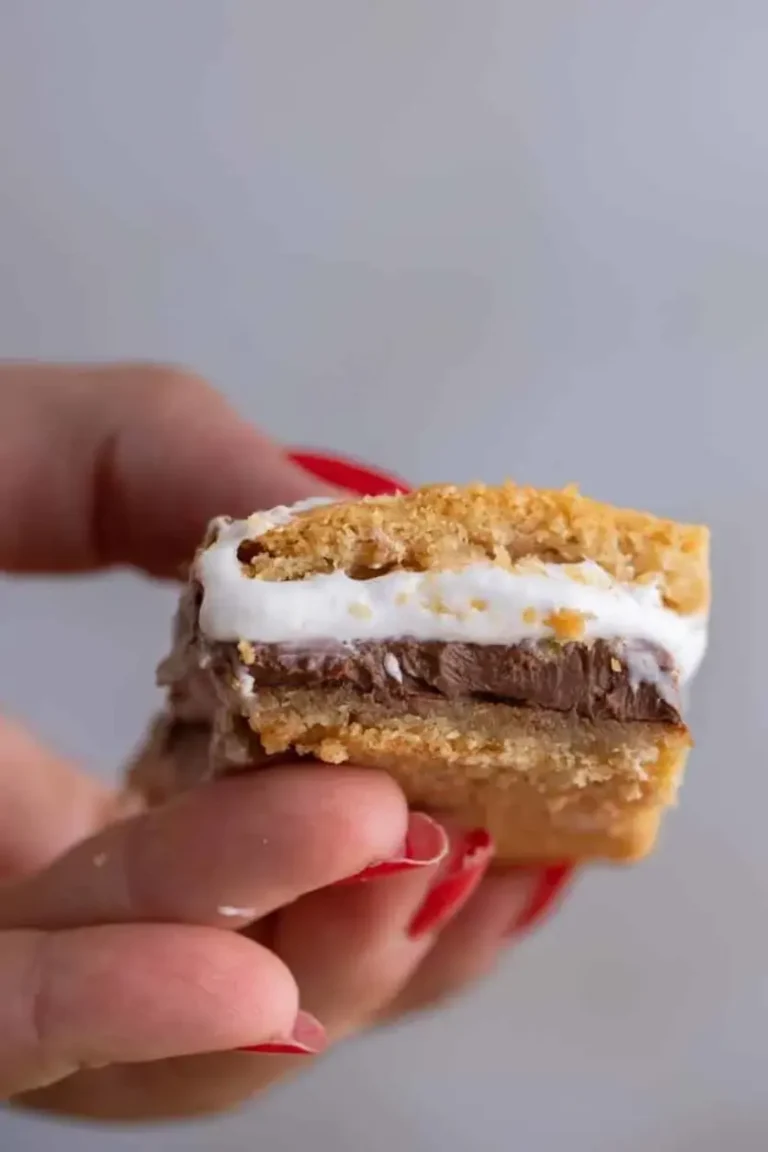
Picture a golden, buttery cookie base, its edges crackling slightly at the corners. Nestled atop is a generous layer of chocolate bars—shattered into chunks, melting just enough to create little rivers of ganache. Above that lies a cloud of marshmallow fluff, soft and silky, that, when frozen for a few minutes, forms a dreamy cushion. The aroma is warm vanilla, toasted graham, and a hint of espresso‑kissed chocolate that lures you in before your first bite. When you cut into a bar, the crust gives a satisfying snap, the chocolate pools like sunrise, and the marshmallow sighs like a sweet, sweet sigh from my grandmother’s kitchen in Fez.
I’ve spent years refining this recipe: the trick is to chill each layer separately before assembling, so the final product doesn’t crumble and the chocolate remains perfectly sealed. The biggest mistake people make is tossing the chocolate and marshmallow before the dough is fully cooled—this unwittingly melts the layers. My secret: keep the pans cold and work quickly. By following my method, you’ll be able to impress friends with a salon‑style s’mores creation that’s edible and Instagram‑worthy, even for newcomers to baking.
Why This S’mores Cookie Bars Recipe Is the Best
The flavor secret lies in the two‑layer structure. By pressing a dough biscuit, laying chocolate, then marshmallow, and setting the stack in the fridge, I preserve the pure gooeyness of the filling. In Paris, we call this “gaufres glacées,” but here I’ve transformed it into a buttery, crisp cookie that still sings with every bite.
The texture has been perfected with my French pastry technique of creaming butter and sugar until the mixture is airy yet dense enough to hold the chocolate. The result is a cookie that’s crisp on the outside, chewy inside, and never leaves you feeling soggy—a direct transfer from my Parisian bistro after‑dinner crêpe to your kitchen.
The recipe is foolproof for beginners: the dough doesn’t need a mixer, and the chilling steps are simple. Even if you’re pressed for time, follow the step‑by‑step instructions and you’ll produce bars that look like something out of a chocolate shop.
S’mores Cookie Bars Ingredients
I always walk through the aisles of the pull‑up store in Brooklyn’s Flatiron District for fresh butter, then pop into the bakery section for those perfect graham crackers that still carry that sweet crunch. A quick jaunt to the specialty aisle gives me premium chocolate bars that are luscious in texture, and I love whipping up my own homemade marshmallow. The blending of New York convenience, Moroccan spice markets, and French culinary standards gives this recipe its unique depth.
Ingredients List
- 1/2 cup unsalted butter, softened
- 1/3 cup packed brown sugar
- 1/4 cup granulated sugar
- 1 large egg
- 1 tsp vanilla extract
- 1 1/2 cups all‑purpose flour
- 1/2 cup graham crackers, finely crushed (about 3–4 sheets)
- 1/4 tsp salt
- 3/4 tsp baking soda
- 5 standard Hershey bars (or your favorite chocolate, broken into pieces)
- 1 1/2 cups marshmallow fluff
Ingredient Spotlight
Unsalted Butter: The foundation of flavor. Use a softened stick so it creams smoothly. Substitution: replace with equal parts coconut oil for a tropical variant—taste is slightly nutty.
Graham Cracker Crumbs: They lend crunch and balance the sweetness. You can swap for crushed almond biscotti for a nutty, but still crisp texture—resulting in light almond undertones.
Chocolate Bars: My favorite are Hershey’s milk for accessibility; dark chocolate adds depth. Substitution: use melted chocolate spread for a glossy finish, but expect a richer, bittersweet center.
Marshmallow Fluff: Provides the hallmark fluffiness. Replace with homemade marshmallow if you’re after better flavor—mix sugar, gelatin and water responsibly for a light, airy interior.
| Original Ingredient | Best Substitution | Flavor / Texture Impact |
|---|---|---|
| Unsalted Butter | Coconut Oil | Slightly tropical nuttiness, firmer crumb |
| Graham Cracker Crumbs | Almond Biscotti Crumbs | Nutty crunch, lighter sugar profile |
| Hershey Bars | Dark Chocolate Pieces | Rich bitterness, deeper chocolate flavor |
| Marshmallow Fluff | Homemade Marshmallow | More airy, less sticky, authentic taste |
How to Make S’mores Cookie Bars — Step‑by‑Step
Let’s roll up our sleeves and start building these decadent bars—trust me, the process is as joyful as biting into the finished product.
Step 1: Preheat
Preheat the oven to 350 °F (175 °C). Line an 8×8 inch baking pan with parchment paper and set it aside for the first layer of dough.
💡 Pierre’s Pro Tip: Use parchment whose edges are slightly overlapping; this keeps the bar sheet from sliding during chilling.
Step 2: Cream Butter & Sugars
In a bowl, beat the softened butter with brown and granulated sugars until pale and airy. Add the egg and vanilla; mix until uniform.
⚠️ Common Mistake to Avoid: Letting the egg sit out too long makes the dough too runny—keep it at room temp to avoid separation.
Step 3: Combine Dry Ingredients
Sift the flour, salt, and baking soda. Add to the wet mixture, folding gently until the dough just blends. Avoid over‑mixing to keep tenderness.
💡 Pierre’s Pro Tip: Folding in the graham crumbs last ensures they’re evenly distributed without clumping.
Step 4: Press Dough Into Pan
Press half the dough evenly into the prepared pan. Flip the parchment over and place the pan in a cold refrigerator or freezer for 20 minutes to chill.
⚠️ Common Mistake to Avoid: Using a hot pan can cause the cookie to bake prematurely during chills.
Step 5: Assemble Layers
Remove the parchment from the first layer, re‑line the pan with fresh parchment, and press the remaining dough on top. Place the chocolate pieces on the chilled base, then spread marshmallow fluff over the chocolate. Carefully lift the chilled base and flip it onto the fluffy layer, keeping the five Buttercreams intact. This double‑layer architecture is the secret to that perfect cross‑section.
💡 Pierre’s Pro Tip: Use a thin spatula to lift the chilled sheet so the marshmallow stays layered.
Step 6: Bake & Cool
Bake in the preheated oven for 25 minutes, until edges are golden. Remove and allow bars to cool completely—only when cooled will the bars hold their shape when sliced.
⚠️ Common Mistake to Avoid: Cutting the bars while still warm will release the chocolate into a smushy mess.
| Step | Action | Duration | Key Visual Cue |
|---|---|---|---|
| 1 | Preheat oven | 350 °F (175 °C) | Oven rack in center |
| 2 | Cream butter & sugars | 2 min | Light and airy |
| 3 | Fold in dry mix | 30 s | No lumps |
| 4 | Press & chill first layer | 20 min in fridge | Firm yet flexible |
| 5 | Layer chocolate & marshmallow | 5 min | Fluffy top, chocolate spread evenly |
| 6 | Bake | 25 min | Edges golden |
Serving & Presentation
Once cooled, lift the bars from the pan with a silicone spatula. Slice crosswise into 16 rectangles. Each slice reveals a glossy chocolate center swirled with a soft marshmallow ribbon. Serve them warm in a shallow dish with an extra dusting of powdered sugar—mirroring doe‑filled pastries from my mother’s kitchen—or paired with a frothy café latte, a laugh‑filled brunch, or a late‑night snack. If you’re in a Brooklyn café, let the bars rest at room temp for a few minutes; the chocolate will soften, turning each bite into a Chu‑Chu surge of vanilla‑sweetness.
To elevate presentation, drizzle a thin line of smoked sea salt over the top. The subtle saltiness will contrast with the marshmallow’s sweetness, amplifying the overall flavor profile—a twist I sourced from the deli section of the iconic Midtown food hall.
| Pairing Type | Suggestions | Why It Works |
|---|---|---|
| Side Dish | Pineapple fresh halves, toasted coconut crumble | Sweetness balances chocolate |
| Sauce / Dip | Whipped cream, warm cinnamon‑spiced milk, caramel drizzle | Complement the gooey center and add depth |
| Beverage | Café latte, chocolate‑spiced hot chocolate, iced tea vanilla | Contrast temperatures and textures |
| Garnish | Gold leaf strip, cacao nibs, sliced almonds, rosemary sprig | Add visual drama and aromatic nuance |
Make-Ahead, Storage & Reheating
When I’m juggling a mixing class in the morning and a client tasting in the afternoon, I prep these bars ahead of time and store them in the fridge or freezer. Their sturdy construction keeps them fresh long after the assembly.
| Method | Container | Duration | Reheating Tip |
|---|---|---|---|
| Refrigerator | Airtight plastic tub | 3–5 days | Reheat in oven at 300 °F for 10 min, or microwave 30 s |
| Freezer | Ziploc freezer bag | 2–3 months | Thaw in fridge overnight, then microwave 20 s |
| Make-Ahead | Paper‑lined baking sheet | 4–6 hours in fridge before baking | Pre‑bake at 350 °F for 20 min; darken edges slightly before storing |
When reheating, give the bars a quick 30‑second blast in the microwave—this preserves their molten heart and prevents the chocolate from hardening. The bars magically return to their original, creamy middle within seconds, perfect for spontaneous snack cravings.
Variations & Easy Swaps
| Variation | Key Change | Best For | Difficulty Impact |
|---|---|---|---|
| Almond Delight | Add almond butter to dough and sprinkle crushed almonds on top | Nut lovers | Minimal change |
| Gluten‑Free | Replace AP flour with 1 1/2 cups gluten‑free blend; use gluten‑free Hershey discs | Those with gluten concerns | Easy |
| Herbal Twist | Incorporate a splash of Pomegranate molasses into the topping | Flavor‑curious diners | Slight extra step |
Almond Delight – Almond Butter & Crunch
This version injects nutty depth with almond butter in the dough and coats the top with almond crumbs. The taste is reminiscent of a Moroccan almond tart, offering a new layer of texture that pairs beautifully with a glass of sweet white wine.
Gluten‑Free – Flexibility for All
Using a certified gluten‑free blend and Hershey’s discreet grain‑free chocolate blocks ensures the bars remain safe and just as chewy. The gluten‑free crumb stays slightly denser, but the fondant center remains blissfully tender.
Herbal Twist – Pomegranate Molasses Swirl
A subtle syrupy drizzle of pomegranate molasses veils the chocolate with tangy‑sweet notes, inspired by a couscous dish I once made. The result is a sorbet‑like splash that transforms each bite into an elegant, mildly exotic experience.
Can I use real marshmallows instead of marshmallow fluff for these bars?
Yes, you can swap out marshmallow fluff for real, handmade marshmallows. It adds a richer, more authentic texture and an extra caramelized flavor front note. Just prepare the marshmallows ahead and fluff them with an electric mixer to keep them airy. Make sure they’re soft enough to spread evenly; otherwise you may get clumps that won’t hold up after the second chill. Feel confident about this swap—it’s that simple, and your bars will taste even more nostalgic.
Are these s’mores cookie bars gluten-free?
No, the default recipe uses all‑purpose flour, which contains gluten. However, you can achieve a gluten‑free version by replacing all‑purpose flour with a 1 1/2 cup gluten‑free blend that has xanthan gum or guar gum. This substitution preserves the structure of the dough. Also pick chocolate blocks that are explicitly labeled gluten‑free to avoid cross‐contamination.
How long do these bars keep after baking?
When stored correctly, the bars retain their freshness for about 3–5 days at room temperature in an airtight container. If you place them in the refrigerator, they’re good for 3–5 days as well, while the freezer can maintain them for up to 2–3 months. The two‑layer construction prevents moisture from spoiling the chocolate core, keeping the bars flavorful and safe for weeks.
Do I need to chill the dough before assembling the layers?
Yes, chilling each layer separately before stacking is the secret to a crisp, clean cross‑section. Cold dough holds its shape during the delicate flipping step, and keeping the chocolate and marshmallow intact. If you skip the chill, you’ll find the chocolate leaks into the dough, creating a jelly‑like center rather than the beautiful, molten look I aim for.
What if I only have chocolate chips instead of chocolate bars?
Chocolate chips can work as an alternative, but they melt faster and tend to scatter randomly when you fold them into the dough. To mitigate this, toss the chips into a little melted butter or cocoa butter before layering. This bind helps them stay in place while still delivering that delightful chocolate burst. The overall flavor profile remains sweet and chocolatey, just slightly less concentrated than large bar chunks.
Can I bake these without parchment paper?
Technically, you could, but parchment is essential for smooth release. Without it, the bars stick and tear apart when you try to lift them. If you want to skip parchment, coat the pan with non‑stick spray or butter and flour it lightly, but you’ll still need a careful lift. Parchment allows you to keep the bars intact and ensures the surface remains even for clean slicing.
Is there a vegan version of these s’mores cookie bars?
Yes! Swap the recipe’s butter for vegan margarine or coconut oil, and use a plant‑based flour blend. Replace the egg with a flax‑egg or a silken tofu puree. For the marshmallow fluff, a dairy‑free commercial brand, or make your own by whipping aquafaba with sugar. The chocolate must be dairy‑free; dark chocolate bars with a high cocoa content work wonderfully. The texture will stay chewy, and the flavor stays rich.
What’s the best way to keep these bars from sticking to the pan?
To prevent sticking, make sure the parchment edges overlap for an extra seal. After the dough’s first layer has chilled, remove the parchment and replace it with a fresh sheet. Also, lightly grease the rim of the pan with butter and lay the parchment over; this prevents the dough from contacting the metal. When you push the second layer, keep a dry spatula on the top to avoid squeezing the moisture out of the dough.
Can these bars be frozen for later use?
Absolutely. Once baked and cooled, wrap the entire sheet tightly in plastic wrap and place it in a freezer safe bag. They’ll keep well for 2–3 months. When ready to serve, let them sit at room temperature for 15–20 minutes; the chocolate will soften for that perfect melt line. If you need to speed up the process, pop the bakery in a quick 10‑minute toss at 300 °F or microwave for 20–30 seconds.
What’s the calorie count per serving?
Each bar contains approximately 121 calories, based on the recipe’s standard serving of 1/8 of the 16‑piece sheet. That number considers the butter, sugar, chocolate, marshmallow fluff, and graham crackers. If you’re watching your intake, keep an eye on the portion size, or use dairy‑free substitutes to cut about 10–15 calories off per bar.
Share Your Version!
Drop a thoughtful star rating and comment below—let me know how your creation turned out. If your photo makes the gallery, pin it to Instagram or Pinterest and tag @spicemingle so I can see and share your rendition. I love hearing how I might sprinkle a corner of Moroccan spice or a Parisian drizzle into your next batch, so ask me: “What’s the best way to surprise friends with an unexpected twist on the classic s’mores?” I’ll be waiting excitedly in my inbox.
From my NYC kitchen to yours — I hope this recipe brings as much warmth to your table as it does to mine. — Pierre 🧡
Love This Recipe? Save It to Pinterest!
If you enjoyed this S’mores cookie bars recipe, don’t let it get lost in your browser tabs! 😄 Pin it now so you can find it again anytime — and explore hundreds more tried-and-tested recipes waiting for you on my Pinterest boards.
👉 Follow Pierre on Pinterest @exorecipe
📌 Pin this recipe · 🔁 Re-pin your favorites · 💬 Tag me when you make it — I love seeing your creations!

S’mores cookie bars
Description
These delicious s’mores cookie bars are filled with delicious marshmallow creme and chocolate bars in the center.
Ingredients
- 1/2 cup Butter (softened, salted or unsalted)
- 1/3 cup brown sugar
- 1/4 cup granulated sugar
- 1 egg
- 1 tsp vanilla extract
- 1 &1/2 cup AP flour
- 1/2 cup graham crackers (finely crushed, about 3.5 sheets, for the cookie dough)
- 1/4 tsp salt
- 3/4 tsp baking soda
- 5 standard Hershey bars
- 1 & 1/2 cup Marshmallow fluff
Instructions
- Preheat the oven to 350F then line an 8×8 inch baking pan with parchment paper and set it aside.
- Cream the butter, granulated sugar, and brown sugar until combined. Add in the egg and the vanilla extract and mix again.
- Add in the flour, graham cracker crumbs, salt, baking soda, and mix just until the flour mixture disappears.
- Press half of the dough evenly onto the prepared baking sheet then remove that parchment from the pan and place in the freezer while you re-line the pan with more parchment paper and repeat the process with the leftover cookie dough.
- Place the chocolate bars over the dough, feel free to break pieces apart to fit the whole surface. Spread the marshmallow fluff or creme on top of the chocolate bar then gently flip the chilled cookie dough layer on top working carefully to keep it intact.
- Bake the cookies in the preheated oven for 25 minutes. Make sure you let the bars cool down fully before slicing into them to get that beautiful cross section that you see in my images.