Table of Contents
Smothered Green Chili Burritos – Tender Meat in Soft Tortillas Drenched in Tangy Green Chili Sauce
I still remember the first time I tasted a green chili burrito in a little street taco stand in Marrakesh. The tangy sauce, the aromatic cumin, and the soft tortilla wrapped around tender meat made my taste buds sing. Years later, I brought that memory to my NYC kitchen, adding a dash of French flair with a creamy sour cream swirl, to create these Smothered Green Chili Burritos. This recipe keeps the bold flavors of a Moroccan cumin‑spiced dish while delivering a comforting, oven‑baked finish that’s perfect for busy evenings.
The aroma that fills the kitchen as the onions caramelize and the beef browns is nothing short of irresistible. A splash of enchilada sauce and a handful of diced green chilies give it a bright, slightly smoky heat that’s balanced by the silky sour cream. When the burritos bake, the cheeses melt into a velvety blanket, and the tortillas become delightfully soft. The final bite is a burst of savory heat, creamy tang, and the subtle sweetness of roasted onions—a sensory experience that transports you straight from the bustling markets of NYC to the sunny streets of Marrakesh.
I’m proud to say this version is a family favorite. I’ve tweaked the original taco concept by adding a thick layer of green chili sauce that coats every inch of the burrito, then baking it to perfection. The result is a melt‑in‑your‑mouth, heat‑kissed delight that even the pickiest eaters love. A pro tip: let the sauce simmer longer for a deeper flavor, but be careful not to over‑cook the onions or they’ll become bitter. The most common mistake is filling the tortillas too thin; I always leave a generous mound of filling to keep them sturdy during baking.
Why This Smothered Green Chili Burritos Recipe Is the Best
The flavor secret lies in my unique angle—combining a rich, tangy green chili sauce with a velvety sour cream base. This blend creates a depth that’s reminiscent of a Moroccan tagine, yet light enough to pair with everyday meals. My background in French cuisine taught me the importance of balancing acidity and richness, so I carefully layer the sauce to coat each bite.
The perfected texture comes from the slow browning of the onions and the gentle simmer of the sauce. This slow‑cook technique, inspired by a classic French braise, ensures the beef remains tender and the tortilla soft. The cheese melt is enhanced by using a blend of cheddar and Monterey Jack, delivering both sharpness and creaminess without a greasy finish.
Foolproof & Fast: The assembly is straightforward—just spoon the mixture onto tortillas, roll, and bake. Even beginners can follow the step‑by‑step instructions without getting overwhelmed. With just ten minutes of prep and a 30‑minute bake, you’ll have a comforting, crowd‑pleasing meal ready in under an hour.
Smothered Green Chili Burritos Ingredients
I source the freshest ingredients from the Brooklyn farmer’s market, where local producers grow organic peppers that give our green chilies that bright, smoky flavor. The cheddar I pick from the specialty cheese shop on 5th Avenue is aged just enough for that perfect snap. Each ingredient in this list is chosen to bring authentic taste and quality to the dish.
Ingredients List
- 2 tablespoons olive oil
- 1 medium onion, chopped
- 2 cloves garlic, minced
- 1 pound ground beef
- 1 teaspoon ground cumin
- 1 teaspoon chili powder
- ½ teaspoon paprika
- ½ teaspoon oregano
- ¼ teaspoon salt
- ¼ teaspoon black pepper
- ¼ teaspoon crushed red pepper flakes
- 1 can (4 ounces) diced green chilies
- 1 can (10 ounces) red enchilada sauce
- ½ cup sour cream
- 1 cup shredded cheddar cheese
- 1 cup shredded Monterey Jack cheese
- 8 flour tortillas
- ¼ cup chopped fresh cilantro
Ingredient Spotlight
Ground Beef: The foundation of the flavor, choose a lean blend that still has some fat for moisture. In the U.S., I often pick a 80/20 mix from a reputable butcher; if you prefer a leaner option, a 90/10 works, though the dish may be drier. A quick substitution is turkey or chicken for a lighter protein, which keeps the heat but cuts calories.
Shredded Cheddar Cheese: I use aged cheddar from a specialty shop; it adds sharpness and a slight nuttiness. If you can’t find it, a sharp Monterey Jack works, but the flavor will be milder. For a vegan twist, try a plant‑based cheddar alternative that melts well.
Flour Tortillas: I choose a medium‑size, soft tortilla that can hold the filling without tearing. Store‑brand tortillas are fine, but a fresh, freshly baked tortilla from a local bakery will give the best texture. If you’re gluten‑free, look for a certified GF tortilla that still keeps its pliability.
| Original Ingredient | Best Substitution | Flavor / Texture Impact |
|---|---|---|
| Ground Beef | Ground Turkey | Lighter taste, lower fat, similar texture |
| Cheddar Cheese | Plant‑based Cheddar | Milder, dairy‑free, melts like dairy |
| Flour Tortilla | Gluten‑Free Tortilla | Same softness, no gluten; may be slightly denser |
How to Make Smothered Green Chili Burritos — Step-by-Step
Let’s dive in; the process is simple enough for a weekday dinner but sophisticated enough to wow your guests.
Step 1: Sauté Onion
Heat the olive oil in a large skillet over medium heat. Add the chopped onion and sauté until it becomes soft and translucent, about 3 to 4 minutes.
💡 Pierre’s Pro Tip: For deeper flavor, let the onions caramelize a little longer until golden brown.
Step 2: Add Garlic
Stir in the minced garlic and cook for another 30 seconds, until fragrant.
⚠️ Common Mistake to Avoid: Adding garlic too early can cause it to burn; wait until onions are translucent.
Step 3: Cook Beef
Add the ground beef to the skillet, breaking it apart with a spoon as it cooks. Cook until browned and no longer pink, about 6 to 7 minutes.
💡 Pierre’s Pro Tip: Drain excess fat after browning to keep the dish from becoming greasy.
Step 4: Add Spices
Sprinkle in the cumin, chili powder, paprika, oregano, salt, black pepper, and crushed red pepper flakes. Stir everything together, ensuring the spices are evenly distributed.
⚠️ Common Mistake to Avoid: Skipping the spices can make the dish bland; let the aromatics bloom for a minute.
Step 5: Add Chilies & Sauce
Pour in the diced green chilies and red enchilada sauce, mixing it all in. Lower the heat to medium‑low and let the mixture simmer for about 5 minutes, stirring occasionally.
💡 Pierre’s Pro Tip: Use fresh, diced green chilies if available; they give a brighter, fresher heat.
Step 6: Stir in Sour Cream
Stir in the sour cream until fully combined and smooth. Remove the skillet from heat and set it aside.
⚠️ Common Mistake to Avoid: Adding sour cream while the mixture is too hot can curdle it.
Step 7: Preheat Oven & Prep Dish
Preheat your oven to 375°F. Lightly grease a 9×13‑inch baking dish with cooking spray or a little olive oil.
💡 Pierre’s Pro Tip: Using a silicone baking mat ensures easy clean‑up and even browning.
Step 8: Assemble Burritos
Place the flour tortillas on a flat surface. Spoon about ¼ cup of the beef mixture into the center of each tortilla. Top the mixture with a little shredded cheddar and Monterey Jack cheese. Roll up the tortillas, folding in the sides as you go, to form burritos. Place seam‑side down in the prepared baking dish.
⚠️ Common Mistake to Avoid: Filling too lightly can cause the burrito to fall apart during baking.
Step 9: Bake Covered
Once all burritos are in the dish, pour any remaining beef mixture evenly over the top. Sprinkle the remaining shredded cheddar and Monterey Jack cheese. Cover the baking dish with aluminum foil and bake for 15 minutes.
💡 Pierre’s Pro Tip: The foil keeps moisture in, preventing the tortillas from drying out.
Step 10: Finish & Serve
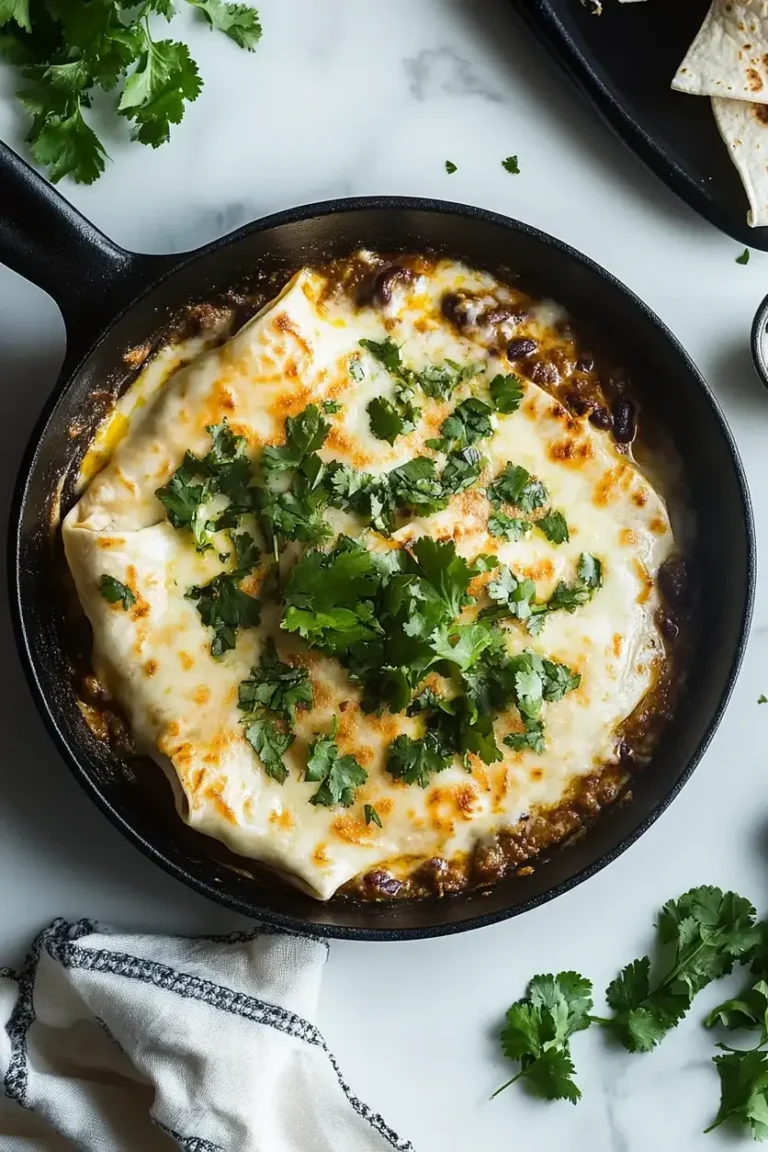
After 15 minutes, remove the foil and continue baking for an additional 5 to 10 minutes, until the cheese is melted and bubbly. Remove the dish from the oven and let it cool for a few minutes before serving. Garnish the burritos with chopped fresh cilantro before serving.
⚠️ Common Mistake to Avoid: Over‑baking can make the cheese rubbery; keep an eye on the bubbling.
| Step | Action | Duration | Key Visual Cue |
|---|---|---|---|
| 1 | Sauté onion | 3–4 min | Translucent, slightly golden |
| 2 | Add garlic | 30 sec | Fragrant, no brown spots |
| 3 | Brown beef | 6–7 min | Fully browned, no pink |
| 4 | Spice it | 1 min | Aroma released, spices fragrant |
| 5 | Simmer sauce | 5 min | Thickened, flavors melded |
| 6 | Stir sour cream | 1 min | Smooth, creamy consistency |
| 7 | Preheat & prep dish | 5 min | Oven at 375°F, dish greased |
| 8 | Assemble burritos | 5 min | Filled, rolled, sealed |
| 9 | Bake covered | 15 min | Cheese bubbling, crust forming |
| 10 | Finish & cool | 5 min | Cheese melted, cilantro fresh |
Serving & Presentation
When you plate the burritos, let the golden cheese glaze gleam on top. Slice each burrito in half diagonally to reveal the creamy interior, and arrange them on a rustic wooden platter for an instant wow factor. Sprinkle a light dusting of fresh cilantro and a squeeze of lime for a citrusy brightness that cuts through the richness.
For a NYC twist, serve alongside a side of tangy pickled cucumber salad and a chilled glass of sparkling rosé. The bright acidity of the rosé balances the heat, while the crisp cucumbers add a refreshing bite that echoes the Mediterranean palate.
| Pairing Type | Suggestions | Why It Works |
|---|---|---|
| Side Dish | Pickled cucumber salad, Mexican street corn | Freshness and heat balance |
| Sauce / Dip | Chipotle crema, guacamole | Adds creaminess, complements chili |
| Beverage | Sparkling rosé, cold Mexican cerveza | Acidity cuts through richness |
| Garnish | Fresh cilantro, lime wedges, diced tomatoes | Bright, herbal accents |
Make-Ahead, Storage & Reheating
When my week gets hectic, I bake a batch of these burritos the night before and freeze them. In the morning, a quick reheat in a toaster oven or microwave restores the cheese melt and the tortillas’ soft texture, making this a perfect comfort‑food option for a busy NYC schedule.
| Method | Container | Duration | Reheating Tip |
|---|---|---|---|
| Refrigerator | Foil‑wrapped dish | 1–2 days | Reheat at 350°F for 10 minutes |
| Freezer | Freezer‑safe zip bag | Up to 3 months | Thaw in fridge, bake at 375°F 15 minutes |
| Make-Ahead | Individual muffin tins | 2 days in fridge | Reheat in toaster oven until cheese melts |
I always keep a small bowl of extra sour cream on hand for a quick dip; it’s a favorite among my friends who love an extra creamy bite. When reheating, cover the dish with foil to trap moisture and prevent the tortilla edges from drying out.
Variations & Easy Swaps
| Variation | Key Change | Best For | Difficulty Impact |
|---|---|---|---|
| Mediterranean Twist | Add chopped olives and feta | Sea‑food lovers | Easy |
| Gluten‑Free | Use corn tortillas | Gluten‑free diners | Easy |
| Veggie‑Rich | Swap beef for sautéed mushrooms | Vegetarian crowd | Medium |
Mediterranean Twist
Add finely chopped kalamata olives and crumbled feta to the beef mixture before baking. The briny olives echo Moroccan spices, while the salty feta offers a creamy contrast reminiscent of a Provençal salad. The result is a burrito that feels like a Mediterranean mezze rolled into one.
Gluten‑Free Option
Swap the flour tortillas for corn tortillas; they hold up well under the heat and provide a subtle sweetness that complements the chili. Use a high‑quality corn tortilla from a local health food store, and the texture will stay soft and pliable, making this swap seamless for anyone avoiding gluten.
Veggie‑Rich Swap
Replace the ground beef with a medley of sautéed mushrooms, zucchini, and bell pepper. The earthy mushrooms absorb the green chili sauce, creating a hearty vegetarian core that’s just as comforting. The texture becomes lighter, and the dish retains its smoky depth thanks to the chili spices.
How do I prevent my burritos from falling apart while baking?
If your burritos feel loose, it’s often because the filling isn’t dense enough. Use a generous amount of meat mixture (about a quarter cup per tortilla) and make sure you fold the sides tightly before rolling. Securing the seam by pressing it down with your fingers before baking creates a firm seal that keeps everything intact during the oven’s heat.
Can I use ground turkey instead of beef?
Absolutely! Ground turkey keeps the same flavor profile but reduces the fat content. To keep the burritos moist, use a leaner turkey or mix in a bit of ground beef for extra richness. The cooking time remains the same; just be sure to break the turkey into fine crumbles so it cooks evenly.
What can I do if the green chilies are too spicy?
If the chilies hit a bit too hot, balance the heat with a splash of lime juice or a spoonful of plain yogurt. You can also add a small amount of sugar or honey to mellow the spiciness without altering the sauce’s core flavor. This quick adjustment turns a fiery dish into a smooth, flavorful experience.
Can I bake the burritos in a microwave?
Microwaving is a fast alternative, but it won’t produce the same crispy cheese top. For a microwave version, cover the burritos with a damp paper towel and heat on medium for 3–5 minutes until hot. Then finish under a broiler for 1–2 minutes to melt the cheese slightly. It’s a good option for a quick lunch on the go.
How long do these burritos keep in the fridge?
You can refrigerate the fully baked burritos in a foil‑wrapped container for up to 2 days. Keep them at a steady 32°F–40°F to maintain moisture. Reheat in a preheated oven at 350°F for 10 minutes or in a toaster oven until the cheese is melted and the tortilla softens again.
Is there a quick version that skips the baking step?
Yes, you can skip baking by rolling the burritos and then heating them in a skillet. Place each rolled burrito seam‑side down in a lightly oiled pan over medium heat, pressing gently with a spatula. Cook until the tortilla is crispy and the cheese is melted, about 4–5 minutes per side. This method gives a crisp exterior while keeping the interior creamy.
What’s the best way to serve leftovers?
Let the leftovers cool completely, then wrap each burrito individually in foil or parchment and refrigerate. When you’re ready to eat, reheat in the oven at 375°F for 12–15 minutes or use a toaster oven until the cheese is gooey. If you want a fresh crisp, finish each burrito in a skillet for a minute on each side.
Can I use a different cheese?
Definitely! Mozzarella, pepper jack, or a smoked cheese blend will work nicely. The key is to choose a cheese that melts smoothly without becoming greasy. A sharp cheddar or a mix of Monterey Jack and mozzarella offers a balanced flavor while keeping the cheese silky.
What’s a good side dish for these burritos?
A refreshing cucumber and tomato salad with a light vinaigrette pairs beautifully. The acidity of the vinaigrette cuts through the richness of the cheese and chili sauce. Alternatively, a simple corn salsa or roasted sweet potatoes provide sweet, earthy balance that complements the heat.
Do I need a special pan for baking?
Any standard 9×13 baking dish will do, but a silicone baking mat or parchment paper lining reduces sticking and makes cleanup easier. If you don’t have a silicone mat, lightly spray the dish with cooking spray to keep the burritos from sticking during baking.
Share Your Version!
I’d love to see how you adapt this recipe to suit your taste. Drop a star rating and a comment below—your feedback fuels my next culinary adventure. Feel free to snap a photo of your finished burritos and tag me on Instagram or Pinterest; I always enjoy sharing a moment of cooking joy with my followers.
Have a favorite spice blend or a new ingredient that makes these burritos even more special? Tell me about it—your insight could inspire the next variation on my menu.
From my NYC kitchen to yours — I hope this recipe brings as much warmth to your table as it does to mine. — Pierre 🧡
Love This Recipe? Save It to Pinterest!
If you enjoyed this Smothered Green Chili Burritos recipe, don’t let it get lost in your browser tabs! 😄 Pin it now so you can find it again anytime — and explore hundreds more tried-and-tested recipes waiting for you on my Pinterest boards.
👉 Follow Pierre on Pinterest @exorecipe
📌 Pin this recipe · 🔁 Re-pin your favorites · 💬 Tag me when you make it — I love seeing your creations!

Smothered Green Chili Burritos
Description
These smothered green chili burritos are a perfect blend of tender, seasoned meat wrapped in soft flour tortillas, drenched in a rich, tangy green chili sauce. Each bite is bursting with savory heat, melting cheese, and the perfect balance of flavors.
Ingredients
- 2 tablespoons olive oil
- 1 medium onion, chopped
- 2 cloves garlic, minced
- 1 pound ground beef
- 1 teaspoon ground cumin
- 1 teaspoon chili powder
- 1/2 teaspoon paprika
- 1/2 teaspoon oregano
- 1/4 teaspoon salt
- 1/4 teaspoon black pepper
- 1/4 teaspoon crushed red pepper flakes
- 1 can (4 ounces) diced green chilies
- 1 can (10 ounces) red enchilada sauce
- 1/2 cup sour cream
- 1 cup shredded cheddar cheese
- 1 cup shredded Monterey Jack cheese
- 8 flour tortillas
- 1/4 cup chopped fresh cilantro
Instructions
- Heat the olive oil in a large skillet over medium heat.
- Add the chopped onion and sauté until it becomes soft and translucent, about 3 to 4 minutes.
- Stir in the minced garlic and cook for another 30 seconds, until fragrant.
- Add the ground beef to the skillet, breaking it apart with a spoon as it cooks.
- Cook the beef until it is browned and no longer pink, about 6 to 7 minutes.
- Sprinkle in the cumin, chili powder, paprika, oregano, salt, black pepper, and crushed red pepper flakes.
- Stir everything together, ensuring the spices are evenly distributed.
- Pour in the diced green chilies and red enchilada sauce, mixing it all in.
- Lower the heat to medium-low and let the mixture simmer for about 5 minutes, stirring occasionally.
- Stir in the sour cream until its fully combined and smooth.
- Remove the skillet from heat and set it aside.
- Preheat your oven to 375°F.
- Lightly grease a 9×13-inch baking dish with cooking spray or a little olive oil.
- Place the flour tortillas on a flat surface.
- Spoon about 1/4 cup of the beef mixture into the center of each tortilla.
- Top the beef mixture with a little shredded cheddar cheese and Monterey Jack cheese.
- Roll up the tortillas, folding in the sides as you go, to form burritos.
- Place the rolled burritos seam-side down in the prepared baking dish.
- Once all the burritos are in the dish, pour any remaining beef mixture evenly over the top.
- Sprinkle the remaining shredded cheddar and Monterey Jack cheese over the top of the burritos.
- Cover the baking dish with aluminum foil and bake for 15 minutes.
- After 15 minutes, remove the foil and continue baking for an additional 5 to 10 minutes, until the cheese is melted and bubbly.
- Remove the dish from the oven and let it cool for a few minutes before serving.
- Garnish the burritos with chopped fresh cilantro before serving.