Table of Contents
Pesto Chicken Pull Apart Sliders – Easy New York Style Dinner
I still remember the first time I made these Pesto Chicken Pull Apart Sliders. It was a busy Tuesday night in my tiny New York City apartment, and I needed something fast but deeply satisfying. Growing up in Morocco, my mother would make these little bread-based dishes that pulled apart at the table, everyone grabbing a piece. Here, I’ve taken that same communal spirit and given it a French-trained twist with fragrant pesto and gooey mozzarella. These sliders are the perfect quick and easy dinner that feels like a hug on a plate.
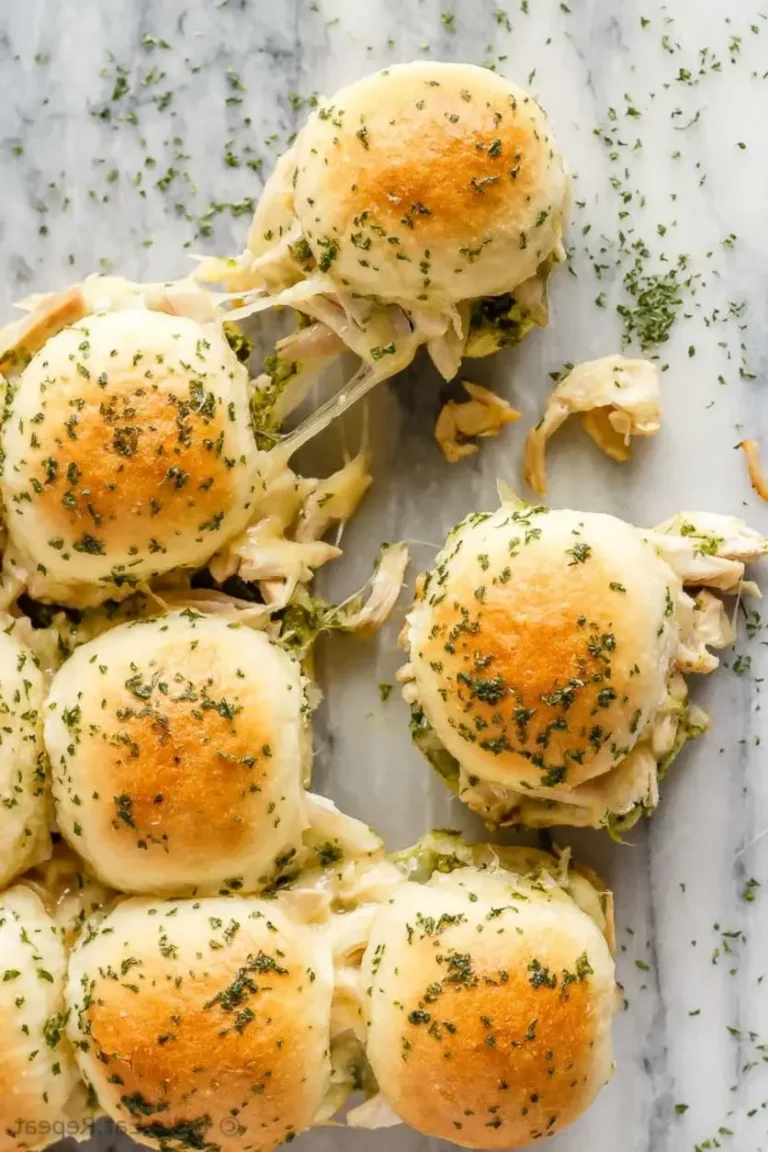
The moment you pull one slider apart, you’ll see the stretchy cheese, smell the basil pesto, and catch that garlic butter glaze shimmering on top. The bread stays soft on the inside but gets just a tiny bit golden on the edges. It’s the kind of dish that disappears in minutes—kids love it, adults go back for seconds, and I always make sure to hide a couple for my lunch the next day. It’s my go-to when I want comfort food that doesn’t take all evening.
I’ve tested this recipe countless times to make sure it’s foolproof. The secret is layering the pesto evenly and brushing the melted butter mixture generously on top—that’s what gives these sliders their irresistible golden crust. One common mistake people make is using dry chicken, but I’ll show you how to keep everything moist. From my professional kitchen to yours, these sliders are a winner every time.
Why This Pesto Chicken Pull Apart Sliders Recipe Is the Best
The flavor secret starts with the pesto. I don’t just spread it on—I make sure it reaches every corner of the bread so each bite is packed with basil and pine nut goodness. I trained under a chef in Paris who taught me that layering flavors is the key to any great dish, and this sliders recipe proves it. The pesto ties the chicken and cheese together in a way that feels both Italian and distinctly New York.
Texturally, these sliders are perfection. The bread stays pillowy soft because we bake them covered with foil for the first part, then let the butter mixture create a delicate crust on top. That slight crunch gives way to a tender, cheesy center. I’ve spent years perfecting the baking time—20 minutes at 375°F is the sweet spot where everything melts together without drying out.
What makes this recipe truly foolproof is how forgiving it is. You can use leftover rotisserie chicken, store-bought pesto, or make your own—I’ll give you tips for both. Whether you’re a beginner or a seasoned cook, these sliders come together in 30 minutes flat. They’re perfect for game day, family dinners, or when you just want something delicious without a lot of fuss.
Pesto Chicken Pull Apart Sliders Ingredients
I love shopping for these ingredients at the Union Square Greenmarket in New York. Fresh basil pesto is easy to find, and I often grab artisan slider rolls from a local bakery. But honestly, you can get everything at any grocery store—that’s what makes this recipe so accessible. Growing up, my mother always said the best dishes come from simple ingredients treated with care.
Ingredients List
- 9 Slider Rolls, or tray buns
- 1/4 cup Pesto
- 2 cups Cooked Shredded Chicken
- 1 cup Shredded Mozzarella Cheese
- 2 tablespoons Butter, melted
- 1/2 teaspoon Garlic Salt
- 1 teaspoon Dried Parsley
Ingredient Spotlight
The slider rolls are the foundation—look for soft, pull-apart tray buns that are slightly sweet. Pesto is the star; I prefer a basil-based pesto with good olive oil, but sun-dried tomato pesto works beautifully too. The chicken should be moist—rotisserie chicken is my secret weapon. Mozzarella gives that perfect stretch, though provolone adds a sharper note.
| Original Ingredient | Best Substitution | Flavor / Texture Impact |
|---|---|---|
| Slider Rolls | Hawaiian sweet rolls | Sweeter, softer base |
| Pesto | Sun-dried tomato pesto | Richer, more tangy flavor |
| Shredded Chicken | Shredded turkey | Leaner, slightly drier |
| Mozzarella | Provolone or Gouda | Sharper or smoky note |
How to Make Pesto Chicken Pull Apart Sliders — Step-by-Step
Trust me, this is one of the easiest recipes you’ll ever make. I’ll walk you through every step so your sliders come out perfect—the kind that gets devoured before you even sit down.
Step 1: Preheat and Prep
Preheat your oven to 375°F. Lightly spray an 8×8-inch baking dish with cooking spray. This ensures nothing sticks, and cleanup is a breeze.
💡 Pierre’s Pro Tip: Use a glass or ceramic dish—it heats evenly and helps the sliders bake uniformly. Metal pans can cause the edges to brown too fast.
Step 2: Slice the Rolls
If your rolls are pull-apart style, leave them stuck together and slice through all of them at once horizontally. This keeps them aligned and makes assembly so much faster.
⚠️ Common Mistake to Avoid: Don’t pull them apart individually—you’ll lose the neat shape and the sliders won’t hold together as well. Keep them in one piece!
Step 3: Layer the Pesto
Place the bottom halves into the prepared baking dish. Spread the pesto sauce evenly over the bottom halves, making sure to cover every edge. This is where the flavor starts.
💡 Pierre’s Pro Tip: Use the back of a spoon to spread the pesto—it gives you better control. For extra flavor, warm the pesto slightly first to make it easier to spread.
Step 4: Add Chicken and Cheese
Spread the shredded chicken on top of the pesto, distributing it evenly. Sprinkle the mozzarella cheese generously over the chicken—don’t skimp, this is the glue that holds everything together.
⚠️ Common Mistake to Avoid: Overloading the chicken can make the sliders soggy. Stick to 2 cups and spread it thin for even melting.
Step 5: Cover and Glaze
Cover with the top halves of the dinner rolls. In a small bowl, whisk together the melted butter, garlic salt, and dried parsley. Brush this mixture generously over the top of the sliders.
💡 Pierre’s Pro Tip: Use a pastry brush for even coverage. Don’t forget the edges—those get the crispiest and most delicious.
Step 6: Bake and Serve
Cover the whole dish tightly with aluminum foil. Bake for 15-20 minutes, or until the cheese is melted and the tops are golden. Remove the foil for the last 2-3 minutes if you want a crispier top.
⚠️ Common Mistake to Avoid: Don’t skip the foil cover—it traps steam and ensures the cheese melts without burning the tops. Removing it too early makes the bread dry.
| Step | Action | Duration | Key Visual Cue |
|---|---|---|---|
| 1 | Preheat & prep dish | 5 mins | Oven at 375°F, dish sprayed |
| 2 | Slice rolls | 2 mins | Even horizontal cut |
| 3 | Layer pesto | 2 mins | Even green coverage |
| 4 | Add chicken & cheese | 3 mins | Chicken spread, cheese on top |
| 5 | Cover & glaze | 3 mins | Butter brushed on tops |
| 6 | Bake & serve | 15-20 mins | Golden tops, melted cheese |
Serving & Presentation
I love serving these sliders on a big wooden board, just like we did in Morocco with bread dishes. Arrange them in a single layer so everyone can pull one apart easily. Garnish with a sprinkle of fresh basil or parsley for a pop of color—it makes them look as good as they taste.
These are perfect for game day, potlucks, or a cozy weeknight dinner. In New York, I often bring them to friends’ gatherings and they disappear within minutes. Pair them with a simple green salad or roasted vegetables to balance the richness.
| Pairing Type | Suggestions | Why It Works |
|---|---|---|
| Side Dish | Mixed green salad, roasted broccoli | Adds freshness and crunch |
| Sauce / Dip | Marinara, ranch, extra pesto | Enhances moisture and flavor |
| Beverage | Iced tea, lemonade, light beer | Cuts through richness |
| Garnish | Fresh basil, parsley flakes | Adds color and aroma |
Make-Ahead, Storage & Reheating
My New York schedule is always busy, so I love that these sliders can be prepped ahead. Assemble them the night before, cover with foil, and refrigerate. The next day, just pop them in the oven—they’re ready in 20 minutes. Leftovers are amazing for lunch, and I’ll show you how to store them properly.
| Method | Container | Duration | Reheating Tip |
|---|---|---|---|
| Refrigerator | Airtight container | 3-4 days | Bake at 350°F for 10 mins |
| Freezer | Freezer-safe bag | 2 months | Bake from frozen at 375°F for 25 mins |
| Make-Ahead | Covered dish | 24 hours in advance | Add 5 mins to bake time |
When reheating, I like to cover the sliders with foil to prevent drying out. For extra crispness, uncover them for the last 2 minutes. The garlic butter glaze refreshes beautifully, so they taste almost as good as fresh.



