“`html
Table of Contents
Peanut Butter Chocolate Oat Cups – A No-Bake, Vegan Treat
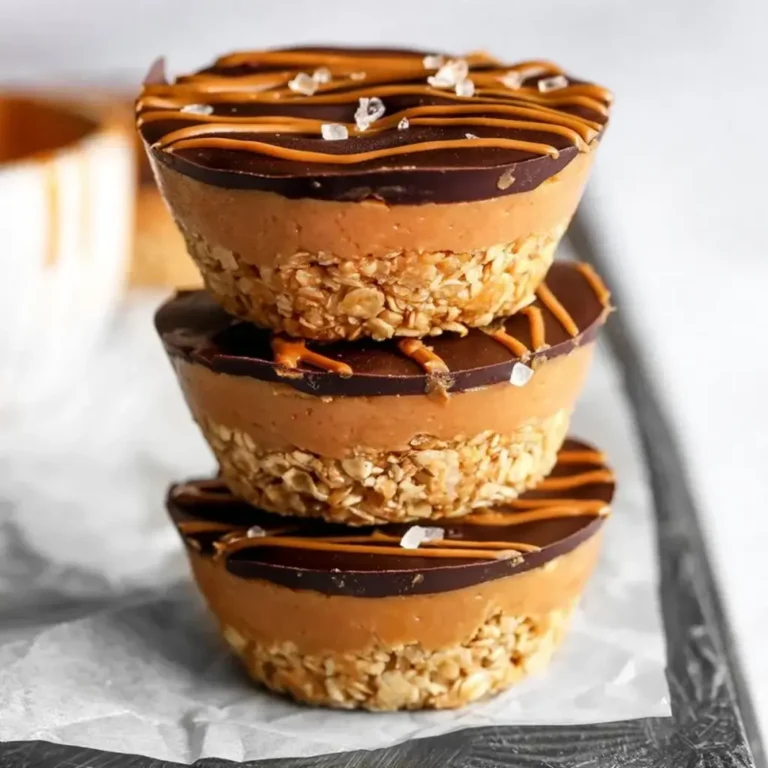
Growing up in Morocco, my mother always emphasized simple pleasures. Often, that meant a small, sweet treat at the end of a meal. These Peanut Butter Chocolate Oat Cups are inspired by those moments – a little indulgence made with wholesome ingredients. These are wonderfully simple, and completely no-bake, making them the perfect quick treat. They’re incredibly versatile too, being vegan and gluten-free, without sacrificing any of the flavor we all crave!
Imagine biting into a cool, creamy cup where the subtle chewiness of oats meets the rich, comforting flavor of peanut butter, all enveloped in a smooth, decadent layer of dark chocolate. The aroma is simply divine – a delicate balance of roasted peanuts and intensely chocolatey goodness. It’s a texture party in your mouth, reminiscent of my time spent mastering French pastry techniques in Paris – where it’s all about building layers of flavor and contrast.
I’ve perfected this recipe over the years, adjusting ratios and experimenting with different ingredients to achieve the ideal balance of flavors and textures. What sets these cups apart is their simplicity – they require no baking and minimal ingredients. I’ll share a pro tip on achieving a perfectly smooth chocolate topping and one common mistake to avoid (it relates to chilling time!), ensuring your cups turn out perfectly every time.
Why This Peanut Butter Chocolate Oat Cups Recipe Is the Best
The secret to this recipe lies in using high-quality dark chocolate. It’s an ingredient I learned to appreciate while exploring the Parisian chocolate shops. The slightly bitter notes of the dark chocolate perfectly complement the sweetness of the peanut butter and maple syrup, creating a sophisticated yet comforting flavor profile. I always opt for a 70% cacao chocolate – it provides the perfect intensity.
The texture is key. By freezing the oat base for just 15 minutes, we achieve the perfect consistency – firm enough to hold its shape, but still slightly chewy. This technique, drawn from my French culinary training, prevents the cups from becoming overly crumbly or dense. It’s all about precision to get that melt-in-your-mouth texture.
This recipe is foolproof and fast. It requires no baking, minimal ingredients, and comes together in under 20 minutes, plus chilling time. It’s perfect for beginner cooks, busy weeknights, or when you’re craving a quick and healthy dessert. I often make a batch of these on Sunday to have a sweet treat ready for the week ahead.
Peanut Butter Chocolate Oat Cups Ingredients
I love sourcing my ingredients from the Union Square Greenmarket here in NYC. You can find beautiful, high-quality oats and maple syrup there. Sometimes, though, a trip to my local specialty store is needed for the perfect dark chocolate. It reminds me of the small, family-run shops in Marrakech where my mother would always find the best spices.
Ingredients List
- 70g rolled oats (use gluten-free if necessary)
- 2 tbsp smooth peanut butter (or nut butter of choice)
- 2 tbsp maple syrup
- Pinch of salt
- 100g smooth peanut butter
- 1 tbsp maple syrup
- 70g dark chocolate (melted)
- Optional drizzle of melted Biscoff spread
Ingredient Spotlight
Let’s talk about the oats. Rolled oats are ideal here because they provide a nice chewiness and bind the base together. Quick oats will work in a pinch, but the texture won’t be quite as satisfying. If you’re gluten-free, be sure to use certified gluten-free oats. I usually find Bob’s Red Mill brand to be consistently good.
The dark chocolate is another star. I strongly recommend using a high-quality dark chocolate with at least 70% cacao. The higher cacao content gives a deeper, richer flavor that’s less overly sweet. Ghirardelli or Valrhona are both excellent choices, although they budget friendly brands work too! Don’t skimp on quality if you can help it!
Peanut butter, naturally! I prefer smooth peanut butter for this recipe, as it creates a more homogenous texture. If you’re using a natural peanut butter (the kind that separates), be sure to stir it well before using it. And, of course, feel free to experiment with other nut butters – almond butter or cashew butter would also be delicious.
| Original Ingredient | Best Substitution | Flavor / Texture Impact |
|---|---|---|
| Rolled Oats | Quick Oats | Slightly less chewy texture. |
| Smooth Peanut Butter | Almond Butter | Different nutty flavor, slightly less sweetness. |
| Dark Chocolate | Milk Chocolate | Much sweeter, less intense flavor. |
How to Make Peanut Butter Chocolate Oat Cups – Step-by-Step
Making these cups is incredibly straightforward! Just follow these simple steps for a delicious and hassle-free treat that everyone will love.
Step 1: Prepare the Oat Base
In a mixing bowl, combine the rolled oats, 2 tablespoons peanut butter, 2 tablespoons maple syrup, and a pinch of salt. Mix well until everything is evenly combined and slightly sticky. Press the mixture firmly into the bottom of 6 silicone muffin cups.
💡 Pierre’s Pro Tip: Use the back of a spoon to really press the oat mixture into the cups. This helps it to hold its shape and prevents crumbling.
Step 2: Make the Peanut Butter Layer
In a small bowl, combine the 100g smooth peanut butter and 1 tablespoon maple syrup. Mix well until smooth and creamy. Spread this mixture evenly over the oat base in each muffin cup, creating the peanut butter layer.
⚠️ Common Mistake to Avoid: Don’t skip pressing the oat base firmly! It’s crucial for a stable base.
Step 3: Add the Chocolate Topping
Melt the dark chocolate (either in a double boiler or in the microwave in 30-second intervals, stirring in between). Pour the melted chocolate over the peanut butter layer in each muffin cup, spreading it evenly. For an extra touch, drizzle with melted Biscoff spread!
💡 Pierre’s Pro Tip: For a perfectly smooth chocolate topping, make sure your chocolate isn’t too hot when you pour it. Slightly cooled chocolate is easier to spread and sets more nicely.
| Step | Action | Duration | Key Visual Cue |
|---|---|---|---|
| 1 | Prepare Oat Base | 5 mins | Oats are fully combined and slightly sticky. |
| 2 | Make Peanut Butter Layer | 2 mins | Peanut butter and maple syrup are smooth. |
| 3 | Add Chocolate Topping | 3 mins | Chocolate is melted and evenly spread. |
Serving & Presentation
These Peanut Butter Chocolate Oat Cups are best enjoyed chilled, allowing the chocolate to set and the flavors to meld. I like to sprinkle a tiny bit of flaky sea salt on top – it really enhances the sweetness and adds a sophisticated touch. Serve them individually on small plates, perhaps with a glass of cold almond milk or a strong cup of coffee.
For a New York-style presentation, try arranging the cups on a slate board with a sprinkle of cocoa nibs. If you’re feeling fancy, a few fresh raspberries alongside add a burst of color and tartness. Serving them in small Moroccan tea glasses evokes memories of afternoons spent with my grandmother in Marrakech – simple pleasures, beautifully presented.
| Pairing Type | Suggestions | Why It Works |
|---|---|---|
| Side Dish | Fresh Berries, sliced banana | Adds freshness and natural sweetness |
| Sauce / Dip | Raspberry Coulis | Tartness cuts through the richness |
| Beverage | Almond Milk, Coffee | Complements the chocolate and peanut butter flavors. |
| Garnish | Flaky Sea Salt, Cocoa Nibs | Enhances flavor and adds texture |
Make-Ahead, Storage & Reheating
As a busy New Yorker, I’m always looking for ways to meal prep. These cups are fantastic for that! You can easily make them a day or two in advance and store them in the refrigerator. They’re also great to make ahead if you’re hosting guests – one less thing to worry about!
| Method | Container | Duration | Reheating Tip |
|---|---|---|---|
| Refrigerator | Airtight container | Up to 5 days | No reheating needed! |
| Freezer | Airtight, freezer-safe container | Up to 2 months | Thaw in refrigerator overnight. |
| Make-Ahead | Silicon Muffin Tray | Up to 24 hours | Cover with plastic wrap. Ready to enjoy chilled! |
For optimal texture, I prefer to let these cups chill in the refrigerator for at least 2 hours before serving. This allows the chocolate to set completely and the flavors to meld together beautifully. Don’t be tempted to rush the chilling process—patience is key for a perfect treat!
Variations & Easy Swaps
| Variation | Key Change | Best For | Difficulty Impact |
|---|---|---|---|
| Dark Chocolate Peanut Butter Cups with Sea Salt | Sprinkle top with flaky sea salt | Salted Chocolate Cravers | Easy |
| Gluten-Free and Dairy-Free Cups | Ensure all ingredients are GF/DF | Allergy Restrictions | Easy |
| White Chocolate Raspberry Cups | Swap dark chocolate for white, add raspberries | Fruity Sweetness | Easy |
Dark Chocolate Peanut Butter Cups with Sea Salt
A sprinkle of flaky sea salt on top elevates these cups to another level! The salt enhances the sweetness of the chocolate and peanut butter, creating a perfect balance of flavors. It’s a simple addition that makes a big difference. This is my go-to variation!
Gluten-Free and Dairy-Free Cups
To make these cups gluten-free and dairy-free, simply use certified gluten-free oats, dairy-free chocolate, and ensure your peanut butter doesn’t contain any hidden dairy ingredients. It’s a simple swap that opens up this recipe to a wider audience – and it taste just as amazing.
White Chocolate Raspberry Cups
For a lovely twist, swap out the dark chocolate for white chocolate and add a few fresh raspberries to the peanut butter layer before pouring over the chocolate. The tartness of the raspberries beautifully complements the sweetness of the white chocolate and peanut butter, making for a delightful treat.
Can I use a different nut butter besides peanut butter?
Absolutely! Feel free to substitute almond butter, cashew butter, or even sunflower seed butter if you have allergies or just prefer a different flavor. Each nut butter will lend its own unique nuance to the cups. Almond butter offers a slightly more delicate flavor, while cashew butter is incredibly rich and creamy. If using sunflower seed butter, a pinch of extra salt will enhance the flavor.
Can these be made without maple syrup?
Yes, you can! Maple syrup adds a lovely flavor and natural sweetness, but you can substitute it with agave nectar, honey (if not vegan), or even a date syrup. Just keep in mind that the flavor profile will be slightly different. You may also need to adjust the amount to achieve the desired sweetness and consistency.
How do I melt the chocolate without burning it?
The key to melting chocolate without burning it is low and slow heat. I recommend using a double boiler, or melting it in the microwave in 30-second intervals, stirring well in between each interval. This prevents the chocolate from overheating and seizing. If you’re using a double boiler, make sure the water doesn’t touch the bottom of the bowl containing the chocolate.
Can I make these ahead of time?
Definitely! These cups are perfect for making ahead. You can store them in an airtight container in the refrigerator for up to 5 days. They actually taste even better after a day or two, as the flavors have time to meld together. The texture might soften slightly with refrigeration, but this doesn’t affect the taste.
How do I get a really smooth chocolate topping?
The secret to a smooth chocolate topping is to make sure your chocolate isn’t too hot when you pour it. Slightly cooled chocolate is easier to spread evenly. Also, adding a tiny bit of coconut oil or vegetable oil (about a teaspoon) to the melted chocolate can help create a glossier finish and a smoother texture.
Can I freeze these peanut butter chocolate oat cups?
Yes, you can! These freeze very well. Place the cups in a single layer on a baking sheet lined with parchment paper and freeze for at least 2 hours, or until solid. Then, transfer them to a freezer-safe container. They can be stored in the freezer for up to 2 months. Thaw overnight in the refrigerator before enjoying.
I don’t have silicone muffin cups, what can I use?
If you don’t have silicone muffin cups, you can line a regular muffin tin with paper liners. Just make sure the liners are sturdy enough to hold the mixture. You can also lightly grease the muffin tin with coconut oil or cooking spray to prevent the cups from sticking. It might make them a bit more fragile to remove, so handle gently!
How can I adjust the sweetness of these cups?
You can easily adjust the sweetness to your liking! Reduce the amount of maple syrup for a less sweet treat, or use a darker chocolate with a higher cacao percentage. You can also add a pinch of salt to balance the sweetness. If you want them extra sweet, consider adding a teaspoon of vanilla extract or a drizzle of honey.
Share Your Version!
I absolutely love seeing my recipes come to life in your kitchens! If you try these Peanut Butter Chocolate Oat Cups, please leave a star rating and comment below—let me know how they turned out. Snap a photo and share it on Instagram or Pinterest using #spicemingle – I’ll be sure to check it out and give you a shoutout! If you have any questions about this recipe, don’t hesitate to ask!
From my NYC kitchen to yours — I hope this recipe brings as much warmth to your table as it does to mine. — Pierre 🧡
Love This Recipe? Save It to Pinterest!
If you enjoyed this Peanut Butter Chocolate Oat Cups recipe, don’t let it get lost in your browser tabs! 😄 Pin it now so you can find it again anytime — and explore hundreds more tried-and-tested recipes waiting for you on my Pinterest boards.
👉 Follow Pierre on Pinterest @spicemingle
📌 Pin this recipe · 🔁 Re-pin your favorites · 💬 Tag me when you make it — I love seeing your creations!
“`
Print
Peanut Butter Chocolate Oat Cups
Description
A simple treat with a layer of peanut butter all topped with rich dark chocolate. No-bake, vegan AND gluten-free!
Ingredients
- 70g rolled oats (used gluten-free if necessary)
- 2 tbsp smooth peanut butter (or nut butter of choice)
- 2 tbsp maple syrup
- Pinch of salt
- 100g smooth peanut butter
- 1 tbsp maple syrup
- 70 g dark chocolate (melted)
- Optional drizzle of melted Biscoff spread
Instructions
- Mix all the base ingredients in a bowl, then press into a 6 cup silicon muffin tray. Freeze for 15 minutes.
- In the meantime mix the peanut butter and maple syrup in a small bowl to create the middle layer, then spread over the oat bases and top with the melted chocolate.
- Refrigerate until hardened. Enjoy!



