Table of Contents
Peanut Butter Blossom Bars Bar Form – Snack That Chains Portion Control
Growing up in a bustling Moroccan kitchen, I learned early that an extra pinch of butter could soften the heat of our spices. When I moved to Paris, I refined those techniques with the elegance of French pastry. Now, in my New York City kitchen, I blend this heritage with the vibrant energy of the city to create Peanut Butter Blossom Bars in a fresh, easy bar form—no cookie mess, just sweet, bite-sized joy.
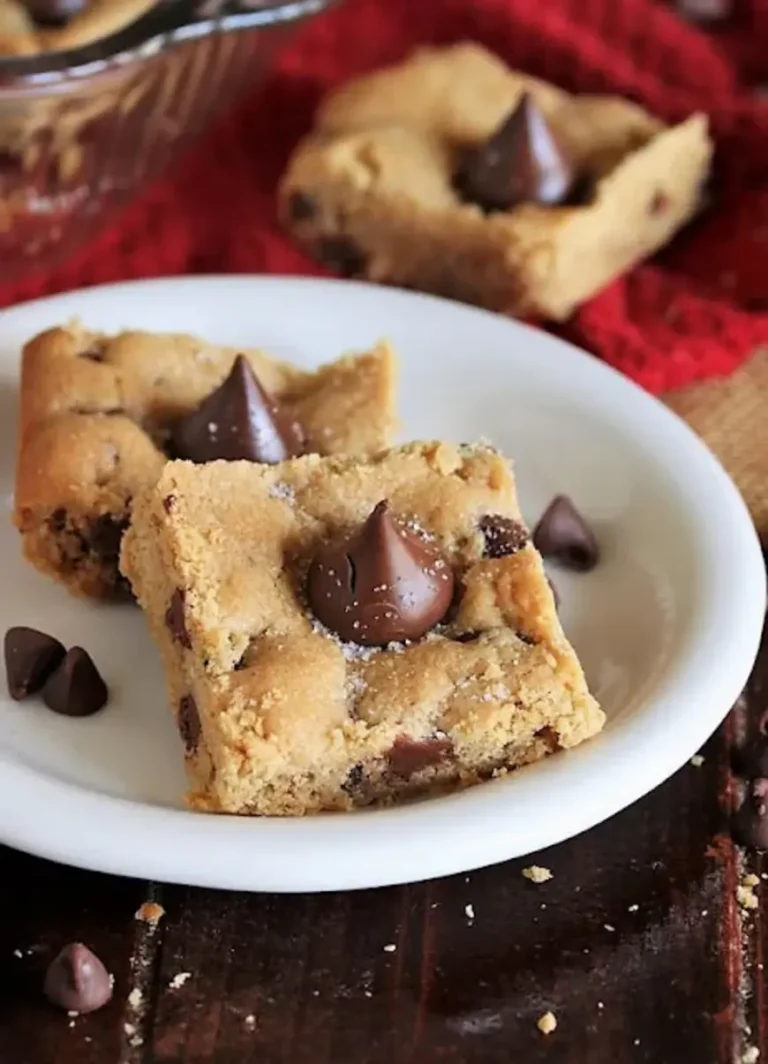
Each bar is a textured, buttery layer of creamy peanut butter that melts with a hint of chocolate chip crunch. The salty Hershey’s Kiss sits perched like a star, shimmering in the kitchen light. The aromatic blend of vanilla, slight caramelized sugar, and creamy butter invites the senses, while the crispy sugar granules give a subtle crunch that’s surprisingly indulgent.
I’ve reimagined this classic cookie into bars to make portion control effortless. It’s perfect for office lunches, school snack boxes, or a quick treat on a rainy NYC evening. A quick pro tip: keep the Hershey’s Kisses wrapped until after baking, so they stay intact and illuminate the front of each bar.
Why This Peanut Butter Blossom Bars Recipe Is the Best
The unique angle—transforming beloved cookies into bars—lets the familiar flavors shine through while slashing prep time. No cookie dough stretching, just a lump of functional, crumbly dough.
The butter-softening technique borrowed from my Moroccan kitchen ensures a tender, moist crumb that’s not too dense. The butter’s subtle olive-like aroma complements the peanut butter’s nutty depth.
Being an NYC foodie, I know how time wars happen—this recipe stays under 40 minutes, making it ideal for anyone on the go. No gimmicks, just straightforward instructions that a beginner can follow without fear.
Peanut Butter Blossom Bars Ingredients
The ingredients are simple enough you’ll find them in any NYC grocery—Streit or Whole Foods is a good spot for high-quality peanut butter, and I love buying Cocoa butter from local markets for added richness.
Ingredients List
- 1/2 cup unsalted butter, softened
- 1/2 cup granulated sugar
- 1/2 cup brown sugar
- 1/2 cup creamy peanut butter
- 1 egg
- 1 1/2 cups all-purpose flour
- 3/4 teaspoon baking soda
- 1/2 teaspoon baking powder
- 1/8 teaspoon salt
- 2/3 cup milk chocolate chips
- 24 Hershey’s Kisses, unwrapped
- 3 teaspoons white sparkling sugar (or granulated sugar)
Ingredient Spotlight
Unsalted Butter: It’s the backbone of the crumb. Use a high‑smoke-point butter, like European-style, for smooth texture. Substituting with salted butter will alter the final flavor profile, making the bars slightly too salty.
Peanut Butter: A creamy or crunchy variety changes mouthfeel; I prefer the creamy. If you’re vegan, a natural peanut butter with no added oils keeps the bars rustic.
Hershey’s Kisses: The unique shape keeps them from melting completely, providing a visible, sweet centerpiece. Replacing them with chocolate truffles would change the look and sound. Stick to the classic for authenticity.
| Original Ingredient | Best Substitution | Flavor / Texture Impact |
|---|---|---|
| Unsalted Butter | Salted Butter | Slightly saltier crumb, competes with chocolate sweetness. |
| Peanut Butter | Almond Butter | Milder nutty note, less protein. |
| Chocolate Chips | Dark Chocolate Chunks | More intense cacao, slightly bitter. |
How to Make Peanut Butter Blossom Bars — Step-by-Step
The goal is a chewy center with a crisp top and that iconic Kiss on display—easy enough to master, yet a chef’s delight.
Step 1: Prepare Batter
In a large mixing bowl, combine the softened butter, 1/2 cup granulated sugar, 1/2 cup brown sugar, 1/2 cup creamy peanut butter, and 1 egg. Beat with an electric mixer on medium speed until the mixture becomes light and fluffy—about 2–3 minutes.
💡 Pierre’s Pro Tip: Use a stand mixer to ensure the butter is fully incorporated; this reduces lumps and adds a silky texture.
Step 2: Assemble Dough
By hand, stir in the flour, baking soda, baking powder, and salt until just combined. The dough will feel slightly chunky—if it’s too wet, add a teaspoon of flour.
⚠️ Common Mistake to Avoid: Overmixing the batter will make the bars tough; whisk only until ingredients are just combined.
Step 3: Press Into Pan
Spread the dough evenly in a greased 9×13-inch baking pan. Press firmly with a spatula so it’s flat and even—this helps the bars rise uniformly.
💡 Pierre’s Pro Tip: Lightly tap the pan on the counter to create a smooth surface—prevents gaps.
Step 4: Sprinkle Sugar
Evenly sprinkle 2 teaspoons of white sparkling sugar (or granulated sugar) over the top of the pressed dough to give a sweet, lightly crisp crust.
⚠️ Common Mistake to Avoid: Over-sprinkling can cause the sugar to burn—use a tablespoon at most.
Step 5: Bake
Bake at 350°F for 22–24 minutes, or until the bars puff up and are golden brown around the edges.
💡 Pierre’s Pro Tip: Pausing the oven halfway helps prevent the sugar from caramelizing too quickly.
Step 6: Add Hershey’s Kisses
Remove the pan from the oven and immediately top the bars with unwrapped Hershey’s Kisses in a 4×6 grid pattern—place 1 Kiss in the center of each section.
⚠️ Common Mistake to Avoid: Waiting too long before placing Kisses causes them to melt and lose shape.
Step 7: Sprinkle Remaining Sugar
After the Kisses are on the bars, sprinkle another teaspoon of sparkling sugar around them to highlight their shine.
💡 Pierre’s Pro Tip: Aim for an even layer; dots of sugar add visual elegance.
Step 8: Cool
Let the bars cool completely in the pan—about 30 minutes—so the Kisses transition from molten to a glistening glaze.
⚠️ Common Mistake to Avoid: Cutting them too early while warm leads to a sticky mess and loss of crispness.
Step 9: Cut and Store
Once cooled, cut the bars into squares, each with a Hershey’s Kiss embedded in the center. Store in an airtight container in the fridge for up to a week.
💡 Pierre’s Pro Tip: Wrap slices in parchment for individual portions—great for on-the-go snacking.
| Step | Action | Duration | Key Visual Cue |
|---|---|---|---|
| 1 | Mix butter & sugars | 2–3 min | Light, fluffy batter |
| 2 | Fold dry ingredients | 1–2 min | Chunky, cohesive dough |
| 3 | Press into pan | 30 sec | Even surface |
| 4 | Sprinkle sugar | 10 sec | Even dust |
| 5 | Bake | 22–24 min | Golden edges |
| 6 | Place Kisses | 1 min | Touchdown points |
| 7 | Final sugar sprinkle | 10 sec | Crystalline highlights |
| 8 | Cool in pan | 30 min | Solid bars |
| 9 | Cut & store | 5 min | Uniform squares |
Serving & Presentation
Serve these bars glazed with their sunny kiss at 8 pm during a Netflix binge, or slice them for a quick grab-and-go breakfast. Add a splash of espresso or a handful of dried apricots for a decadently sweet twist.
The bars fit perfectly in a glass-lined tin so that each piece stays crisp and tidy—great for guests or for gifting at a potluck. A drizzle of caramel or a dusting of powdered sugar finishes the look.
| Pairing Type | Suggestions | Why It Works |
|---|---|---|
| Side Dish | Cornbread croutons, roasted chickpeas | Complement crunch and flavor. |
| Sauce / Dip | Spicy yogurt, honey‑mustard | Adds tang. |
| Beverage | Hot cocoa, iced coffee | Matches sweetness. |
| Garnish | Mint leaves, toasted coconut | Adds freshness. |
Make-Ahead, Storage & Reheating
I keep a stack of these bars on my countertop for when I’m pressed for time in the metro. Set them in a fridge-safe silos, then I can pop a slice whenever hunger hits.
| Method | Container | Duration | Reheating Tip |
|---|---|---|---|
| Refrigerator | Zip‑lock bag | 3–5 days | Room temp 10 min. |
| Freezer | Plastic container | 2–3 months | Toast briefly; let cool. |
| Make‑Ahead (perimeter) | Plastic wrap | 1 week | Reassemble fresh. |
When you reheat a sliced bar, place it on a parchment plate and warm it in a 350°F oven for 3 minutes—this preserves the chewy center while letting the sugar caramelize a bit more.
Variations & Easy Swaps
| Variation | Key Change | Best For | Difficulty Impact |
|---|---|---|---|
| Spiced Kisses | Replace Hershey’s with almonds or hazelnuts. | Savoury snack. | Easy. |
| Gluten-Free | Use gluten‑free flour mix. | Health conscious. | Appropriate. |
| Seasonal Twists | Swap milk chocolate chips with seasonal chocolate chunks. | Festive. | Medium. |
Spiced Kisses Variation
Cinnamon‑sweetened cornstarch wraps give the Hershey’s Kisses a fragrant, warm twist; the bite stays intact while hinting at a Moroccan saffron sunset.
Gluten‑Free / Dairy‑Free Variation
A 1:1 swap of all-purpose flour for a blend of oat and almond flour gives a nutrient‑rich texture—results in a slightly firmer crumb but maintains the delicious peanut butter base.
Seasonal Flavor Twist Variation
In winter, I use orange‑infused caramel chips; in summer, I add a handful of frozen blueberries for a burst of color—each variation keeps the original bar essence while adding seasonal flair.
What is the difference between Peanut Butter Blossom cookies and bars?
Peanut Butter Blossom cookies are bite‑size and come in classic cookie form, full of chewy crumb and a Hershey’s Kiss flaking on top. The bar version compresses the same flavor profile into a rectangular slice, allowing portion control, easier storage, and a neat visual presentation that feels like a mini dessert bar.
Can I use almond butter instead of peanut butter?
Yes, almond butter works quite nicely, but it carries a lighter, buttery flavor and a bit less protein compared to peanut butter. It may also produce a slightly different crumb texture—less syrupy but still chocolatey. Make sure to use unsweetened almond butter so the sweetness balances.
How do I keep the Hershey’s Kisses from melting?
Place the Kisses onto the bars immediately after removing the pan from the oven. The heat of the bars is enough to create a brief glossy coating, but the Kisses won’t fully melt if added right away. Let the bars cool for a few minutes first—this gives the chocolate a chance to set and keeps the shape intact.
Place the Kisses onto the bars immediately after removing the pan from the oven. The heat of the bars is enough to create a brief glossy coating, but the Kisses won’t fully melt if added right away. Let the bars cool for a few minutes first—this gives the chocolate a chance to set and keeps the shape intact.
Is there a vegan version of these bars?
Switch the butter for plant‑based butter or coconut oil and use vegan peanut butter. For the butter, dairy‑free margarine with a high smoke point works best. Replace the Hershey’s Kisses with vegan chocolate truffles or dark chocolate. The rest of the recipe stays unchanged, and the texture remains rich and chewy.
Can I store these bars outside the refrigerator?
They can be stored at room temperature for 1–2 days if kept in an airtight container. However, the Hershey’s Kiss may soften as the bars warm. For longer freshness, refrigerate the bars; for an extended shelf life, freeze and thaw lightly before consumption.
They can be stored at room temperature for 1–2 days if kept in an airtight container. However, the Hershey’s Kiss may soften as the bars warm. For longer freshness, refrigerate the bars; for an extended shelf life, freeze and thaw lightly before consumption.
What’s the role of the sparkling sugar?
Sparking sugar or fine granulated sugar contributes a crisp, caramelized topping that glazes the bar surface. It also helps to keep the Kisses perched by adding a shallow base that glints when the chocolate is hot. The sugar’s lightness enhances texture contrast between the chew and the sparkle.
Do I need to grease the pan before pressing dough?
Yes, a lightly greased 9×13‑inch pan is essential for easy peel‑off and clean cuts. Butter or non‑stick spray works well. Greasing also prevents the butter from hardening on the surface, which could make the bars less tender.
Yes, a lightly greased 9×13‑inch pan is essential for easy peel‑off and clean cuts. Butter or non‑stick spray works well. Greasing also prevents the butter from hardening on the surface, which could make the bars less tender.
How do I make these bars gluten-free?
Replace the all‑purpose flour with an equivalent gluten‑free blend that contains xanthan gum or guar gum. Use the same proportions; the dough may be slightly denser but the crumb will still be tender. Keep the rest of the recipe unchanged, and bake at the same temperature.
Can I add spices like cinnamon or nutmeg to the bars?
Absolutely! A pinch of ground cinnamon or nutmeg adds a warm undertone that complements both peanut butter and chocolate. Add 1/4 teaspoon of either spice with the dry ingredients; they’ll infuse the dough without altering the structure, yielding a subtle aromatic layer.
Absolutely! A pinch of ground cinnamon or nutmeg adds a warm undertone that complements both peanut butter and chocolate. Add 1/4 teaspoon of either spice with the dry ingredients; they’ll infuse the dough without altering the structure, yielding a subtle aromatic layer.
What’s the best storage method for maximum freshness?
For the freshest taste, keep the bars cold in a sealed container in the fridge for up to five days. If you need a longer supply, freeze the intact bars in airtight packaging; thaw at room temperature before slicing. They remain chewy and flavorful through these methods.
For the freshest taste, keep the bars cold in a sealed container in the fridge for up to five days. If you need a longer supply, freeze the intact bars in airtight packaging; thaw at room temperature before slicing. They remain chewy and flavorful through these methods.
Share Your Version!
If you try these bars, let me know how you tweaked them—did you swap the chocolate chips, add a hint of sea salt, or use a different type of peanut butter? Drop a comment, give me a star rating, and tag @spicemingle when you post your photos. I’d love to see how you bring a touch of urban flair into this classic.
From my NYC kitchen to yours — I hope this recipe brings as much warmth to your table as it does to mine. — Pierre 🧡
Love This Recipe? Save It to Pinterest!
If you enjoyed this Peanut Butter Blossom Bars recipe, don’t let it get lost in your browser tabs! 😄 Pin it now so you can find it again anytime — and explore hundreds more tried-and-tested recipes waiting for you on my Pinterest boards.
👉 Follow Pierre on Pinterest @chefrecipes2
📌 Pin this recipe · 🔁 Re-pin your favorites · 💬 Tag me when you make it — I love seeing your creations!
Peanut Butter Blossom Bars
Description
We all know and love iconic Peanut Butter Blossom cookies — but why not enjoy this classic treat in easy bar form? Just like their classic cookie inspiration, Peanut Butter Blossom Bars are rich in peanut butter flavor with that signature Hershey’s Kiss perched deliciously on top. And they’re super easy to make, too.
Ingredients
- 1/2 c. unsalted butter, softened
- 1/2 c. granulated sugar
- 1/2 c. brown sugar
- 1/2 c. creamy peanut butter
- 1 egg
- 1 1/2 c. all-purpose flour
- 3/4 tsp. baking soda
- 1/2 tsp. baking powder
- 1/8 tsp. salt
- 2/3 c. milk chocolate chips
- 24 Hershey's Kisses, unwrapped
- 3 tsp. white sparkling sugar OR granulated sugar
Instructions
- In large mixing bowl, combine the butter, 1/2 cup granulated sugar, brown sugar, peanut butter, and egg. Beat with an electric mixer on medium speed until well mixed.
- By hand, stir in flour, baking soda, baking powder, and salt until just combined and a dough forms. Stir in milk chocolate chips.
- Press dough into the bottom of a greased 9×13-inch baking pan. Sprinkle evenly with 2 teaspoons of the white sparkling sugar (or granulated sugar).
- Bake at 350x for 22-24 minutes, or until puffed up all over and golden brown.
- Remove from oven and immediately top with unwrapped Hershey's Kisses in a 4 rows by 6 rows pattern. Sprinkle with remaining teaspoon of the white sparkling sugar (or granulated sugar).
- Cool completely. Cut into squares with one of the Hershey's Kisses in the center of each bar.
- Store in an airtight container.
- The dough will be a stiff, almost crumbly dough.
- After placing the Hershey's Kisses on the baked bars, don't touch the Kisses again until the bars are completely cooled. The Kisses do melt (and glisten) from the heat of the baked bars, but do keep their shape. If you touch the Kisses at this point, they will smush and their shape will warp.



