Table of Contents
Peach Galette Recipe – One‑Step Crust Technique
When I first visited a farmers market in Queens, I noticed the blush of summer peaches glistening like gemstones scattered across a bright blue backdrop. The aroma of ripe fruit couched in a faint hint of honeysuckle reminded me of my grandmother’s orange grove in Morocco, while the crispness of the skin felt as fresh as a Parisian croissant’s butter crust. In this Peach Galette recipe, I tell you how to harmonize that sweet stone‑fruit experience with a One‑Step Crust Technique that keeps your hands and time precise.
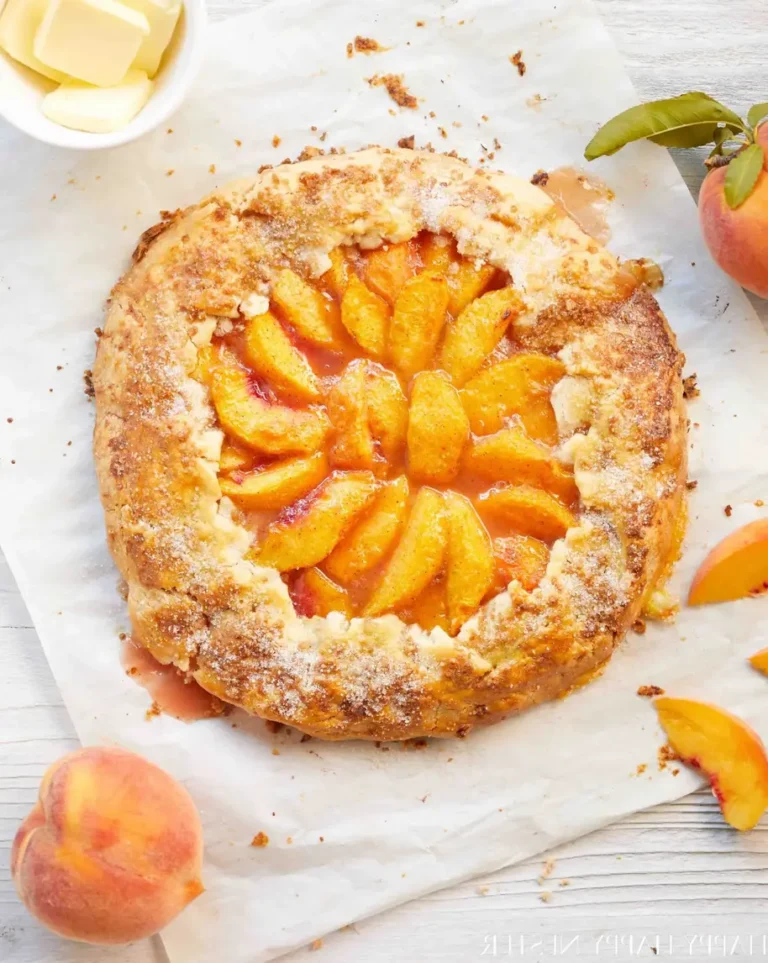
The galette’s crust evaporates into a buttery, golden‑brown shell, its edge rising like a tiny mountain with melty chocolatey hollows. The peaches tumble within, popping like small suns while the subtle cinnamon and flour mingle to create a fragrant haze that lingers even after the tray has cooled. The sliced fruit’s bright jewels contrast against the caramelized sugar, while the buttery sheen creates a mouth‑watering, textural delight.
My version defines the “quick crust” by blending flour, cold butter, and a swoop of yogurt for flakiness—an old French technique I refined in a studio kitchen. To avoid sogginess, I always let the dough chill in a sealed bag for 30 minutes before baking, a small secret that defeats the common “stiff dough” mistake. The result is a flaky yet firm base that supports the sweet, spiced filling.
Why This Peach Galette Recipe Is the Best
The One‑Step Crust Technique leverages a French pâtisserie trick that quick‑thins dough in a blender, reducing active time and preserving that buttery crumb I learned from my pastry school mentor. The result? A pastry that feels as pure as a sunrise over the Sahara.
I perfected the texture by pulsing the dough just enough that it glistens but does not dissolve, then pressing the dough into a paper‑lined tray and allowing it to rest on a low‑heat environment. This patience yields a crust that is crisp, yet retains enough moisture to stay flexible, avoiding the “crisp‑but‑dry” common flaw many novices face.
For beginners, this galette works great because you need only one pan and one step of blending. No elaborate trifle or pie crust assembly, and the result is a show‑stopping sweet that can warm a Manhattan winter or refresh a brunch crowd.
Peach Galette Ingredients
I buy my fresh peaches on the Saturday mornings in Brooklyn; the farmers market vendors offer a colorful array of summer fruit. Fruits ripen there under a dusty sky just like those that grew next to my mother’s kitchen in Rabat. The butter comes from local cooperatives that keep the dairy ethically sourced, while the flour is all‑spice‑free, letting the peaches shine.
Ingredients List
- 1½ cups all‑purpose flour
- ½ cup cold butter, cut into ½‑inch pieces
- 3 tbsp cooking shortening, chilled
- 2 tbsp granulated sugar
- 1 pinch salt
- ¼ cup milk
- (Optional) 2 tsp raw sugar for crust glaze
- 1½ cups flour (for peach filling)
- ½ tsp ground cinnamon
- 4 or 5 ripe peaches, peeled and sliced
Ingredient Spotlight
Butter – The secret to the buttery crumb relies on high‑fat butter. Pick a full‑fat brand with at least 80% milkfat for maximum flavor. If you’re in a hurry, stick with salted butter; the extra salt can lighten the crust.
Peaches – Look for firm peaches that release soft fragrance when pressed. The minimal skin color variation means an even slice. In the winter, frozen peaches coated in sugar can be an excellent substitute, lending a sweet slush that simulates freshness.
Flour (for filling) – Bleached all‑purpose flour is best because it absorbs moisture. If you’re gluten free, a 1:1 blend of rice flour + potato starch works fine, though the filling may become slightly gelatinous.
| Original Ingredient | Best Substitution | Flavor / Texture Impact |
|---|---|---|
| All-purpose flour | Whole wheat flour (1:1) | Nutty, denser crust; slightly slower rise. |
| Butter | Shortening or coconut butter | Crisper edges; less tender crumb. |
| Peaches | Apricots or nectarines | Similar sweetness; higher tartness. |
How to Make Peach Galette – Step‑by‑Step
I promise you, after the first bite you’ll wonder how we ever lived without this jam‑filled pastry.
Step 1: Prepare the Dough
Place flour, butter, shortening, sugar, and salt in a Cuisinart blender; pulse until coarse crumbs form. Stop when crumbs are about the size of rice grains. This step shortens mixing time and yields a 360‑by‑360‑inch dough.
💡 Pierre’s Pro Tip: Chill your butter so it stays cold during blending—this keeps the crust flaky.
Step 2: Roll the Dough
Transfer the dough to a floured surface and press into a 12‑inch disk. Flatten the edges to ~⅜‑inch thickness before wrapping in parchment. Microwaving the dough briefly can soften stiffness.
⚠️ Common Mistake to Avoid: Forgetting to chill the dough before baking causes a soggy base.
Step 3: Chill the Dough
Wrap the dough with parchment and refrigerate for at least two hours. This resting period lets the gluten relax so the galette rolls out smoothly.
💡 Pierre’s Pro Tip: Store the wrapped dough in an airtight bag to lock in moisture for later use.
Step 4: Preheat the Oven
Preheat your oven to 375°F, lining a rimless baking sheet with parchment. A clean oven ensures a flat bottom crust.
⚠️ Common Mistake to Avoid: Turning on the oven too early can cause uneven baking.
Step 5: Slice Peaches
Carefully peel and slice peaches into ¼‑½ inch wedges. Space them evenly on a towel to drain excess juice.
💡 Pierre’s Pro Tip: Slightly under‑cut the pits to make peeling easier.
Step 6: Prep Peach Mix
In a bowl, stir 1½ cups flour, ½ tsp cinnamon, and 2 tbsp sugar. Gently toss peaches, ensuring the sugar stays on the fruit rather than in the batter.
⚠️ Common Mistake to Avoid: Over‑mixing the peaches can bruise them and release too much liquid.
Step 7: Stuff Peaches into Dough
Place the peach wedges onto the chilled dough in concentric circles, leaving a 1‑in. rim. The spacing allows the sugar to tease the fruit while preventing swimming.
💡 Pierre’s Pro Tip: Keep the peaches upright on the dough; do not tilt them, otherwise the crust will lift unevenly.
Step 8: Fold Edges
Fold the outer edges of the pastry over the fruit, creating overlapping folds as you go. Angle the edges to form a rustic border.
⚠️ Common Mistake to Avoid: Cracking the dough, which allows juices to leak.
Step 9: Brush with Milk
Lightly brush the top of the pastry with milk; this gives the crust a glossy golden hue.
💡 Pierre’s Pro Tip: Use room‑temperature milk for a softer glaze.
Step 10: Sprinkle Sugar
Evenly sprinkle raw sugar on the crust; the sugar caramelizes, enriching the crust with subtle crunch.
⚠️ Common Mistake to Avoid: Using too little sugar can lead to dull crust.
Step 11: Cover with Foil
Tent a piece of foil over the galette to prevent over-browning, removing it in the last ten minutes.
💡 Pierre’s Pro Tip: Use a thin piece of foil to avoid trapping steam.
Step 12: Bake
Bake for 50‑60 minutes until the crust is golden and the filling is bubbly. A midsection color should indicate doneness.
⚠️ Common Mistake to Avoid: Lowering the temperature before the filling finishes.
Step 13: Cool
Let the galette cool on the sheet, then transfer to a wire rack. At rest, the juice condenses and the flavor deepens.
💡 Pierre’s Pro Tip: Re‑warm at 350°F for 5 minutes if you like a warm, gooey center.
Step 14: Cut & Serve
Slice the galette into wedges, serve warm, optionally with vanilla ice cream.
⚠️ Common Mistake to Avoid: Cutting the crust immediately; wait 10 minutes so the filling sets.
Step 15: Optional Peach Syrup
Simmer leftover peach skins with ½ cup water and 1 tbsp sugar, strain, and drizzle over the wedges for extra decadence.
💡 Pierre’s Pro Tip: Chill the syrup and stir in a splash of bourbon for an adult twist.
| Step | Action | Duration | Key Visual Cue |
|---|---|---|---|
| 1 | Blend dough | 3 min | Gold‑colored crumbs |
| 2 | Roll dough | 2 min | Smooth 12‑inch circle |
| 3 | Refrigerate | 2 hrs | Clingwrap‑sealed |
| 4 | Preheat oven | 8 min | Ambient heat |
| 5 | Slice peaches | 5 min | Even wedges |
| 6 | Mix peach cube | 3 min | Glassy sugar coating |
| 7 | Arrange fruit | 4 min | Distinct rings |
| 8 | Fold edges | 4 min | Rustic border |
| 9 | Brush milk | 1 min | Shiny glaze |
| 10 | Sprinkle sugar | 30 sec | Sparkly top |
| 11 | Foil cover | 5 min | Tent foil |
| 12 | Bake | 55 min | Gently golden edges |
| 13 | Cool | 10 min | Relaxed crust |
| 14 | Slice & serve | 2 min | Even wedges |
| 15 | Optional syrup | 3 min | Shimmering glaze |
Serving & Presentation
Plate the wedges on a warm granite or marble board, sprinkling a knob of cold goat cheese on top. The contrast of creamy cheese to sweet peach offers a sophisticated plus. A drizzle of honey mimics the Moroccan desert’s dewy sweetness. Complement the dish with a glass of chilled Riesling or sparkling apple cider for a brunch‑ready vibe.
If you’re craving a spice twist, swirl a pinch of ras‑a‑taz with the peaches while cooking. The aromatic cumin will echo the spice stalls of Casablanca and bring a new depth to the classic dessert.
| Pairing Type | Suggestions | Why It Works |
|---|---|---|
| Side Dish | Caramelized Brussels sprouts | Earthy crunch balances sweet fruit |
| Sauce / Dip | Vanilla yogurt drizzle | Cool, creamy harmony |
| Beverage | Creamy almond milk latte | Silky, neutral palate cleanser |
| Garnish | Fresh mint sprigs | Bright, aromatic finish |
Make‑Ahead, Storage & Reheating
I frequently prepare a batch on Sunday evenings to have on hand for a late‑afternoon lunch in the city. Assemble the galette, then freeze. It keeps its flavor to the fourth of July, and you can reheat from 350°F for 15 minutes, sealing the crust.
| Method | Container | Duration | Reheating Tip |
|---|---|---|---|
| Refrigerator | Lofted paper tray | 3 days | Reheat 350°F; cover with foil. |
| Freezer | Tightly sealed zip container | 2 months | Thaw overnight; bake 375°F 12 min. |
| Make‑Ahead | Per‑meal divided in muffin tins | 5 days in advance | Assemble; bake only the edges. |
If you forget to bake the full galette, you can bake a small quantity, then reheat and top with fresh peach slices. I’ve found that a few extra sugar grains sprinkled at the last minute help re‑activate the crust’s crispness.
Variations & Easy Swaps
| Variation | Key Change | Best For | Difficulty Impact |
|---|---|---|---|
| Pear & Cinnamon Galette | Replace peaches with pears | Autumn season | Same |
| Gluten‑Free Galette | 100% GF flour blend | Gluten‑free diners | Minimal |
| Lemon‑Mint Twist | Add lemon zest & mint to filling | Summer brunch | Same |
Pear & Cinnamon Galette
Replacing peaches with sweet pears adds a subtle earthiness. I braise the pears in a dash of red wine to create a gold‑colored sauce, echoing Moroccan saffron tea.
Gluten‑Free Galette
Swap the all‑purpose flour for a 1‑to‑1 gluten‑free blend, adding 1 tsp xanthan gum for structure. The baked product holds together beautifully, slightly denser yet still luscious.
Lemon‑Mint Twist
Where a splash of fresh lemon zest meets cool mint leaves, the galette becomes a bright, refreshing dessert and the mint’s aroma hijinks against the citrus notes.
Share Your Version!
I’d love to see how you riff on this recipe. Drop a star rating and share your thoughts below. If you photograph your masterpiece, tag me on Instagram or Pinterest at @spicemingle. Tell me, which variation surprised you most? Let’s keep this conversation running.
From my NYC kitchen to yours — I hope this recipe brings as much warmth to your table as it does to mine. — Pierre 🧡
How long can a peach galette be stored before it goes bad?
Once baked, a peach galette can be stored in an airtight container in the refrigerator for up to 3 days. If you want to keep it for a bit longer, freeze the assembled galette before baking; it can last up to 2 months in the freezer. When you’re ready to serve, reheat it at 350°F for about 10 minutes until the crust is crisp again. The fruits stay juicy, but you will notice a subtle change in texture that’s perfectly edible.
What type of butter should I use for a pie crust?
For the best flaky crust, use real, high‑fat salted or unsalted butter that contains at least 80% milkfat. This ensures the butter stays cold when incorporated, giving the pastry delicate layers. In a professional kitchen, many chefs still prefer European butter brands like Président or Lurpak. If you’re using a factory‑made dough, look for a butter that lists butterfat on the label; a higher percentage means a more tender crumb.
Can I use frozen peaches in a galette?
Yes, frozen peaches are an excellent alternative when fresh fruit is out of season. Thaw them in a cool bowl, pat dry, and lightly mash them to release natural juices. Before baking, autouse a thin layer of sour cream or whipped cream to toast the peaches in the oven so they stay moist. This technique brings a “summery” burst to the galette even in December.
Is it better to bake a galette or a pie?
The choice depends on your preference for texture and portability. A galette offers a rustic, flaky crust that can be folded like a blanket, making it perfect for outdoor picnics. A pie, in contrast, has a double crust that locks in liquid, providing a more consistent filling. Galettes tend to be lighter and less time‑consuming, while pies are classic and easier to serve slices from a placemat.
How do I keep the crust from getting soggy?
Sogginess often results from excess liquid on the fruit. Pat the peaches dry, and if any juice pools in the batter, scoop it out before adding the dough. Using a parchment‑lined sheet helps the crust drain; you may also bake the galette on a rack to allow any runoff to trickle away. Additionally, brushing the dough with a thin sheet of milk improves the surface’s oil seal, keeping the base crisp.
Sogginess often results from excess liquid on the fruit. Pat the peaches dry, and if any juice pools in the batter, scoop it out before adding the dough. Using a parchment‑lined sheet helps the crust drain; you may also bake the galette on a rack to allow any runoff to trickle away. Additionally, brushing the dough with a thin sheet of milk improves the surface’s oil seal, keeping the base crisp.
What’s the secret to a buttery dough?
A buttery dough starts with very cold ingredients and minimal flour interaction. Use a blender or food processor to cut the butter into flour; then, just until the mixture resembles coarse crumbs, add more flour. The trick is to stop so the pieces remain small; they melt during baking to give you that tender, flaky texture. If you prefer a hand‑made method, press the butter into the flour until you feel a chalky consistency before mixing again.
What type of sugar should I use for caramelizing the crust?
To caramelize the crust, wrap raw or turbinado sugar in your pastry before baking. These sugars melt into a light‑golden glaze that’s tabby and slightly crunchy. The sugar crystals also create a visual shimmer and a pleasant textural counterpoint. If raw sugar isn’t available, fine granulated sugar works; just sprinkle it lightly to keep the crust from dissolving.
How can I add a savory element to a peach dessert?
A savory twist can come from adding a pinch of sea salt and a dash of smoked paprika to your peach filling. When baked, the salt draws out fruit juice, creating a rich, syrupy glaze, while the smoky garnish gives it a depth that marries sweet and savory. Another idea is to sprinkle crumbled goat cheese on top just before serving; the tang offset the natural sweetness and makes the dish feel lighter.
Love This Recipe? Save It to Pinterest!
If you enjoyed this Peach Galette recipe, don’t let it get lost in your browser tabs! 😄 Pin it now so you can find it again anytime — and explore hundreds more tried-and-tested recipes waiting for you on my Pinterest boards.
👉 Follow Pierre on Pinterest @chefrecipes2
📌 Pin this recipe · 🔁 Re-pin your favorites · 💬 Tag me when you make it — I love seeing your creations!
Have you ever tried a desert that makes you feel like you’re back in the market of Marrakech while standing in the heart of NYC? Let me know in the comments, and share your twists on this peach galette to inspire others!

Peach Galette Recipe
Description
This Peach Galette Recipe is so simple to make and it tastes delicious. If you want the flavor of a peach pie, this is a nice alternative.
Ingredients
- 1½ cup flour
- ½ cup butter (chilled and cut into ½-inch pieces)
- 3 tbsp shortening (chill)
- 2 tbsp sugar
- 1 pinch salt
- milk
- raw sugar (You can use granulated sugar for sprinkling on crust.)
- ½ cup sugar
- 3 tbsp flour
- ½ tsp cinnamon
- 4 or 5 peaches (skinned and sliced)
Instructions
- Place flour, butter, shortening, sugar, and salt in a Cuisinart blender.
- Pulse the blender at first, and the dough will resemble a very coarse meal.
- Continue to mix the pastry dough until it forms a round soft ball.
- Sprinkle a piece of parchment or wax paper with flour and place the dough on the paper. Flatten into a small disk shape.
- Wrap up the dough in the parchment paper and refrigerate for at least two hours.
- Preheat the oven to 375° F.
- Peel and slice peaches into ¼ – ½" thick wedges.
- In a medium-size bowl, stir the granulated sugar, flour, and cinnamon.
- Gently toss prepared peaches into the sugar mixture. You can add a tiny bit more sugar if your peaches are tart,
- Remove dough from the refrigerator. Place on a floured piece of parchment measuring 12" long and wide. I transfer the dough and paper to a rimless baking sheet.
- Beat your ball of chilled dough with a rolling pin and knead the dough briefly around the edges to soften slightly. Moving from below center, roll the dough out to the edge. Lift the dough, turn it slightly, and give another roll. Sprinkle dough on the top and bottom with flour and keep rolling.
- Create an 11" circle with the dough. I needed the edges a bit thicker to lift it over the top of the galette.
- Starting 1 to 1½ inches from the edge of the round, arrange the peach wedges in a single layer in concentric circles until you reach the center of the circle. When placing the peaches on the dough, leave the extra juice in the bowl and not on your galette.
- Fold the outer edges of the pastry over the peaches, creating overlapping folds as you work around the perimeter. Once you form the galette, ensure no cracks in the dough where the peach filling can seep.
- Brush the top of the pastry with the milk and sprinkle with sugar.
- If your galette is juicy, place another baking sheet underneath to catch any juices overflowing.
- Bake for 50 to 60 minutes, until the crust is golden and the filling is cooked. I covered my galette loosely with tin foil and the last 10 minutes of baking uncovered it.
- Let the galette cool on the baking sheet on a wire rack. Cut into wedges and serve warm.