Table of Contents
Oreo Cinnamon Rolls Oreo-infused – Sweet & Crunchy Surprise
When I first walked into my grandmother’s kitchen in Marrakech, the smell of cinnamon and roasting almonds curled around me like a warm blanket. A day later, in the back of the Upper West Side where I run my own Brooklyn bakery, I was craving something sweet and comforting, but with an edge that would wow the modern crowd. That’s why I created the Oreo-infused Cinnamon Rolls — a marriage of flaky, buttery dough, sweet dark chocolate Oreo filling, and a silky vanilla glaze that brings together Mediterranean spice, French pastry finesse, and the iconic American cookie.
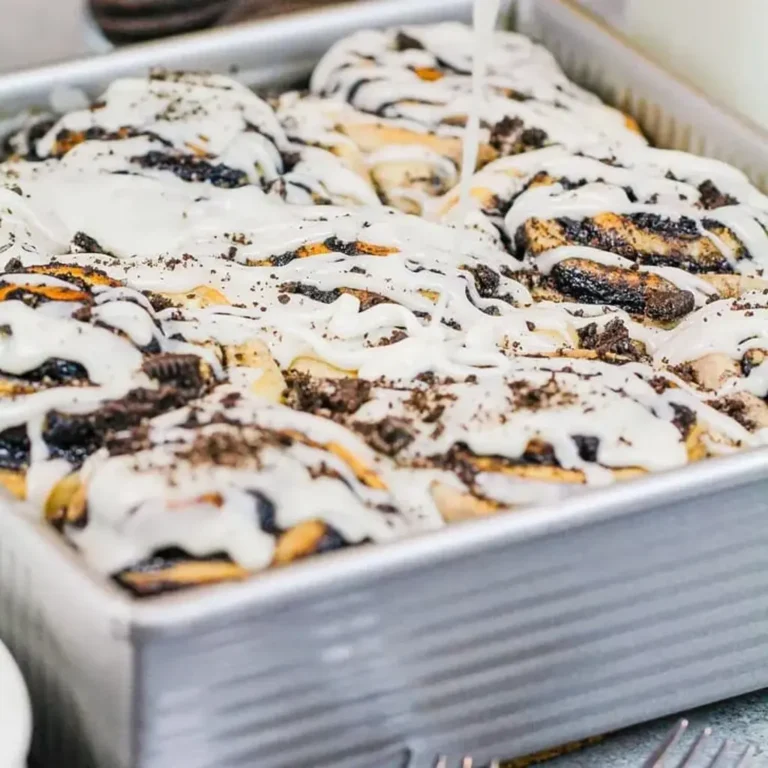
The moment you break these rolls open, you’ll feel the contrast of a smooth, melty Oreo center that pours out like a decadent chocolate river. The dough itself is lightly sweetened by the brown sugar and cocoa, while the cinnamon swirls add a subtle warmth that’s reminiscent of Moroccan spice markets. Visually, the golden crust is accented by tiny flecks of crushed Oreos, giving the rolls a speckled, almost festive look — perfect for a brunch or an after‑dinner treat.
I’ve spent years perfecting dough that is soft but elastic, so the rolls keep their shape during baking. A key trick I learned from a seasoned pastry chef in Paris is to let the dough rest just long enough to develop gluten, yet not so long that the yeast overproofs. One common mistake I hear is adding too much flour at once, which can make the rolls dense; instead, add it gradually as the dough turns tacky. And don’t forget – a quick swirl of the glaze just before serving keeps the rolls glistening and flavorful.
Why This Oreo Cinnamon Rolls Recipe Is the Best
The secret of this recipe lies in its Oreo-infused filling. By crushing the Oreos and mixing them with a hint of cocoa powder, the chocolate flavor is evenly distributed throughout the dough, creating a chocolate‑scented crust that satisfies every chocolate lover. The blend between the French‑style butter technique and Moroccan cinnamon gives the dough an aroma that’s unmistakably comforting.
Texture-wise, I use a light touch when kneading, working the dough just until elastic. This technique, taken straight from a Parisian patisserie, ensures the rolls puff up beautifully yet remain tender. I also leave a small uncovered strip on the long side, giving the rolls a natural bite and preventing them from becoming too buttery.
The recipe is designed for beginners, too. Every step is broken down, from preheating the oven at a low temperature to covering the dough while it rises. Plus, the glaze is a single‑step mixture that can be made in under five minutes – so you can enjoy a bakery‑quality treat even after a busy NYC shift.
Oreo Cinnamon Rolls Ingredients
I always source the chocolate Oreos from the little bakery on 5th Avenue that prides itself on fresh dough, while the almond‑infused cinnamon comes from the farmers market in the East Village. The rest? A trusted line of organic butter, artisanal flour, and a pinch of sea salt from a Brooklyn spice shop. This combination of local and international staples transforms a simple bake into a celebration of flavors.
Ingredients List
- ½ cup packed light brown sugar (100g)
- 2 Tbsp black cocoa powder (12g)
- 1 tsp ground cinnamon (3g)
- ¼ cup unsalted butter, softened – to be spread on the dough (56g)
- ½ cup crushed Oreos (50g)
- 3 ½ cups all-purpose flour + up to ½ cup addition flour (440g‑500g)
- 2 tsp instant dry yeast (7g)
- 1 tsp fine salt (6g)
- 1 cup whole milk (240g)
- ½ cup granulated sugar (100g)
- ¼ cup unsalted butter, room temperature (56g)
- 1 large egg, room temperature (56g)
- ½ cup crushed Oreos (50g)
- 1 Tbsp unsalted butter, room temperature (8g)
- 1 ½ cups powdered sugar (188g)
- 2 Tbsp whole milk (30g)
- 1 tsp artificial vanilla extract (4g)
Ingredient Spotlight
Crushed Oreos are the star of this recipe. Look for those with a creamy filling that melts slowly; they provide a rich, chocolatey center. If you’re in a pinch, you can substitute them with chocolate sandwich cookies from local brands, but expect a slightly lighter flavor. The key is to maintain the crunch that melts just as the dough rises.
Unsalted butter adds subtle depth to both dough and glaze. Look for cultured butter from a specialty shop for a buttery tang; dairy‑free butter is a viable alternative if you prefer a vegan variation, though the glaze will be slightly less silky.
All-purpose flour carries the dough’s structure. A mixture of organic and conventional blends gives texture; try a 70/30 blend if you’re looking for a slightly denser crumb. Gluten‑free flour substitutes can be used but will require a different hydration ratio.
| Original Ingredient | Best Substitution | Flavor / Texture Impact |
|---|---|---|
| Crushed Oreos | Chocolate sandwich cookies | Slightly lighter, less creamy center |
| Unsalted butter | Dairy‑free butter | Milder butter flavor, slightly less silkiness |
| All‑purpose flour | 70/30 gluten‑free blend | Denser crumb, more cake‑like texture |
How to Make Oreo Cinnamon Rolls — Step-by-Step
Let’s bring these rolls to life step by step. Grab a mixing bowl, a stand mixer if you have one, and let the aroma open up your senses.
Step 1: Prep the filling
In a medium bowl, whisk together ½ cup packed light brown sugar, 2 Tbsp black cocoa, 1 tsp cinnamon until well blended. Set aside to infuse. This dry mix will be the heart of the roll.
💡 Pierre’s Pro Tip: Let the sugar-cocoa blend sit for 10 minutes; it releases a deeper chocolate aroma.
Step 2: Heat milk and butter
Combine 1 cup milk, ¼ cup softened butter, ½ cup granulated sugar in a microwave safe bowl. Heat on high for 60–90 seconds until warm and butter melted, then stir until the mixture is uniform.
⚠️ Common Mistake to Avoid: Overheating the mixture; it can scorch the milk and alter the flavor.
Step 3: Gather yeast and flour
In a large bowl, mix 3 ½ cups flour, 2 tsp yeast, 1 tsp salt. Stir to combine before adding warm liquid.
💡 Pierre’s Pro Tip: Beat the yeast into the warm milk to activate before adding to dry mix.
Step 4: Assemble the dough
Gradually pour the warm milk mixture into the flour mixture while mixing on medium speed with a dough hook. Let the dough stick together, then add the egg and mix on low speed until a sticky ball forms.
⚠️ Common Mistake to Avoid: Skipping the egg; it bonds the dough and improves rise.
Step 5: Add flour and Oreos
As you knead, add 1 Tbsp flour at a time until the dough pushes to the bowl sides but leaves a small tacky film. Then fold in ½ cup crushed Oreos on medium speed until evenly distributed.
💡 Pierre’s Pro Tip: Use a silicone spatula to gently fold in Oreos to maintain even texture.
Step 6: Rest the dough
Cover the bowl with plastic wrap and let the dough rise for 10 minutes. The wrap should fog slightly, indicating yeast activity.
⚠️ Common Mistake to Avoid: Leaving the dough uncovered; it dries out.
Step 7: Roll out the dough
Flour your countertop, roll the dough into a 12″ × 18″ rectangle, ½ cm thick. Keep it on a lightly floured surface to avoid sticking.
💡 Pierre’s Pro Tip: Roll the dough slightly longer on the outer side for easier rolling later.
Step 8: Apply butter and filling
Spread ¼ cup softened butter over the dough, leaving a ½ inch open strip on one long side. Evenly sprinkle the prepared filling and top with leftover crushed Oreos.
⚠️ Common Mistake to Avoid: Smearing the butter all over; keep the open strip to protect the edge.
Step 9: Roll and cut
Tightly roll the dough horizontally toward the uncovered strip. Slice the log into 9 equal pieces with dental floss, then place in a greased 8″×8″ pan.
💡 Pierre’s Pro Tip: Gently press the rolls in to ensure they stay close together for even rise.
Step 10: First rise, foil covered
Cover the pan with foil and bake at 200 °F (95 °C) for 30 minutes or until the rolls have risen noticeably.
⚠️ Common Mistake to Avoid: Uncovering too early; rolls may collapse.
Step 11: Second bake
Remove foil, set oven to 350 °F (175 °C) and bake for 26–30 minutes or until golden brown, rotating halfway through.
💡 Pierre’s Pro Tip: Use a paper towel under the pan to trap heat for an even rise.
Step 12: Make vanilla glaze
Whisk together 1 Tbsp butter, 1 ½ cups powdered sugar, 2 Tbsp whole milk, 1 tsp vanilla extract until smooth. The glaze should be pourable but thick.
⚠️ Common Mistake to Avoid: Adding too much milk; glaze will be too runny.
Step 13: Apply glaze
Allow rolls to cool 10–20 minutes, then drizzle glaze over the tops. Sprinkle additional chopped Oreos for crunch.
💡 Pierre’s Pro Tip: Tilt the board for a more even drizzle.
| Step | Action | Duration | Key Visual Cue |
|---|---|---|---|
| 1 | Mix dry filling | 5 min | Uniform brown-powder texture |
| 2 | Heat milk‑butter mix | 1 min | Clear, warm fluid |
| 3 | Combine dry & liquid | 3 min | Smooth dough |
| 4 | Add egg & knead | 5 min | Sticky but manageable |
| 5 | Add Oreos & flour increments | 4 min | Even crumbs |
| 6 | First rise | 10 min | Soft, airy |
| 7 | Roll & cut | 5 min | Tight logs |
| 8 | First bake | 30 min | Slight puff |
| 9 | Second bake | 26–30 min | Golden crust |
| 10 | Make glaze | 5 min | Smooth consistency |
| 11 | Glaze drizzle | 2–3 min | Even shine |
Serving & Presentation
Serve the rolls warm, plated on a rustic slate plate that echoes my mother’s souk. Sprinkle a final dusting of powdered sugar and scatter a few whole Oreos around the plate to create a textural contrast. The contrast of hot, gooey center against the crisp cookie pieces feels like a trip from Marrakech to Manhattan in one bite.
For a classic brunch, pair these rolls with freshly squeezed orange juice or a light latte flavored with cardamom – a spice I grew up with in Morocco. If you’re looking for a more decadent pairing, a scoop of vanilla bean ice cream melts over the warm glaze, offering a creamy counterpoint to the chocolate‑o‑crunchy layers.
I love plating them so that each roll sits at a slight angle; that way, the glaze glistens more, creating visual symmetry that’s very Instagram‑ready. The soft aroma lingers, letting your guests anticipate the first bite long before the taste arrives.
| Pairing Type | Suggestions | Why It Works |
|---|---|---|
| Side Dish | Caramelized spinach, crisp crostini | Complementary sweetness and buttery base |
| Sauce / Dip | Kremé brulee butter sauce, honey drizzle | Enhances chocolate notes and adds silky texture |
| Beverage | Espresso, caramel latte, chilled chai | Balances sweetness and provides aromatic contrast |
| Garnish | Chocolate dust, toasted almonds, fresh mint | Adds crunch and fresh freshness |
Make-Ahead, Storage & Reheating
Running late on Monday mornings means I prep these rolls on Sunday night, freeze them in a single-layer silicone mat, then wrap in parchment and foil once thawed. That way, I can simply pop them back into the oven on a Wednesday morning and enjoy fresh rolls almost instantly.
| Method | Container | Duration | Reheating Tip |
|---|---|---|---|
| Refrigerator | Sealed zip‑lock bag | 3 days | Reheat 5 min at 350 °F (175 °C) |
| Freezer | Freezer bag | 2 months | Defrost overnight, bake 10 min |
| Make‑Ahead | Individual silicone molds | 4 days in advance | Reheat 6 min, then drizzle glaze |
While I usually bake fresh daily, having a batch ready for a busy office lunch or a quick family breakfast has saved me countless mornings. The reheating trick of lightly covering the rolls with foil helps trap steam, keeping the interior tender and preventing the glaze from drying out.
Variations & Easy Swaps
| Variation | Key Change | Best For | Difficulty Impact |
|---|---|---|---|
| Blueberry Oreo | Replace ½ cup Oreos with ½ cup fresh blueberries; add 1 tsp lemon zest. | Summer brunch | Easy to medium |
| Gluten‑Free Oreo | Swap all‑purpose flour with 1 ½ cups GF blend; reduce yeast slightly. | Gluten‑free families | Medium |
| Mint‑Infused Oreo | Add ½ tsp fresh mint leaf to filling; sprinkle crushed mint leaves on top. | Holiday desserts | Easy |
Blueberry Oreo
Swapping the Oreo crumble for ripe blueberries gives a burst of juicy tartness that cuts through the rich chocolate center. The bright color makes the rolls feel festive, perfect for an early summer tea party. I also tease in a pinch of lemon zest to brighten the flavor profile, a cue from my Moroccan breakfast spices.
Gluten‑Free Oreo — Dairy‑Free
Use a 1 ½ cup gluten‑free blend that includes xanthan gum, and replace the butter with a plant‑based butter such as Earth Balance. The result is a roll that holds rise yet feels lighter. The glaze thickens slightly due to the lower sugar content, but I add a splash of coconut milk for a silky finish. Test run? You’ll taste the difference.
Mint‑Infused Oreo — Seasonal Flavor Twist
Add a handful of fresh mint leaves into the dough right before rolling, and finish the glaze with a drizzle of mint‑infused simple syrup. The green hue and subtle coolness pair well with the sweet chocolate core, making it a perfect New York fall dessert with a hint of Mediterranean charm.
Can I use dark chocolate Oreos instead of regular?
Yes, dark chocolate Oreos will deepen the chocolate flavor and give the rolls a slightly richer mouthfeel. Dark chocolate introduces a subtle bitterness that balances the brown sugar. Keep the same amount – ½ cup – as the recipe calls for, and if the filling feels a bit leaner, add an extra 1 tbsp of crushed Oreos to retain a gooey center.
Is it possible to make this recipe gluten‑free?
Absolutely. Swap the all‑purpose flour with a one‑to‑one blend of 1 ½ cups gluten‑free flour, ensuring it has xanthan gum. Reduce the yeast slightly to accommodate the different gluten structure. The dough will be denser but still rise nicely, and the glaze remains unchanged.
How long do Oreo cinnamon rolls stay fresh?
When stored in an airtight container in the refrigerator, the rolls retain optimal flavor for up to three days. If you want to keep them longer, freeze them in a sealed bag for up to two months; thaw overnight and reheat for five minutes at 350 °F for a crisp crust.
What is the best glaze for these rolls?
The vanilla glaze proposed in this recipe is silky and not overpowering, showcasing the chocolate Oreo center. If you prefer a richer finish, replace the vanilla extract with a single teaspoon of almond extract and add a splash of heavy cream to the glaze, giving it a more decadent texture.
Do I need a stand mixer?
No, a stand mixer is optional. You can knead the dough by hand; mix the dry ingredients first, slowly pour in the wet mixture, and knead until smooth. The key is to maintain a firm hand and avoid over‑kneading, which can make the rolls tough.
Can I use instant coffee instead of instant dry yeast?
About Me

Hey! I’m Pierre, the heart behind Meaty Delights. Cooking has always been my passion, and I love creating bold, flavorful recipes that make every meal truly memorable.
Let’s be friends!


