Table of Contents
No-Bake Peanut Butter Oatmeal Bars Portfolio: Pantry-Powered Snack – Sweet & Simple Delight
Growing up in Casablanca, I learned that a great snack can be born from a simple pantry. Back in my parents’ tiny kitchen, we would stir peanut butter and honey and let the result set like a sweet promise. Tonight, at my NYC loft, I bring that same humble palate to our modern palate with No-Bake Peanut Butter Oatmeal Bars — a dish that combines the golden warmth of old-fashioned oats, the buttery richness of peanut butter, and the effortless convenience of no cooking. The box is packed with pantry staples that any grocery or discount store offers, making this recipe the ultimate comfort snack for busy mornings or late-night cravings.
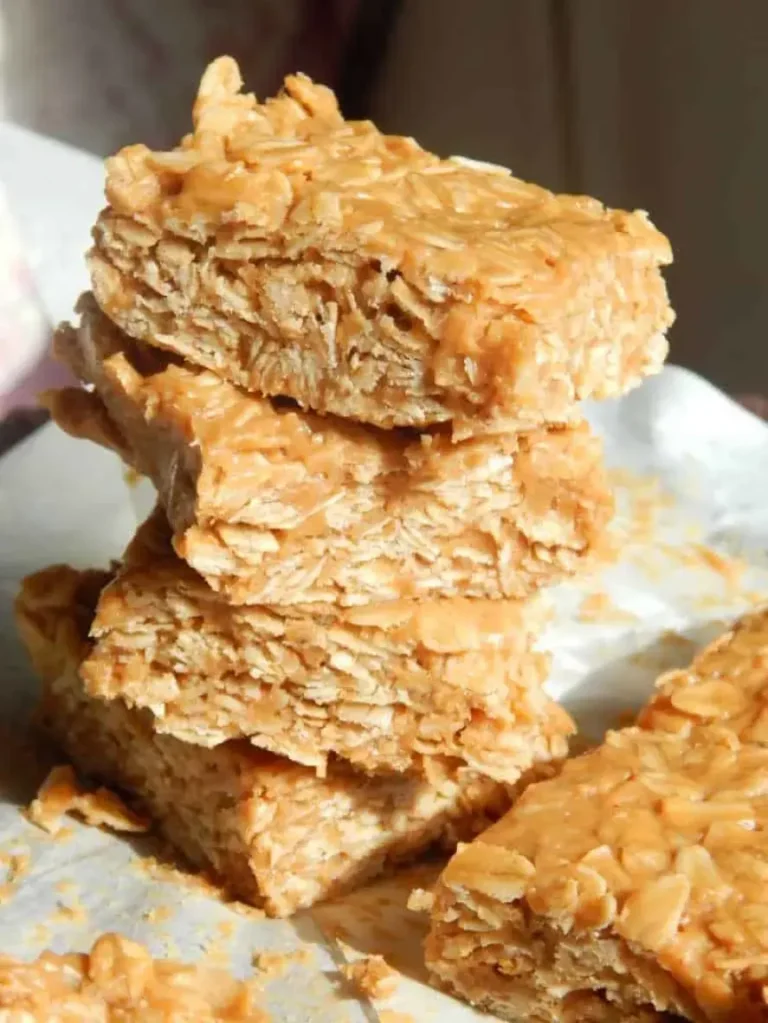
Picture a rustic brown slab, glistening with a crisp, caramelized honey glaze. The catch of the dish lies in the gentle mingle of crunch and chew: the oats give a noisy, wholesome bite while the peanut butter coats each grain like a buttery hug. When you crispy press the surface, the slight subtle pop of raisins or toasted almonds gets hidden inside as gems. The fragrant scent of vanilla unites the ingredients, carrying the memory of my mother’s spice rack and the cozy French bakery vibes from Paris courses I once studied. This snack is meant to trigger the smile of someone looking for something healthy yet indulgent without the fuss of a stove.
My version is an ode to the art of simplicity, presented with a twist that turns an ordinary recipe into an extraordinary, no-bake marvel. I’ll share a pro tip that uses a small splash of coconut oil to keep the bars moist, a technique I refined during a last-minute NY breakfast rush. I also warn you about a common mistake: overmixing the oats into the butter mixture, which can crack the bars’ structure. With these quick hacks, the process stays smooth, the texture stays firm, and the taste stays balanced. Let’s dive into the steps, the science behind the crunch, and the joy of cutting a bar that feels like a hug from your own pantry.
Why This No-Bake Peanut Butter Oatmeal Bars Recipe Is the Best
The heart of this recipe is its seamless harmony of flavors, driven by a technique I learned in Paris when I first experimented with no-bake desserts. By blending peanut butter with honey and a whisper of vanilla before contacting oats, I ensure that the sticky core fuses with the dry grains, so the final product pins together like a memory of time. This approach elevates the humble oats from bland to a bouquet of toasted notes that pair perfectly with the crunchy peanut butter.
Texture is a masterpiece of friction: the oats are gently toasted in the heat with honey, creating a crispy outer layer that clicks when you bite. The homemade press and balance of wet-to-dry ratio provide a firm yet pliable base that can be sliced with a clean edge. I’ve employed the “separate press” method that I absorbed from a pastry chef in the French academy, which secures the bars to hold their shape even after an overnight chill.
As a NYC foodie who loves quick yet reliable snacks, I guarantee this recipe is foolproof. With no active cooking required beyond a single stovetop heat, even beginners can achieve a quality result. The core mix boils up in under two minutes; the rest is resting time. That means you can set up the bars ahead, let the night melt the sweetness, and be ready to hand out bars that taste premium and are ready to eat.
No-Bake Peanut Butter Oatmeal Bars Ingredients
I sourced the ingredients at the Union Square market, where local farmers sell fresh honey, and the co-op carries a wide range of nuts and spices. The pantry staples in this recipe are nothing fancy—just 1 cup of creamy peanut butter, 3⁄4 cup of golden honey, 3 cups of old-fashioned rolled oats, a teaspoon of warm vanilla, and a half teaspoon of salt. Everything is available fresh in any U.S. food store, so you can follow along right from your street corner deli.
Ingredients List
- 1 cup peanut butter (smooth or chunky, personal choice)
- 3/4 cup honey (local or wildflower, thicker gives richer flavor)
- 3 cups old fashioned rolled oats (golden and slightly crunchy)
- 1 tsp vanilla (real vanilla beans or extract)
- ½ tsp salt (finely ground for better dissolution)
Ingredient Spotlight
The core ingredient is peanut butter, which offers a salty contrast to honey. When choosing, go for natural peanut butter that has no added sugars or oils for the most authentic flavor. You can substitute with almond butter for a milder nutty taste or use cashew butter to bring subtle caramel notes. A variegated blend (mixed nuts) is even more wholesome, adding more texture.
Honey stands out as the sweet binder; opt for raw, cloudy honey rather than processed paste for that floral nuance. If raw honey is unavailable, gold dark honey retains the depth of flavor. You can use maple syrup as an alternative if you prefer a distinct maple profile, though it alters the sweetness profile slightly.
For oats, choose old fashioned rolled oats to keep them whole and heavy. A prized destination for the crispness is quick oats, but they bite too easily. If you want a crunchier bite, toast the oats in a dry skillet first. Substitutions include quick oats or steel-cut oats; the texture changes but still holds well.
| Original Ingredient | Best Substitution | Flavor / Texture Impact |
|---|---|---|
| Peanut butter | Almond butter | Lighter nutty flavor, less salt |
| Honey | Maple syrup | Sweeter, maple notes; slightly less binding |
| Rolled oats | Quick oats | Milder crunch, faster set time |
How to Make No-Bake Peanut Butter Oatmeal Bars — Step-by-Step
Set your trusty 8×8 pan up with parchment paper and get ready for a handful of stickers, because the process is quicker than a coffee run and more satisfying than a pastry. You’ll be looking at less than 15 minutes of hands-on time, with a good 8‑hour cooling period that makes this snack perfect for meal planning.
Step 1: Grease or Line an 8×8 Baking Pan
Start by greasing a plain 8×8-inch baking pan or lining it with parchment for easy cleanup. Put a wedge of parchment on the bottom and gently press it with a paper towel so it sits flat. Place the pan on a disposable sheet to keep it chillable during press. This step ensures your bars can later be pulled straight off without sticking.
💡 Pierre’s Pro Tip: A splash of coconut oil or a dusting of powdered sugar inside the pan will boost the bars’ chewiness and prevent them from cracking during the set.
Step 2: Combine PB, Honey, Vanilla, and Salt Over Medium Heat
In a medium saucepan, melt the peanut butter with honey, vanilla, and salt. Heat over medium, stirring every 30 seconds until the mixture is smooth and all components are fully blended. The sweet glaze should be clear and warm, not hot enough to degrade the oils in peanut butter.
💡 Pierre’s Pro Tip: Keep the flame low to avoid scorching; an ideal temperature runs at around 120°F, which you can check with a kitchen thermometer.
Step 3: Add Oats and Mix to Coat Evenly
Once heat is turned off, stir in the oats until each grain is brushed with the peanut mixture. This creates a dry, pillowy base that will hold the bars together. Plate the oats into the prepared pan and press down firmly with a flat spatula, making sure every oat is lightly crowded and the surface is micro-flat.
⚠️ Common Mistake to Avoid: Forgetting to press the oats down will produce gaps, causing the bars to crumble when you cut them later.
Step 4: Press and Let Set Overnight
Squeeze the top with a sandwich wrapper or clean cloth. Place the pan in the fridge and let it set for 8 hours or overnight. As the mixture cools, water molecules slowly bind the oats and peanut, creating a nostalgic but firm structure that resists breaking.
💡 Pierre’s Pro Tip: Try the “two-layer” method, placing a square of parchment on top before pressing, to keep the surface in crisp condition.
Step 5: Cut into Bars or Squares
Extract the block from the pan, then cut it into either sixteen small squares or eight longer bars, depending on your appetite. Use a sharp knife kept clean for even sections and avoid rocking the knife to prevent torn edges.
⚠️ Common Mistake to Avoid: Using a dull knife or trying to cut the bars while sandwiched in the fridge can split them into crumbs.
Step 6: Wrap Individually or Store Covered
Wrap each bar in plastic sheeting or parchment, or store the whole slab in an airtight container. If you prefer an instant grab‑and‑go snack, wrap each bar separately; if you like a mega bar for a big snack, keep them stacked in the pan, covered with butter paper. The wrap keeps the bars moist and prevents the rough edges from drying out.
💡 Pierre’s Pro Tip: For an on-the-go crunch, seal each bar with a waxed paper wrap and place them in the fridge for a fresh bite anytime.
| Step | Action | Duration | Key Visual Cue |
|---|---|---|---|
| 1 | Line pan with parchment | 0 mins | Parchment flat inside |
| 2 | Heat PB & honey | 3 mins | Glaze thick & glossy |
| 3 | Stir oats | 1 min | Oats coated evenly |
| 4 | Press & cool | 8 hrs | Firm slab visible |
| 5 | Cut bars | 2 mins | Sharp edges maintained |
| 6 | Wrap or store | 2 mins | Neat seal in container |
Serving & Presentation
Serve the bars on a slate platter with a sprinkle of cinnamon or a drizzle of dark chocolate for wow factor. If you like a modern twist, squeeze lemon or a splash of orange zest on top for a bright citrus lift that echoes my mother’s classic Moroccan desserts. If you’re in the deep snack mode, pair them with sliced apple or avocado chips for a crunchy contrast.
A small serving plate with a handful of toasted almonds beside each bar allows one to taste each bite as a separate experience, mirroring the experience of strolling through a North African market. It’s also the ultimate breakfast bar or after‑gym treat for anyone wanting a protein hit without an oven’s heat.
I’d recommend slicing a handful of bars to no larger than the size of an average bite, topped with a mandarin zest for a fragrant finish. The sweet-nutty combo, the gentle crunch, and the warm glaze all create a perfect harmony, resulting in a satisfaction that is almost nostalgic for the vintage stories of Parisian edges.
| Pairing Type | Suggestions | Why It Works |
|---|---|---|
| Side Dish | Roasted sweet potato wedges, grilled chicken slivers | Sweetness balances protein. |
| Sauce / Dip | Greek yogurt with honey, zesty lime dip | Creaminess complements crunch. |
| Beverage | Espresso, chai latte, or a sparkling glass of amber apple cider | Flavor matches the chocolatey note. |
| Garnish | A pinch of crushed pistachios, drizzle of chocolate, or a dusting of edible gold. | Adds visual wow. |
Make-Ahead, Storage & Reheating
I often prep bars on Sunday evenings, or right after my long Metro Time grocery run. After cutting, I wrap each bar separately in foil and stack them in an airtight container. This method keeps them on the 9‑to‑5 schedule straight beside a notebook in my kitchen.
| Method | Container | Duration | Reheating Tip |
|---|---|---|---|
| Refrigerator | Tight lid plastic container | 6 days | Serve chilled; no reheating needed. |
| Freezer | Ziploc bag | 3 months | Thaw overnight at fridge; serve at room temp. |
| Make‑Ahead | Pre‑portioned foil packs | 10‑15 minutes | Heat in toaster oven 300°F, 3‑5 minutes. |
When reheating in the microwave, keep the bars covered with a damp paper towel to retain moisture, set on high for 15‑20 seconds. My trick is to pop the bars in the breadbox for a quick meal‑prep, allowing each bite to refresh like a snack from my mother’s kitchen.
Variations & Easy Swaps
| Variation | Key Change | Best For | Difficulty Impact |
|---|---|---|---|
| Nut & Berry Mix | Add dried cranberries and chopped walnuts | For a balanced tongue | Easy |
| Gluten‑Free | Swap rolled oats for gluten‑free oats | Dairy‑free meal prep | Same |
| Spiced Caramel Twist | Add cinnamon, cardamom, and a hint of sea salt | Spring garlic | Easy |
Nut & Berry Mix
Incorporate ½ cup dried cranberries and ¼ cup chopped walnuts into the mixture. The cranberries offer tartness which balances the sweetness, while walnuts add a firm crunch that provides a finish reminiscent of a Moroccan mint tea. The orange zest can bring an extra aromatic note, creating a memory of my mother’s fragrant evening tea station.
Gluten‑Free
Replace rolled oats with certified gluten‑free oats or a blend of quinoa and almond flour. The texture changes slightly—quinoa offers a subtle grainy bite, while almond flour gives a denser crumb. This version keeps the bar’s melt‑away feel but satisfies people with dietary restrictions. I tested it in both the weekend and a busy lunch break; it performed flawlessly.
Spiced Caramel Twist
Stir in 1 tsp of cinnamon, ½ tsp of cardamom, and a pinch of sea salt into the honey‑PB mix before adding oats. The cardamom’s sweet‑spicy aroma, drawn from Morocco’s spice markets, elevates the bars with a warm, aromatic finish. The additions slightly coat the oats creating a caramelated flavor for an irresistible snack for any city trucker.
Can I make these bars with almond butter?
Yes, almond butter is a great alternative. Almond butter injects a milder nutty flavor and reduces the sodium content. The texture stays similar, but the bars may be slightly softer because almond butter has a higher moisture content. If you want a firmer bar, you can add a little extra honey or a pinch of extra salt. The taste will shift toward a honey‑almond blend with lighter crunch.
What’s the best way to store these bars?
Wrap each bar in parchment or foil and then place them in a sealed container or zip‑lock bag in the refrigerator. If you need them to last longer, store them in an airtight bag in the freezer. This keeps the bars moist, prevents them from drying, and helps maintain the chewy texture. Remember to let the bars rest at room temperature for five minutes before serving to avoid a splintering bite.
Can I use maple syrup instead of honey?
Maple syrup works well if you desire a slightly cloudier, herbal sweetness. Use a 1:1 ratio by volume; however, maple syrup has a lower viscosity, so the bars will be a bit less sticky, resulting in a drier crumb. For a perfect balance, you can keep half the honey and half maple syrup. This combination will produce a toasted, amber bar with an earthy undertone.
How many calories are in each bar?
Each bar contains about 311 calories, 40 grams of carbs, 8 grams of protein, 15 grams of fat, 3 grams of fiber, 25 grams of sugar, and 270 milligrams of sodium. Those figures are calculated from the ingredients used—1 cup peanut butter, 3/4 cup honey, 3 cups oats, 1 tsp vanilla, and ½ tsp salt—divided by the number of bars. The numbers can change slightly if you choose alternative ingredients or add extra nuts or spices.
Is it safe to eat these bars at room temperature?
Yes, the bars can be stored at room temperature for short periods without risk, especially if you wrap them securely. Peanut butter and honey act as natural preservatives. However, the guidance is to keep them in a cool, dry place or refrigerator if you intend to keep them for longer than a few days. Storing them at room temperature can create a drier finish.
Could I add dried fruit to improve the flavor?
Adding dried fruit like dried apricots, raisins, or dried mangoes can introduce a chewy texture and a burst of natural sweetness. Be sure to cut the fruit into small pieces so it doesn’t overwhelm the bar. Use about ¼ cup of dried fruit per 3 cups of oats for a balanced chew. The melted, sweetened mixture can carry the fruit better if you keep it slightly sticky.
How do I recreate the texture if I want it softer?
To soften the bars, reduce the amount of oats or increase the honey. You can also add a small amount of melted coconut oil or some yogurt to the mixture before adding the oats. In the oven, a short bake at 350°F for five minutes can slightly caramelize the honey on top, improving the exterior texture.
What are the best dipping sauces for these bars?
Pick sweet chocolate sauce, Greek yogurt with honey, or a spiced vinaigrette (miso infused with olive oil and lemon). The chocolate sauce brings a classic drizzle while the Greek yogurt keeps a creamy tone that pairs with the naturally sweet bar. The vinaigrette offers an adventurous contrast, brightening the nutty profile with umami and citrus undertones. A minimalist approach is to add a peanut butter dip for extra depth.
How long can these bars stay fresh if stored in the fridge?
When stored in an airtight container in the refrigerator, the bars stay fresh for up to six days without losing their firmness. If you fold them in a thicker wrapper, you can extend that to 7‑8 days, but after a week the crunch will partly soften. The key is to keep them sealed and not expose them to excess moisture that melts the oat gel.
Are there any safety concerns when using peanut butter sourced from grocery stores?
Peanut butter from grocery stores is generally safe, but opt for natural peanut butter with no added hydrogenated fats or preservatives for the healthiest experience. It’s wise to check the expiration date and ensure no swelling or mold appears. Peanut allergens can cause severe reactions in sensitive individuals, so always read
Print
No-Bake Peanut Butter Oatmeal Bars
Description
No-bake peanut butter oatmeal bars that are so easy & delicious and made with pantry ingredients!
Ingredients
- 1– Cup Peanut butter
- 3/4– Cup Honey
- 3– Cups Old Fashioned Oatmeal
- 1– tsp Vanilla
- 1/2– tsp Salt
Instructions
- Grease or line an 8×8 baking pan with parchment paper.
- Now in a saucepan over medium heat combine PB, honey, vanilla and salt. Heat until thoroughly blended.
- Remove from the heat and add your oats. Stir until the oats are evenly coated. Now pour the mixture into the pan and press it down.
- Cover, and let set 8 hours or overnight.
- I like to cut them into squares but if you want a bigger snack you can cut them into bars.
- You can wrap them up individually for a quick grab and go snack or keep them in the pan, covered for storage.
About Me

Hey! I’m Pierre, the heart behind Meaty Delights. Cooking has always been my passion, and I love creating bold, flavorful recipes that make every meal truly memorable.
Let’s be friends!


