Table of Contents
Marshmallow Brownies Marshmallow Fluff Swirl – Dreamy Fudgy Treats
When I first smelled the rich chocolate blend at a Parisian pâtisserie, I was transported back to my mother’s modest kitchen in Marrakesh where saffron and honey coated sweet pastries. That nostalgic aroma fused with French chocolate techniques in me, and now this recipe is a sweet escape between my roots and the bustling streets of New York.
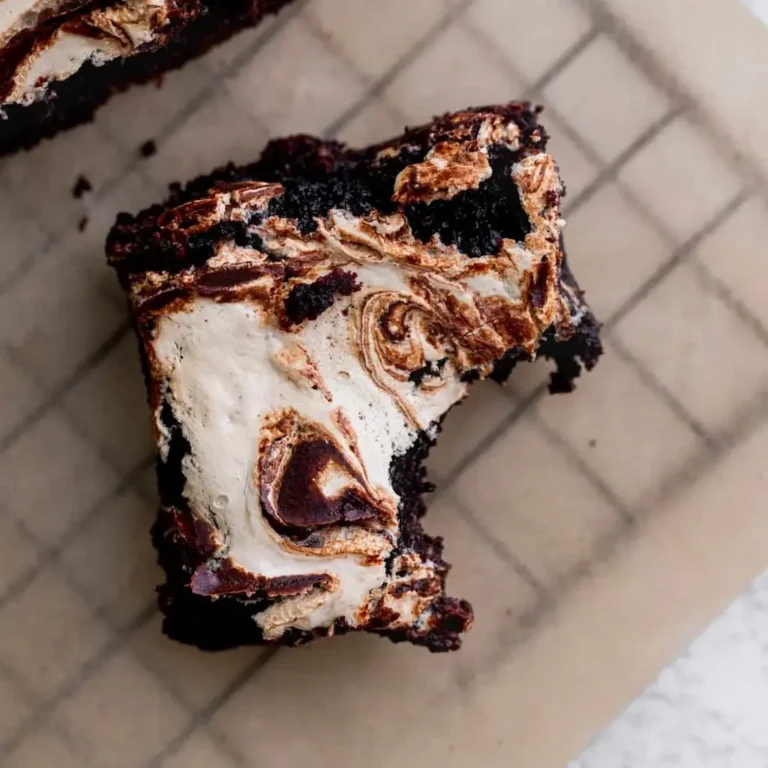
Picture this: molten dark chocolate pockets balanced by silky toasted marshmallow swirls, each bite a cloud of sweetness with a deep cocoa bite. The batter’s wet, fudgy texture merges flawlessly with a glossy top that shimmers like a sunlit desert. Whenever I take a bite, a burst of caramelized sugar dances on the palate, crowned by hints of vanilla and a subtle sea‑salt kick.
What sets this apart? It’s the precision of my “marshmallow fluff swirl” technique: letting the marshmallow melt into the batter, then swirling lightly to create a gradient that’s both hypnotic and dessert‑like. A quick pro tip—keep the marshmallow refrigerated for a firmer swirl, but remember the common mistake of over‑mixing, which chokes the airy fluff. That’s why I separate the chocolate chips at the last minute!
Why This Marshmallow Brownies Recipe Is the Best
The flavor secret lies in the “marshmallow fluff swirl.” In Morocco, we love airy, sweet treats; in Paris, we crave deep, gratifying chocolate. Merging the two gives a layered taste that feels both indulgent and cultured, tickling sweet-oozy joy combined with earthy cocoa.
The texture is perfected by careful mixing: the batter goes stiff only enough to trap air, yet not so stiff that the fondness blooms. After preheat, I whisk sugar and eggs on high for five minutes—this creates a pale, glossy mix that ensures fuddiness. That technique is a staple from my pastry school.
It’s foolproof because every ingredient is widely available and the steps avoid advanced knives or obscure dairy. Anyone can replicate it: just 9‑inch square pan, a pantry of butter, chocolate chips, and that ready‑to‑elevate marshmallow creme. The result? A guaranteed crowd‑pleaser.
Marshmallow Brownies Ingredients
I source the freshest ingredients at the Union Square farmers’ market, often grabbing Dutch‑process cocoa and organic butter. I’m happy to pitch bargains when buying in bulk at Whole Foods or head down to a local Turkish delis for that burst of cocoa flavor at a nicer price.
Ingredients List
- 2 cups White granulated sugar
- 3 Large eggs
- 1 Egg yolk
- ½ cup Unsalted butter (melted)
- 2 tsp Pure vanilla extract
- ½ cup Oil (canola or vegetable)
- ¾ cup All‑purpose flour
- 1 cup Unsweetened cocoa powder (Use dutch process cocoa powder)
- 1½ Tbsp Cornstarch
- ½ tsp Salt
- 1 cup Semi‑sweet chocolate chips
- 1 cup Marshmallow creme
Ingredient Spotlight
Unsalted Butter – The key to silk smoothness. Look for a creamy, pale texture. If you can’t find butter, coconut oil yields a lighter body but gives coconut notes.
Unsweetened Dutch‑Process Cocoa Powder – It reduces acidity, giving our brownies a richer, mellow chocolate profile. If you don’t have Dutch‑process, use instant chocolate mix; the flavor will become a bit sweeter.
Marshmallow Creme – Classic “marshmallow fluff” holds the swirl texture. For a vegan version, substitute with a plant‑based marshmallow spread that thickens on micro‑foams. It maintains sweetness but lacks dairy butter.
| Original Ingredient | Best Substitution | Flavor / Texture Impact |
|---|---|---|
| Unsalted Butter | Coconut Oil | Lighter body, slight coconut undertone |
| Dutch-Process Cocoa | Instant Chocolate Mix | Slightly sweeter, more chocolatey |
| Marshmallow Creme | Vegan Marshmallow Spread | Same texture, less dairy richness |
How to Make Marshmallow Brownies — Step-by-Step
Start by preheating the oven and prepping your pan to guarantee a smooth release.
Step 1: Preheat the Oven
Preheat to 325°F (160°C). Spray a 9X9-inch pan with non-stick spray, then line it with parchment on two sides. The low temp yields a tender crumb.
💡 Pierre’s Pro Tip: Spray the parchment on the bottom too – it prevents sticking during the 55‑minute bake.
Step 2: Sift Dry Ingredients
In a medium bowl, sift flour, cocoa powder, cornstarch, and salt. Removing clumps keeps the batter smooth and airy.
⚠️ Common Mistake to Avoid: Skipping the sift – the result is a dense, gritty brownie.
Step 3: Beat Sugar, Eggs, and Yolk
Using a whisk attachment, beat sugar, eggs, and yolk on high for five minutes till pale and glossy. This incorporates air, a critical foam for fudginess.
💡 Pierre’s Pro Tip: Stop early if the batter becomes too foamy – you want a slight rise, not bulky foam.
Step 4: Mix Oil, Butter, and Vanilla
Add melted butter, oil, and vanilla. Stir on low until combined. The oils lower the batter’s density, giving a chewy center.
⚠️ Common Mistake to Avoid: Adding dry ingredients while still mixing on high – can overwork the batter.
Step 5: Fold in Chocolate Chips
Combine dry mixtures into wet, mix on low “just combined.” Fold in chocolate chips with a spatula to keep the batter from getting too heavy.
💡 Pierre’s Pro Tip: Use a rubber spatula for gentle folding; it preserves the air pockets that make each bite tender.
Step 6: Transfer to Pan
Pour the batter evenly into the prepared pan. Smooth the top lightly.
⚠️ Common Mistake to Avoid: Pouring too fast – the batter might create uneven thickness.
Step 7: Swirl Marshmallow
In a microwave, melt marshmallow creme for 20‑30 seconds. Drizzle a teaspoon over batter, then swirl with a butter knife for a lazy rosette pattern.
💡 Pierre’s Pro Tip: Keep marshmallow slightly chilled; it won’t dissolve into the batter but will create a beautiful swirl.
Step 8: Bake
Bake for 45‑55 minutes. When a toothpick comes out slightly wet, the brownies are ready. If too much batter leaks, bake another five minutes.
⚠️ Common Mistake to Avoid: Overbaking – you’ll end up with a dry top that cracks.
Step 9: Cool & Serve
Cool on a rack completely before cutting. Serving at room temperature allows the fudgy center to shine.
💡 Pierre’s Pro Tip: Chill brownies 20‑30 minutes before slicing; the shape holds better.
| Step | Action | Duration | Key Visual Cue |
|---|---|---|---|
| 1 | Preheat oven & prep pan | 5 min prep | Parchment meets spray |
| 2 | Sift dry mix | 2 min | No clumps |
| 3 | Beat sugar & eggs | 5 min | Pale fluff |
| 4 | Combine oils & vanilla | 3 min | Smooth batter |
| 5 | Fold in chips | 4 min | Uniform chips |
| 6 | Pour into pan | 2 min | Level surface |
| 7 | Swirl marshmallow | 1 min | Rosette pattern |
| 8 | Bake | 45‑55 min | Gold‑irised edges |
| 9 | Cool & serve | 30 min | Firm bite |
Serving & Presentation
Plate the brownies with a sprinkle of sea salt crystals for contrast. A dusting of powdered cacao instantly adds a Moroccan flair. If you want a whimsical touch, drizzle a little caramel sauce or a swirl of dark chocolate ganache.
Serve alongside sliced seasonal fruits from the farmers’ market – like fresh figs or pears. The sweet fruitity pairs beautifully with the rich chocolate, echoing a Parisian patisseries’ dessert plate. Finish with a cup of espresso or a vanilla‑infused latte for a complete NYC brunch vibe.
| Pairing Type | Suggestions | Why It Works |
|---|---|---|
| Side Dish | Fresh figs, sliced pears | Sweet-licorice balance with cocoa |
| Sauce / Dip | Caramel sauce, dark ganache | Adds richness, accent fused tones |
| Beverage | Espresso, vanilla latte | Velvety acidity complements dessert |
| Garnish | Sea salt crystals, cacao dust, pistachios | Textural contrast, color pop |
Make-Ahead, Storage & Reheating
For the busy NYC crowd, bake a rack of brownies and allow them to cool. Afterwards, slice and wrap separately in parchment, then store in an airtight container. They stay fresh through the week.
| Method | Container | Duration | Reheating Tip |
|---|---|---|---|
| Refrigerator | Plastic airtight | 4 days | Microwave 20 sec |
| Freezer | Vacuum seal | 2 months | Preheat oven 170°C, 10 min |
| Make-Ahead | Glass jar | 1 week | Reassemble: mix batter, top, bake |
When reheating from frozen, I always preheat to 350°F and reheat about ten minutes, adding a splash of milk to restore moisture. The brownies never dry out if left to cool between warm temperatures.
Variations & Easy Swaps
| Variation | Key Change | Best For | Difficulty Impact |
|---|---|---|---|
| Pistachio Crunch | Fold in crushed pistachios | Any brownie lover | Easy |
| Gluten‑Free | Swap flour for xanthan‑stabilized gluten‑free blend | Vegans and gluten‑intolerant | Medium |
| Orange‑Zest Twist | Add 1 tsp orange zest | Spring dessert | Easy |
Pistachio Crunch Variation
A simple addition of crushed pistachios after folding in the chocolate chips gives a nutty crunch that brightens each bite. The earthy nuts echo the balance I’m used to in Moroccan tagines. Try stirring in ¼ cup of shelled pistachios for a delightful surprise.
Gluten‑Free Variation — Dairy‑Free
Swap all‑purpose flour for a gluten‑free blend that includes xanthan gum. Replace butter with coconut oil, and choose dairy‑free chocolate chips. The texture remains fudgy, while the flavor stays rich, and it’s a reliable swap for people with dietary restrictions.
Orange‑Zest Twist Variation
Add a teaspoon of fresh orange zest before adding the marshmallow. The citrus aroma provides a bright counterpoint to the deep chocolate, making it perfect for a spring brunch in Manhattan.
How long can I store brownies after baking?
After baking, let the brownies cool completely at room temperature. Once cooled, you can store them in an airtight container in the refrigerator for up to four days. For longer durability, freeze them for up to two months. Reheat in a 350°F oven for 5–10 minutes or microwave for 15–20 seconds to restore moisture. This keeps the fudgy texture without drying out the cake.
Can I make this recipe without marshmallow creme?
Yes, you can replace marshmallow creme with a equal amount of coconut whipped cream or a homemade marshmallow fluff made from egg whites and sugar. Keep the mixture slightly chilled so it won’t dissolve too quickly, and you’ll still get that desired swirl effect. You’ll just lose the classic sweet flavor but gain a subtle tropical nuance.
Is there a way to make them gluten-free?
Create a gluten‑free version by replacing the all‑purpose flour with a blend like King Arthur’s Gluten Free all‑purpose mix and adding a teaspoon of xanthan gum. Keep the same ratios for cocoa, cornstarch, and other dry ingredients. The batter will hold together more tightly, producing a tender, chewy brownie without compromising chocolate flavor.
What’s the best oil to use in brownie batter?
You can use neutral oils like canola or vegetable oil; they provide moisture without influencing flavor. Olive oil adds a slight fruity note that some prefer, but it’s best kept at the ¼ cup level to avoid overpowering the chocolate. For a darker, richer taste, coconut oil can also be used, but keep the heat low to prevent a coconut aroma.
Can I bake these in a larger pan?
Yes, if you use a larger pan, keep the baking time shorter. The batter’s density remains the same, so a 10×10 pan at 325°F will bake the brownies in roughly 35–40 minutes. Check for doneness with a toothpick; it should come out slightly moist but not dripping with batter.
What does “fudgy” mean in brownies?
“Fudgy” refers to a brownie that’s dense, moist, and chewy throughout, with a slight springiness when biting. It’s achieved by keeping the batter thick, using chocolate chips, and baking at a lower temperature for a longer time. The fudgy texture stands in contrast to a crisper, cake‑like brownie that is lighter and more crumbly.
How do i prevent my brownies from sticking?
For a non‑stick surface, spray the pan with non‑stick spray, then line the bottom and two sides with parchment paper. After pouring, spread the batter evenly and gently tap the pan to remove air. Don’t lift the brownies while they’re still hot, or the crumb can stick; let them cool on the rack before cutting.
Why do I see sugar crystals on top of brownies?
Sugar crystals appear when extra sugar sits on top during baking. The solution is to add a thin layer of melted butter over the batter before baking, which seals and dissolves the crystals. The melted butter also gives the brownie a glossy finish that enhances the sweet, caramelized aroma.
Is it safe to eat warm brownies straight from the oven?
Typically it’s best to let brownies cool for at least 15 minutes before cutting. Warm batter can ooze, making clean cuts difficult, and the center may still be undercooked, risking food safety. For a quick bite, let them rest for 10 minutes, then serve. The interior will set properly, giving a safe, delicious treat.
Share Your Version!
Drop me a rating and comment below so I know how you tasted this sweet‑fudgy swirled wonder. Feel free to share a photo on Instagram or Pinterest—tag me @spicemingle and let me see how your brownies look in your own kitchen. Did you tweak the marshmallow swirl? Let me know what variation makes your taste buds dance.
From my NYC kitchen to yours — I hope this recipe brings as much warmth to your table as it does to mine. — Pierre 🧡
Love This Recipe? Save It to Pinterest!
If you enjoyed this Marshmallow Brownies recipe, don’t let it get lost in your browser tabs! 😄 Pin it now so you can find it again anytime — and explore hundreds more tried‑and‑tested recipes waiting for you on my Pinterest boards.
👉 Follow Pierre on Pinterest @chefrecipes2
📌 Pin this recipe · 🔁 Re‑pin your favorites · 💬 Tag me when you make it — I love seeing your creations!
Got questions, twists, or a favorite pairing? Drop them in the comments, or DM me on Instagram @spicemingle. Let’s keep the conversation sweet and savory!
Marshmallow Brownies
Description
These marshmallow brownies are super fudgy chocolate brownie with chocolate chips. It has marshmallow fluff swirled on top.
Ingredients
- 2 cups White granulated sugar
- 3 Large eggs
- 1 Egg yplk
- 1/2 cup Unsalted butter (melted)
- 2 tsp Pure vanilla extract
- 1/2 cup Oil (canola or vegetable)
- 3/4 cup All-purpose flour
- 1 cup Unsweetened cocoa powder (Use dutch process cocoa powder)
- 1 1/2 TBSP Cornstarch
- 1/2 tsp Salt
- 1 cup Semi-sweet chocolate chips
- 1 cup Marshmallow creme
Instructions
- Preheat the oven to 325°F. Spray a 9X9-inch baking pan with baking nonstick spray. Line the bottom and 2 sides of the pan with parchment paper and spray again.
- In a medium bowl, sift the flour, cocoa powder, and cornstarch together. Add in the salt and set aside.
- Using a mixer with a whisk attachment, beat the sugar, eggs, and egg yolk on high speed for 5 minutes. It will become pale in color. While that mixes, melt the butter in the microwave and let it cool.
- Add the oil, melted butter, and vanilla and mix on low until combined. Add in the dry ingredients and mix on low until just combined. Pour in the chocolate chips and use a rubber spatula to fold it in.
- Pour the brownie batter into the pan. Melt the marshmallow fluff in the microwave for 20-30 seconds and mix. Use a 1 teaspoon to dollop the marshmallow fluff on top of the brownie batter. Use a butter knife to very light swirl the marshmallow fluff.
- Bake for 45-55 minutes. It is done baking when you stick in a toothpick, and it is slightly wet. If a lot of batter comes out, then bake for another 5 minutes.
- Cool on a cooling rack completely before cutting into them and serving.



