Table of Contents
Ice Cream Sandwich Cake: The Perfect No-Bake Summer Dessert
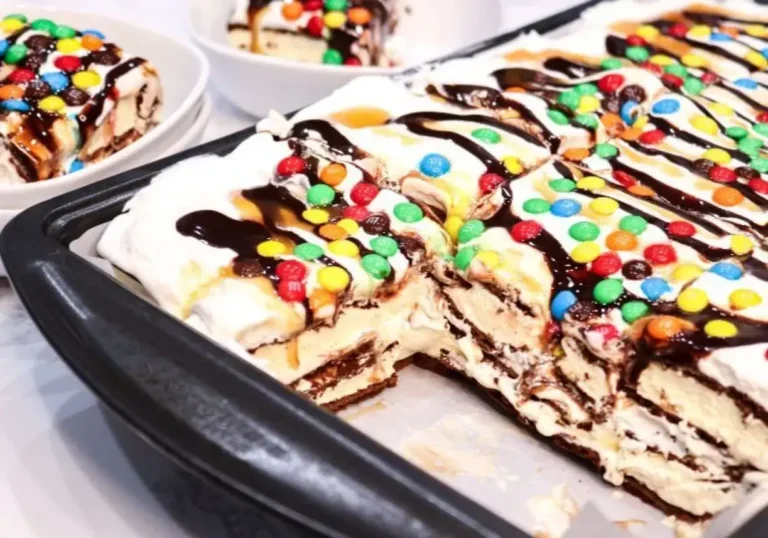
I still remember the first time I made an Easy Ice Cream Sandwich Cake — it was the peak of a sweltering New York City summer, and I had just returned from a trip back home to Morocco. My mother’s kitchen in Marrakech was always full of layered pastries and sweet, syrupy treats, but here in my tiny NYC apartment, the idea of turning on the oven was out of the question. That’s when I realized: I could bring that same spirit of layering and indulgence to a completely no-bake dessert. This Homemade Ice Cream Cake starts with frozen ice cream sandwiches, stacked high with Cool Whip, chocolate syrup, and caramel — it’s the lazy cook’s dream and the perfect summer showstopper.
The beauty of this dessert lies in its contrasts. You get the cold, creamy bite of the ice cream sandwiches, softened by billowy clouds of Cool Whip, then hit with ribbons of rich chocolate and buttery caramel. Every spoonful brings a little crunch from the Mini M&M’s and a melting sensation that reminds me of the first bite of a French mousse — luxuriously light yet deeply satisfying. As a trained chef who spent years in Parisian pastry kitchens, I can tell you: this dessert is pure American comfort with a touch of French elegance in its simplicity.
Now, I’m sharing my tweaked version so you can whip up this Ice Cream Sandwich Cake with total confidence. I’ll walk you through the layering technique — because yes, there is a trick to making sure the sandwiches don’t slide — and I’ll share a pro tip on how to get clean, beautiful slices. Plus, I’ll reveal the one common mistake that leaves the cake icy instead of creamy. Trust me, follow these steps, and you’ll be the hero of every backyard barbecue from here to Brooklyn.
Why This Ice Cream Sandwich Cake Recipe Is the Best
The Flavor Secret: This isn’t just a pile of frozen treats — it’s a carefully balanced dessert. Growing up, my mother layered honey and almonds into everything. Here, I swap honey for a duo of Hershey’s chocolate syrup and rich caramel sauce. The chocolate brings deep, almost bitter richness, while the caramel adds that buttery sweetness that makes you keep going back for more. The Mini M&M’s aren’t just for looks — they add a playful crunch that breaks up the creaminess, inspired by the crushed nuts my grandmother would sprinkle on Moroccan pastries.
Perfected Texture: From my years in Paris, I learned one golden rule: texture is king. If you just stack ice cream sandwiches and freeze, you get a block of ice — hard and unyielding. My method uses a generous spread of Cool Whip between each layer. The Cool Whip acts as a soft blanket, insulating the sandwiches and allowing them to soften just enough to become sliceable, yet still hold their shape. The result is a cake that cuts like a dream, with layers that meld into one harmonious, creamy whole.
Foolproof & Fast: I’ve made this recipe a dozen times for friends, and it never fails. It’s the kind of dessert you can pull together in 15 minutes flat — no baking, no complicated techniques. Even if you’ve never made a layered dessert in your life, you’ll succeed. The bar is low, but the payoff is sky-high. Plus, it’s endlessly customizable, so you can make it your own.
Easy Ice Cream Sandwich Cake Ingredients
I love how straightforward this shopping list is. I pick up most of these items at my local bodega in Chelsea, but for the Mini M&M’s, I always make a special trip to the bulk bins at the Union Square farmers market — they have the best selection of colorful sprinkles and candies. Back in Morocco, we used crushed pistachios and dried rose petals; here, Mini M&M’s give the same festive, jewel-like pop but with an unmistakably American crunch.
Ingredients List
- 24 Ice Cream Sandwiches (standard vanilla kind)
- 16 oz. Container of Cool Whip (thawed, but still cold)
- 8 oz. Hershey’s Chocolate Syrup
- 8 oz. Caramel Sauce (store-bought or homemade)
- 1 Cup Mini M&M’s (or your favorite sprinkles)
Ingredient Spotlight
Ice Cream Sandwiches: The backbone of this dessert. Standard vanilla ice cream sandwiches from the grocery store work perfectly. Look for ones that are firm but not rock-hard in the freezer aisle. The key is their rectangular shape, which fits neatly into a 9×13 pan. Do not substitute with ice cream bars on a stick — they won’t layer properly. If you want a richer flavor, you can use chocolate or mint ice cream sandwiches, but vanilla is classic and lets the chocolate and caramel shine.
Cool Whip: I know, I know — some purists insist on homemade whipped cream. But trust me, Cool Whip is the secret weapon here. It’s stabilized, so it won’t weep or deflate during the freezing process. It also has a lighter, airier texture than heavy cream, which means it won’t weigh down the cake. In my Parisian training, we used stabilized whipped cream for mousses; Cool Whip is the American shortcut that works brilliantly. If you must substitute, use 2 cups of heavy cream whipped with 2 tablespoons of confectioners’ sugar and 1 teaspoon of vanilla — but know the texture will be slightly denser.
Chocolate Syrup & Caramel Sauce: This duo creates the flavor layering. Hershey’s is thick and fudgy, while caramel brings a buttery sweetness. Don’t skimp on quality — cheap syrups can be watery. Drizzle generously between each layer, but don’t drown the cake. I like to warm the caramel slightly (10 seconds in the microwave) so it spreads easily. For a fancy twist, use a dark chocolate sauce or a salted caramel.
| Original Ingredient | Best Substitution | Flavor / Texture Impact |
|---|---|---|
| Ice Cream Sandwiches | Chocolate chip cookie sandwiches | Richer, slightly harder texture; more cookie crunch |
| Cool Whip | Homemade stabilized whipped cream | Denser, less airy; may weep if not stabilized properly |
| Hershey’s Chocolate Syrup | Dark chocolate ganache (1:1 cream + chocolate) | Much richer, more intense chocolate flavor; thicker drizzle |
| Caramel Sauce | Dulce de leche | Thicker, more caramelized sweetness; slightly more complex |
| Mini M&M’s | Crushed Oreos or sprinkles | Different crunch; Oreos add chocolate cookie flavor, sprinkles add color |
How to Make Ice Cream Sandwich Cake — Step-by-Step
Alright, let’s build this beauty. The process is incredibly simple, but a few details make all the difference. I’ve broken it down so you can follow along without any stress.
Step 1: Prepare the Pan
Line a 9×13 cake pan with parchment paper, leaving some overhang on the sides. This is not optional — the overhang acts as handles that will let you lift the entire cake out of the pan once it’s frozen solid. Press the parchment into the corners and make sure it’s snug. I learned this trick from a pastry chef in Paris who used it for pâté en croûte; it works perfectly here too.
💡 Pierre’s Pro Tip: Use two long sheets of parchment, overlapping in the middle, to ensure full coverage. This prevents any ice cream from seeping through and sticking to the pan.
Step 2: First Layer of Ice Cream Sandwiches
Unwrap 12 ice cream sandwiches and arrange them in the bottom of the lined pan. They should fit snugly together in a neat grid — typically 3 rows of 4 sandwiches. If there are small gaps, that’s okay; the Cool Whip will fill them in. Work quickly so the sandwiches don’t soften too much.
⚠️ Common Mistake to Avoid: Don’t let the sandwiches thaw before arranging them. If they’re too soft, they’ll squish together and become a mushy layer. Keep them frozen until the moment you’re ready to place them.
Step 3: First Layer of Cool Whip
Spread half of the Cool Whip (about 8 oz) evenly over the first layer of ice cream sandwiches. Use a rubber spatula to gently spread it from edge to edge. The Cool Whip should completely cover the sandwiches — this is what creates that creamy, sliceable texture. Don’t press down; just let it sit on top.
💡 Pierre’s Pro Tip: If the Cool Whip is too stiff to spread, let it sit at room temperature for 5 minutes — no more. You want it pliable but still cold.
Step 4: Drizzle Chocolate and Caramel
Drizzle half of the chocolate syrup and half of the caramel sauce over the Cool Whip layer. Be generous but artistic — let the syrups create ribbons and swirls. Don’t pour all in one spot; you want the flavor distributed evenly across the cake. The syrups will sink into the Cool Whip slightly, melding the flavors.
⚠️ Common Mistake to Avoid: Over-drizzling can make the cake too soggy. Stick to roughly 4 oz of each syrup per layer. You can always add more later, but you can’t take it out.
Step 5: Repeat Layers
Repeat steps 2 through 4 with the remaining 12 ice cream sandwiches, the rest of the Cool Whip, and the remaining chocolate syrup and caramel sauce. Add the second layer of ice cream sandwiches directly on top of the first drizzled layer, pressing down gently to make sure everything sticks. Spread the remaining Cool Whip evenly, then drizzle the final syrups.
💡 Pierre’s Pro Tip: For extra height and drama, you can stagger the sandwiches in the second layer — offset them slightly from the ones below, like brickwork. This gives the cake more structural integrity when sliced.
Step 6: Add Sprinkles
Sprinkle the Mini M&M’s (or your favorite sprinkles) evenly over the top layer. Press them in gently so they stick to the Cool Whip. The sprinkles add both color and a little crunch — a festive finish that makes the cake look like it came from a bakery.
⚠️ Common Mistake to Avoid: Don’t add the sprinkles too early or they’ll sink into the Cool Whip. Wait until you’ve finished the layering and the top is even, then sprinkle right before freezing.
Step 7: Freeze
Place the pan in the freezer for a minimum of 2 hours — but overnight is even better. The cake needs to be fully firm so it slices cleanly. If you’re in a hurry, 2 hours at 0°F will work, but 4-6 hours yields the best texture. The longer freeze allows the layers to marry and the Cool Whip to set into a creamy, not icy, structure.
💡 Pierre’s Pro Tip: Cover the pan with plastic wrap after 30 minutes to prevent freezer burn. The first 30 minutes allow the top to set slightly, then the wrap protects it.
Step 8: Serve Immediately
When ready to serve, lift the cake out using the parchment paper overhang. Place it on a cutting board, use a sharp chef’s knife to slice into squares, and serve immediately. The cake will begin to soften at room temperature, so work quickly. Enjoy the layers of creamy, chocolaty, caramel-y goodness.
⚠️ Common Mistake to Avoid: If the cake is too hard to slice, let it sit at room temperature for 5-10 minutes. But don’t wait too long — once it melts, the layers will slide apart.
| Step | Action | Duration | Key Visual Cue |
|---|---|---|---|
| 1 | Line pan with parchment | 2 minutes | Parchment overhang on all sides |
| 2 | Place first layer of sandwiches | 2 minutes | Neat grid, sandwiches still frozen |
| 3 | Spread half of Cool Whip | 2 minutes | Even, smooth layer covering all sandwiches |
| 4 | Drizzle half of syrups | 1 minute | Ribbons of chocolate and caramel across the top |
| 5 | Repeat layers | 5 minutes | Second layer of sandwiches, Cool Whip, and syrups |
| 6 | Sprinkle Mini M&M’s | 1 minute | Evenly distributed, pressed in lightly |
| 7 | Freeze | 2 hours minimum | Firm to the touch, no wobble |
| 8 | Serve immediately | 1 minute | Clean slices, layers visible |
Serving & Presentation
This cake is a showstopper, so let’s present it right. I like to slice it into 12 generous squares — each one reveals the beautiful cross-section of ice cream sandwich layers, Cool Whip, and ribboned syrups. For an extra touch, drizzle a little more chocolate and caramel over each slice just before serving. A few extra Mini M&M’s on the plate add a pop of color. It reminds me of the colorful sweets sold at the market in Marrakech — always bright, always inviting.
In my Brooklyn days, we would serve this alongside a tall glass of cold milk for the kids or a strong espresso for the adults — the coffee’s bitterness cuts right through the sweetness. At summer barbecues in Prospect Park, I’ve seen people scoop up extra Cool Whip from the pan, unable to resist. For a more elegant presentation, dust the plate with cocoa powder or serve with a side of fresh berries — the tartness balances the richness beautifully.



