Table of Contents
Homemade Nutter Butters – Better Than the Original
I still remember the first time I bit into a classic Nutter Butter as a kid in New York City, not long after my family moved here from Morocco. That crunchy, peanutty cookie sandwich was pure magic, but something always felt missing — it was too crisp, too processed. Now, after years training in Paris pastry kitchens and experimenting in my own NYC kitchen, I’ve created these Homemade Nutter Butters that are soft, chewy, and utterly irresistible. They’re everything the original should be, with a tender cookie that melts and a creamy filling that’s pure peanut butter bliss.
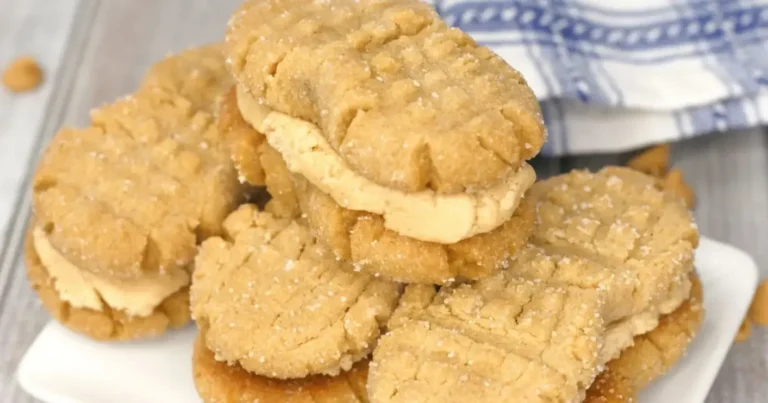
Imagine pulling apart a warm cookie sandwich and seeing that luscious, creamy peanut butter filling stretch between the two golden halves. The cookies themselves are super soft, almost like a peanut butter shortbread, with a delicate crumb that balances perfectly against the rich filling. Each bite has a satisfying crunch from the sugar coating on the outside, then gives way to that silky interior. A light sprinkle of sea salt on top? That’s the little touch from my Paris training that takes these over the top.
In this recipe, I’m sharing the exact technique I’ve perfected — using a mix of brown sugar and butter to keep the cookies soft, plus a secret pinch of salt in the filling to cut through the richness. My biggest tip? Don’t overbake! The cookies should be set on the edges but still puffy in the middle when you pull them from the oven. One common mistake is pressing the fork pattern too deep, which can make the cookies spread unevenly. I’ll show you exactly how to shape them so every sandwich looks like it came from a bakery.
Why This Homemade Nutter Butters Recipe Is the Best
The Flavor Secret: Most recipes use just regular peanut butter, but I add a touch of dark brown sugar for a deeper, almost caramelized flavor that reminds me of the nutty sweets I ate as a child in Morocco. The filling also gets a tiny pinch of salt — a trick I picked up in Paris — that makes the peanut flavor pop without being overwhelmingly sweet.
Perfected Texture: The key is using room-temperature butter and creaming it properly with the sugar. This traps air, giving the cookies that soft, tender crumb. I also underbake the cookies by about a minute — they’ll finish setting as they cool on the tray, so they stay perfectly soft rather than turning crunchy like the store-bought versions.
Foolproof & Fast: This dough comes together in under 15 minutes with just a hand mixer. The step of rolling the dough logs in sugar ensures that beautiful crackly outside. Even if this is your first time making sandwich cookies, the clear visual cues for each stage (like when the dough is just combined or the cookies are slightly puffed) will guide you to success every time.
Homemade Nutter Butters Ingredients
When I shop for these ingredients at my Union Square farmers market, I look for the freshest butter and creamy peanut butter — Skippy or Jif work wonderfully here. The brown sugar I always buy in bulk from the bulk bins; it stays soft and adds that lovely molasses note I adore.
Ingredients List
- 1 1/2 cups all purpose flour
- 1 teaspoon baking soda
- 1/4 teaspoon kosher salt
- 1/2 cup unsalted butter (softened)
- 1 cup light brown sugar
- 1 cup creamy peanut butter
- 1 large egg
- 1/2 teaspoon pure vanilla extract
- 1/2 cup sugar to roll the cookie dough in
- For the Filling: 1/4 cup unsalted butter (softened), 1/2 cup creamy peanut butter, 1 1/2 cups powdered sugar, 2 Tablespoons milk, 1/4 teaspoon vanilla extract
Ingredient Spotlight
Peanut Butter: The star ingredient! I always use creamy, not crunchy, to ensure a smooth dough and filling. Natural peanut butter works but will produce a slightly oilier dough; if using it, stir well and reduce the butter in the dough by 1 tablespoon. For the filling, avoid natural peanut butter — it won’t hold its shape.
Brown Sugar: Light brown sugar gives a perfect sweetness and softness. You can use dark brown sugar for a more intense molasses flavor — it makes the cookies slightly darker and richer. Don’t substitute white sugar alone; the cookies will be too crisp.
Butter: Unsalted is best so you control the salt. Ensure it’s truly softened — when you press your finger in, it leaves an indent without melting. Cold butter won’t cream properly and can make the dough dense.
| Original Ingredient | Best Substitution | Flavor / Texture Impact |
|---|---|---|
| All-purpose flour | Gluten-free 1:1 blend | Slightly more crumbly; add 1 tbsp milk |
| Creamy peanut butter | Natural peanut butter (stirred well) | Oilier dough; reduce butter by 1 tbsp |
| Unsalted butter | Vegan butter (like Miyoko’s) | Slightly less rich; works well |
| Milk | Oat milk or almond milk | No significant change |
How to Make Homemade Nutter Butters — Step-by-Step
Let me walk you through each step with the exact same love I use when teaching my NYC cooking classes. The dough is forgiving, so don’t stress — just follow these cues and you’ll have perfect cookies every time.
Step 1: Prepare and Mix Dry Ingredients
Preheat oven to 350°F and line a cookie sheet with parchment paper or silicone baking mat. Pour 1/2 cup of sugar into a small bowl and set aside. In a separate bowl, whisk together flour, baking soda, and salt until evenly combined. This ensures no pockets of baking soda that can leave a bitter aftertaste.
💡 Pierre’s Pro Tip: Whisk the flour mixture for at least 10 seconds — it aerates the flour and makes the cookies lighter. I learned this from a pastry chef in Paris who said “whisk like you’re making love to the flour.”
Step 2: Cream Butter and Sugars
Using a standing mixer or electric hand mixer, cream together the softened butter, brown sugar, and peanut butter on medium speed for 2-3 minutes, until the mixture is light and fluffy. Scrape the bowl halfway through. This creaming step is crucial — it traps air that helps the cookies rise and stay soft.
⚠️ Common Mistake to Avoid: Don’t rush the creaming! If the mixture looks curdled or separated, your butter was too cold. Let it sit at room temperature for 10 minutes and re-cream.
Step 3: Add Egg and Vanilla
Add the egg and vanilla extract to the butter mixture, mixing on low until just combined. Overmixing at this stage can toughen the dough. Scrape the bowl again to ensure everything is incorporated.
💡 Pierre’s Pro Tip: Crack the egg into a small bowl first — no shells in the dough! This is a basic kitchen rule I never skip.
Step 4: Combine Dry and Wet Ingredients
Gradually add the dry ingredients to the wet mixture, mixing on low speed until the dough just comes together. It should be soft but not sticky. If it feels too tacky, add a teaspoon more flour.
⚠️ Common Mistake to Avoid: Don’t overmix once the flour is added — it activates the gluten and makes the cookies tough. Stop as soon as there are no more streaks of flour.
Step 5: Shape and Coat Dough Logs
Divide the dough into small balls, about 1 1/2 tablespoons each. Roll each ball into a log shape about 2 inches long. Roll each log in the bowl of sugar until fully coated. This sugar coating gives that beautiful sparkle and extra crunch.
💡 Pierre’s Pro Tip: For consistent sizing, use a small cookie scoop. I use a #40 scoop for these — it gives perfect portions every time.
Step 6: Arrange and Press Cookies
Place the dough logs on the prepared baking sheet, about 2 inches apart. Using a fork, press down gently to create a criss-cross pattern, then use your fingers to pinch the middle of each cookie to form a peanut shape. The indent should be about 1/4 inch deep.
⚠️ Common Mistake to Avoid: Press the fork too deep and the cookies will spread into thin disks. Aim for a gentle press that leaves visible ridges but doesn’t flatten the log entirely.
Step 7: Bake to Perfection
Bake for 10-12 minutes, until lightly browned on the edges but still soft in the center. They should look puffy and slightly underdone in the middle — they’ll continue baking on the hot tray. Let the cookies cool on the baking sheet for 5 minutes, then transfer to a wire rack to cool completely.
💡 Pierre’s Pro Tip: Pull them out at the 10-minute mark for a softer cookie, 12 minutes for a slightly firmer one. I always go with 10 minutes for that perfect pillowy texture.
Step 8: Make the Filling
While cookies cool, make the filling. Beat butter and peanut butter on medium speed until light and fluffy, about 2 minutes. Add powdered sugar, milk, and vanilla extract, then mix on low until combined, then beat on high for 30 seconds until creamy. If it’s too thick, add an extra splash of milk; too thin, add a bit more powdered sugar.
⚠️ Common Mistake to Avoid: Don’t skip sifting the powdered sugar if it’s lumpy — you’ll get gritty filling. I’ve done that in a hurry and regretted it!
Step 9: Assemble the Sandwiches
Group the cooled cookies into pairs. Spoon about 1 tablespoon of filling onto the flat side of one cookie, then gently press the second cookie on top. The filling should peek out the sides just a bit. For best results, refrigerate the sandwiches for 15 minutes before serving to let the filling set.
💡 Pierre’s Pro Tip: For perfectly even sandwiches, weigh each cookie after baking and pair them by weight. This is a trick I use at my NYC baking pop-ups for professional-looking results.
| Step | Action | Duration | Key Visual Cue |
|---|---|---|---|
| 1 | Whisk dry ingredients | 1 min | Evenly combined, no streaks |
| 2 | Cream butter+sugars | 2-3 mins | Light, fluffy, pale brown |
| 3 | Add egg + vanilla | 30 sec | Combined, smooth |
| 4 | Mix in dry ingredients | 1 min | Soft dough, no flour visible |
| 5 | Shape logs + coat in sugar | 5-7 mins | Uniform logs fully coated |
| 6 | Press with fork | 2 mins | Criss-cross pattern, peanut shape |
| 7 | Bake | 10-12 mins | Golden edges, soft center |
| 8 | Make filling | 3 mins | Light, creamy, spreadable |
| 9 | Assemble sandwiches | 5 mins | Filling visible at edges |
Serving & Presentation
Growing up in Morocco, we often served sweet treats with mint tea — and these Homemade Nutter Butters are perfect alongside a steaming cup. In my NYC kitchen, I love arranging them on a simple white platter with a sprinkle of flaky sea salt and a few whole peanuts for garnish. They’re gorgeous for parties, bake sales, or a cozy afternoon snack.
For a truly decadent treat, serve them slightly chilled — the filling firms up beautifully and the cookies become almost like a peanut butter ice cream sandwich. Or warm them in a 300°F oven for 5 minutes and serve with a drizzle of warm chocolate sauce. During the holidays, I dip half the sandwich in melted dark chocolate and let it set — a French-inspired twist that always wows guests.



