Table of Contents
Frozen S’mores: Creamy No-Bake Chocolate Marshmallow Dessert
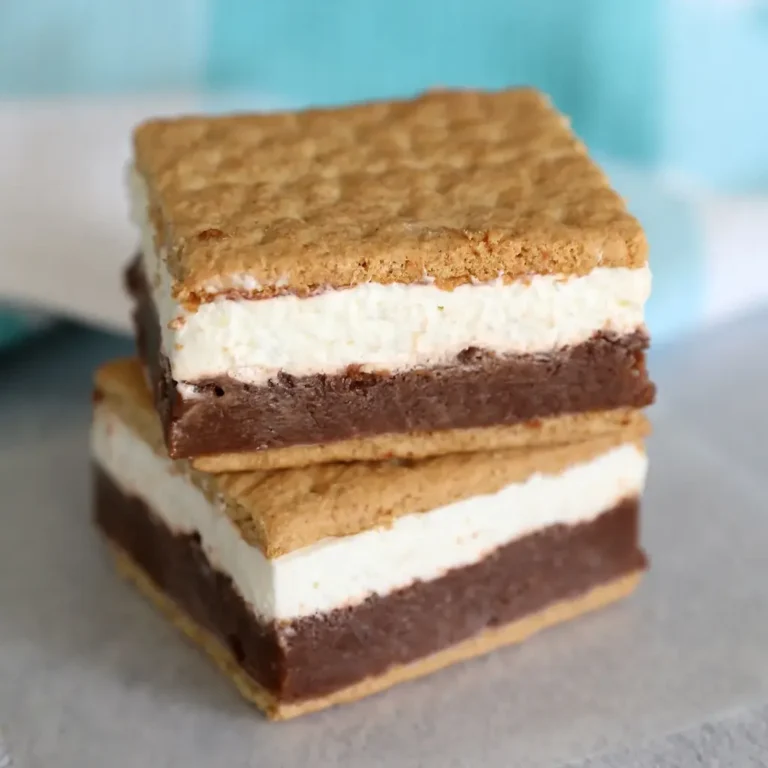
Growing up in Morocco, my mother would make a simple chilled dessert with layers of creamy chocolate and a light, airy topping that reminded me of marshmallows roasted over the coals. It was a clever way to enjoy the flavors of a campfire s’more without the heat of a fire — perfect for the long, sweltering summers in Marrakech. Those memories came rushing back one scorching afternoon here in New York City, when I craved the nostalgic taste of a s’more but couldn’t bear the idea of turning on the oven. That’s how my frozen s’mores recipe was born — a no-bake, make-ahead dessert that captures all the classic s’more joy: the crunch of graham crackers, the richness of chocolate pudding, and the fluffy sweetness of marshmallow creme, all frozen into a cool, creamy treat. This no-bake s’mores dessert is the ultimate way to beat the heat.
Imagine biting into a perfectly chilled square: the first snap of a crisp graham cracker yields to a smooth, velvety chocolate pudding layer that tastes like a rich, homemade chocolate mousse. Then, a cloud of marshmallow creme, whipped with cream cheese until light and luxuriously fluffy, melts on your tongue. The whole thing is finished with another graham cracker top, creating a satisfying crunch in every bite. I love to add a light sprinkle of flaky sea salt — a trick I learned in Paris at a pâtisserie — to cut through the sweetness and elevate every layer. The textures are pure magic: cold, creamy, crunchy, and airy all at once.
Layered no-bake desserts like this one are my specialty, combining my French pastry training with the bold, comforting American classics I’ve come to love in NYC. This recipe is brilliantly foolproof: it requires no baking, uses affordable pantry staples you can find at any supermarket, and comes together in just 15 minutes of active prep. The key to its success is a simple technique I’ll share below — freezing the pudding layer before adding the marshmallow top ensures clean, beautiful layers. A common mistake? Using too much milk in the pudding, which makes it too soft to slice. Don’t worry — I’ll guide you away from that pitfall. From my NYC kitchen to yours, these frozen s’mores are a guaranteed crowd-pleaser for hot summer days, backyard barbecues, and all your seasonal celebrations.
Why This Frozen S’mores Recipe Is the Best
The Flavor Secret: My frozen s’mores don’t just taste like chocolate and marshmallow — they have a sophisticated depth thanks to the cream cheese in the marshmallow layer. It adds a subtle tang that balances the sweetness of the marshmallow creme and the rich chocolate pudding. This is a trick I picked up from a pastry chef in Paris who always added a bit of fromage blanc to her mousses. It transforms a simple dessert into something truly memorable.
Perfected Texture: The freezing process is where the magic happens. By freezing the dessert for at least six hours, the layers set into a perfectly sliceable texture that’s firm but not rock-hard. The graham crackers stay slightly crisp, while the pudding and marshmallow layers become a luscious frozen cream. The result is a texture that’s reminiscent of a frozen cheesecake bar but with the nostalgic flavor of a campfire s’more.
Foolproof & Fast: This is a completely no-bake recipe, meaning there’s no oven to heat up, no complicated equipment to clean. It’s the perfect beginner-friendly dessert. I’ve tested it with my neighbors here in Brooklyn, and even those who “can’t cook” have nailed it on the first try. The steps are simple: mix, layer, freeze, slice. You’ll have a stunning dessert ready with just 15 minutes of hands-on time.
Frozen S’mores Ingredients
I pick up most of my ingredients for these frozen s’mores at the Union Square Greenmarket or my local bodega in Brooklyn. The cream cheese and whipped topping are staples I always have on hand, and instant chocolate pudding is a secret weapon for quick desserts. My mother would have used a homemade chocolate custard, but this shortcut is just as delicious when you’re short on time. Let’s get into what you’ll need.
Ingredients List
- 1 box Instant Chocolate Pudding (5.9 oz)
- 2.5 cups Cold Milk (whole or 2%)
- 12-15 Graham Crackers
- 7 oz Marshmallow Creme
- 4 oz Cream Cheese (softened)
- 8 oz Frozen Whipped Topping (thawed)
Ingredient Spotlight
Instant Chocolate Pudding: This is the backbone of our chocolate layer. Look for a 5.9-ounce box of Jell-O brand or an equivalent store brand. Avoid cook-and-serve pudding, as it won’t set properly in the freezer. I recommend using whole milk for the richest flavor, but 2% works well too. The key is to whisk it thoroughly until it’s completely smooth and slightly thickened before folding in the whipped topping.
Marshmallow Creme: Also known as marshmallow fluff, this is a shelf-stable product found near the baking aisle or peanut butter. It provides the classic s’mores marshmallow flavor without the need for toasting. One 7-ounce jar is exactly what you need. Make sure you use a good quality brand for the best texture — it should be smooth and glossy.
Frozen Whipped Topping: I use Cool Whip (thawed) for convenience and a light, airy texture. It helps lighten both the pudding and marshmallow layers, making the dessert feel ethereal instead of heavy. For a dairy-free version, you can substitute with a vegan whipped topping, but avoid using fresh whipped cream (heavy cream) here, as it can separate during freezing and make the texture weepy.
| Original Ingredient | Best Substitution | Flavor / Texture Impact |
|---|---|---|
| Instant Chocolate Pudding | Homemade chocolate custard (cooked and cooled) | Richer, more complex chocolate flavor; requires extra prep time |
| Marshmallow Creme | Marshmallows melted with a touch of corn syrup | Similar sweetness but denser; may require straining for smoothness |
| Frozen Whipped Topping | Stabilized whipped cream (with gelatin or cornstarch) | Lighter, dairy-forward flavor; can be finicky and may weep if not stabilized |
| Cream Cheese | Mascarpone cheese | Richer, more buttery flavor; slightly softer texture |
| Graham Crackers | Speculoos or ginger snaps | Adds warm spice notes; different crunch profile |
How to Make Frozen S’mores — Step-by-Step
This is the easiest, most satisfying dessert you’ll assemble this summer. Trust me — I’ve made it on the hottest days in my tiny NYC apartment kitchen, and it always turns out perfect. Just follow these simple steps, and you’ll be rewarded with beautiful, creamy frozen s’mores.
Step 1: Prepare the Pan and Base
Line a 9×13 pan with parchment paper, allowing the paper to overhang the pan on two opposite sides — this creates “handles” for easy removal later. Break 6 graham crackers in half and place 12 graham cracker squares down on the parchment paper, covering the bottom of the pan. If your pan has perfectly square edges, you may be able to fit 15 squares by arranging them tightly (3 across, 5 down).
💡 Pierre’s Pro Tip: Make sure the parchment overhangs at least 2 inches on each side. This makes lifting the entire block of frozen s’mores out of the pan effortless when it’s time to slice.
Step 2: Make the Chocolate Pudding Layer
In a medium bowl, beat together the pudding mix and 2.5 cups of cold milk until smooth and creamy. It will be quite thick — that’s good. Then stir in about a quarter of the thawed frozen whipped topping (just over half a cup) until well combined. Spoon this chocolate mixture over the graham crackers, then spread it out into an even layer using a spatula.
⚠️ Common Mistake to Avoid: Don’t over-mix the whipped topping into the pudding. You want it to remain light and airy. Fold it in gently with a rubber spatula to preserve the volume.
Step 3: Freeze the Pudding Layer
Place the pan in the freezer for about 20 minutes while you mix up the marshmallow layer. This brief freeze firms the pudding slightly, preventing it from mixing with the marshmallow layer when you add it on top. It’s a crucial step for those beautiful, distinct layers.
💡 Pierre’s Pro Tip: Use this time to wash your mixing bowls so you’re ready for the next step. Clean-as-you-go is a technique I learned in every professional kitchen — it makes the whole process smoother.
Step 4: Make the Marshmallow Layer
In a medium bowl, beat together the softened cream cheese and marshmallow creme until smooth and fluffy. No lumps should remain. Fold in the remaining whipped topping (the other three-quarters) until just combined. Remove the pan from the freezer and spoon this marshmallow mixture over the firmed-up pudding layer. Spread it out evenly with a spatula.
⚠️ Common Mistake to Avoid: Make sure your cream cheese is truly at room temperature before beating. If it’s too cold, you’ll end up with lumps in your marshmallow layer. Let it sit on the counter for 30 minutes before starting.
Step 5: Assemble the Top Layer
Place the remaining twelve (or 15) graham cracker squares over the marshmallow layer, pressing them down very gently so they sit flush with the surface. If your pan had 15 crackers on the bottom, use 15 on top — the stackable nature of these squares makes it easy to align them.
💡 Pierre’s Pro Tip: Don’t press too hard on the top crackers, or the marshmallow layer will ooze up between the crackers. A gentle tap is all you need to help them stick.
Step 6: Freeze Until Firm
Cover the pan tightly with foil or plastic wrap and freeze for at least six hours, or overnight. The dessert is ready when it’s firm enough to slice cleanly. Freezing for the full time ensures a perfect texture — not too soft, not rock-hard.
⚠️ Common Mistake to Avoid: Don’t rush the freezing time. If you try to slice after only 2-3 hours, the layers will be too soft and the dessert will collapse. Patience is key for this no-bake s’mores dessert.
Step 7: Slice and Serve
Remove from the freezer and let it rest at room temperature for about 10 minutes. Use a long, sharp knife to slice the excess filling from around the outer edges of the graham crackers. Then slice in between each cracker to create individual s’mores bars. Serve immediately for the best texture — cold, creamy, and crisp.
💡 Pierre’s Pro Tip: Run the knife under hot water, dry it off, then make each cut. The warm blade glides through the frozen layers without dragging. Wipe the blade clean between cuts for perfect edges.
| Step | Action | Duration | Key Visual Cue |
|---|---|---|---|
| 1 | Line pan with parchment, place graham crackers | 2 mins | Crackers cover bottom entirely |
| 2 | Make pudding, fold in whipped topping | 4 mins | Pudding is thick and creamy |
| 3 | Freeze pudding layer | 20 mins | Pudding is firm to the touch |
| 4 | Beat cream cheese and marshmallow creme, fold in whipped topping | 4 mins | Mixture is smooth and fluffy |
| 5 | Spread marshmallow layer, top with crackers | 3 mins | Top crackers are level |
| 6 | Freeze until firm | 6+ hours | Firm to the touch |
| 7 | Rest, trim, slice between crackers | 10 mins rest + 5 mins slicing | Clean cuts with no drag |
Serving & Presentation
When it’s time to serve, I love to plate two or three frozen s’mores per person on a chilled plate. Arrange them with a bit of fresh
Print
Frozen S’mores
Description
Layers of chocolate pudding and marshmallow creme make these frozen s’mores the best way to enjoy a s’more on a hot summer day!
Ingredients
- 1 box Instant Chocolate Pudding (5.9 oz)
- 2.5 cups Cold Milk (whole or 2%)
- 12–15 Graham Crackers
- 7 oz Marshmallow Creme
- 4 oz Cream Cheese (softened)
- 8 oz Frozen Whipped Topping (thawed)
Instructions
- Line a 9×13 pan with parchment paper, allowing paper to overhang pan. Break 6 graham crackers in half and place 12 graham cracker squares down on the parchment paper. If your pan has square edges you may be able to fit 15 graham cracker squares.
- In a medium bowl, beat together the pudding mix and milk until smooth and creamy. Then stir in about a quarter of the frozen whipped topping (Cool Whip) – just over half a cup. Spoon the pudding over the graham crackers, then spread it out smooth.
- Place pan in the freezer while you mix up the marshmallow layer.
- In a medium bowl, beat together cream cheese and marshmallow cream until smooth. Fold in the rest of the whipping topping. Remove pan from freeze and spoon marshmallow mixture over the pudding, then spread it out smooth.
- Place twelve (or 15) graham cracker squares over the marshmallow layer.
- Cover the pan with foil and freeze for about six hours, until the s'mores are firm enough to slice through.
- Remove from freezer and rest at room temperature for about 10 minutes. Use a long sharp knife to slice the excess filling from around the outer edges of the graham crackers. Then slice in between each cracker. Serve immediately.
- To store for later, place frozen s'mores in an airtight container with piece of parchment paper in between each treat. Store in the freezer for up to three months. After they've been frozen, allow to sit at room temperature for 10 minutes before eating.



