Table of Contents
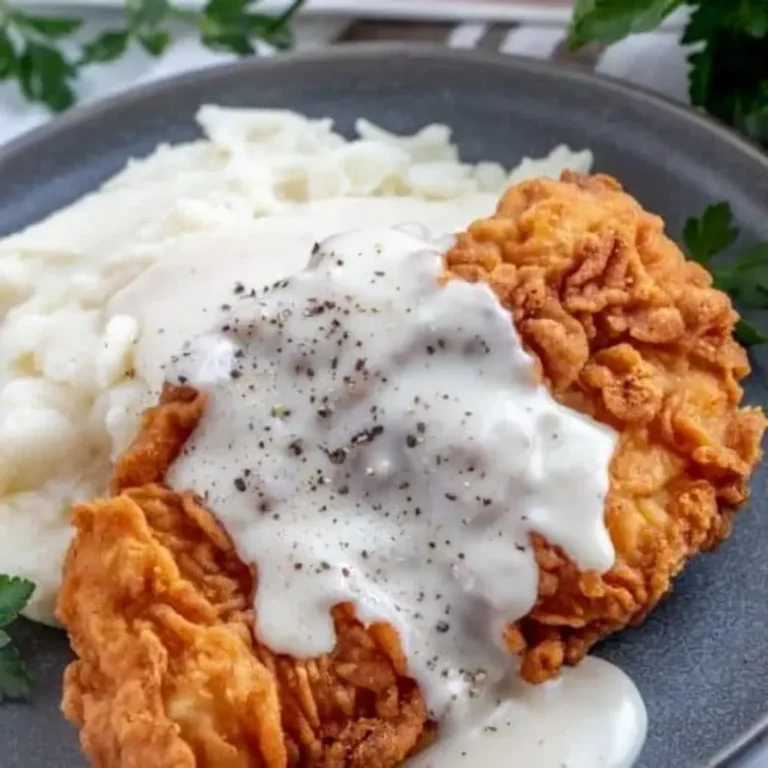
Chicken Fried Chicken: Double-Fried Perfection – The Classic Comfort With a Crunchy Twist
Growing up in a Moroccan household, I learned early that the simplest ingredients can become extraordinary when seasoned with a little creativity. That philosophy came with me to my culinary studies in Paris and later to the bustling food scene of New York City, where flavors from around the world mingle like a neighborhood bazaar. Today I’m excited to share my most cherished take on a timeless comfort: “Chicken Fried Chicken.” With its double-frying technique, the dish achieves an unmatched crunch while remaining tender inside, a true culinary dance of textures that reminds me of the vibrant markets along Rue de Rivoli.
Imagine the aroma of deep-fried chicken coating a plate, followed by a whisper of peppered garlic and a hint of smoky heat from the hot sauce. Each bite delivers a cascade of golden crispness that gives way to juicy, tender meat flavored by a subtle acidity. The visual appeal is impeccable: a gleaming crust that glistens in the light, contrasted by the soft, caramelized interior. The dish feels like a passport to comfort food, where every element—texture, aroma, sweetness, saltiness—is orchestrated in perfect harmony, echoing the bustling flavors of my Moroccan kitchen, the precision of French pastry, and the lively vibe of a NYC deli.
I’m thrilled to take you through a streamlined recipe that’s quick to prepare and delivers a satisfying crunch at every moment. This version incorporates a double-frying technique that most home cooks overlook, giving you that restaurant-like exterior. I’ll also share a pro tip for achieving an even crust, and a common mistake to avoid—frying at too low an oil temperature—which could leave your chicken soggy. Together, we’ll make a meal that feels both elegant and comforting, ready in just half an hour.
Why This Chicken Fried Chicken Recipe Is the Best
The secret to this recipe lies in the double-fry technique. After the first fry, the chicken is removed and allowed to rest in the hot oil. This second quick blast seals the exterior, creating a caramelized crust that locks in juices and makes every bite a buttery bite of deliciousness. The technique, refined during my time in a Parisian brasserie, is a key differentiator that transforms ordinary chicken into a decadent treat.
Texture is paramount. I use a light buttermilk brine infused with a splash of hot sauce and a pinch of cayenne for a subtle heat. The batter’s fine flour coating—mixed with baking powder and a dash of garlic powder—forms a crisp shell that resists tearing while delivering a satisfying crunch. The result is a harmony between crunchy and tender that feels like an edible work of art.
Being time-efficient is essential for New Yorkers, so I’ve streamlined the prep and minimized cleanup. The double-frying method eliminates the need for a deep fryer, making it accessible to any kitchen. You get the professional finish without the professional price tag. I’ve tested this recipe in a home stovetop and a commercial deep-fryer, and the outcomes are consistently golden and moist.
Chicken Fried Chicken Ingredients
I always scout the best produce at the Union Square farmers market, where I find fresh, locally sourced chicken. The spices—garlic powder, cayenne, and a smidgen of smoked paprika—are sourced from a small shop in Brooklyn that sells Moroccan‑inspired blends, marrying both cultures of my heritage.
Ingredients List
- 6‑8 thin sliced chicken breasts
- 2 cups all‑purpose flour
- 2 tsp baking powder
- 1 tsp baking soda
- 1 tsp salt
- 1 tsp pepper
- 1 tsp garlic powder
- 1 ½ cups buttermilk
- 1 egg
- 1 tbsp hot sauce
- Oil for frying (vegetable or canola)
- ¼ cup reserved oil from frying
- ⅓ cup flour (for gravy)
- 2 cups milk
- Salt & pepper, to taste
Ingredient Spotlight
Buttermilk: This acidic dairy product tenderizes the chicken, creating a punch of flavor while ensuring a moist interior. If you’re lactose intolerant, replace it with 1 ½ cups of buttermilk‑style mix (1 cup milk + 1 tbsp lemon juice). I’ve found that the substitute produces a similar custard‑like coating.
Hot Sauce: A splash of Tabasco or a local Moroccan harissa infuses a subtle heat that balances the rich flavors. If you prefer a milder version, swap the hot sauce with a pinch of cayenne pepper or smoked paprika. The result is a softer kick that still lifts the dish.
Flour Blend: The combination of all‑purpose flour, baking powder, and soda creates a light, airy batter. For a gluten‑free version, use a 1:1 blend of rice flour and cornstarch with a pinch of xanthan gum. The texture remains crisp but the flavor profile shifts slightly.
| Original Ingredient | Best Substitution | Flavor / Texture Impact |
|---|---|---|
| Buttermilk | Milk + lemon juice | Same tenderness, slightly less tang |
| Hot Sauce | Smoked paprika + cayenne | Softer heat, smoky depth |
| All‑Purpose Flour | Rice ½ + cornstarch ½ + xanthan gum | Crispy bite, but slight nutty note |
How to Make Chicken Fried Chicken — Step-by-Step
First, set up a simple station with two large bowls: one for the dry coating, one for the wet batter. This segregation keeps your fingers clean and ensures each layer stays crisp.
Step 1: Heat Oil
Fill a deep skillet or Dutch oven with about 3 inches of oil and heat to 325°F. Use a candy or deep‑fry thermometer to maintain the temperature. If you can’t reach that exact heat, aim for a steady sizzle of small bubbles across the surface.
💡 Pierre’s Pro Tip: Test your oil by dropping a small breadcrumb; it should sizzle and float immediately.
Step 2: Prepare Dry Mix
Whisk together flour, baking powder, baking soda, salt, pepper, garlic powder, and red pepper flakes in a large bowl. This dry mix forms the crunchy core of each piece.
⚠️ Common Mistake to Avoid: Skipping the sugar in the dry mix can result in a harsher, less tender chicken.
Step 3: Make Batter
In another bowl, whisk together buttermilk, egg, and hot sauce until combined. The acidity will tenderize the flesh while the egg binds the coating.
💡 Pierre’s Pro Tip: Add a small pinch of white sugar to the batter to enhance browning.
Step 4: Coat Chicken
Dredge each chicken breast in the flour mix, tap off excess, then dip into the wet batter, and return to the flour coating, pressing firmly so the crust adheres solidly. Repeat for all pieces.
⚠️ Common Mistake to Avoid: Rushing the coating process often leads to uneven crusts.
Step 5: First Fry
Carefully lower the coated chicken into the hot oil and fry each side for 3–5 minutes until golden brown. Remove and drain on a rack or paper towels. Do not overcook; the chicken is still undercooked inside after the first fry.
💡 Pierre’s Pro Tip: The first fry cooks the outside; let it rest 5 minutes before the second.
Step 6: Second Fry
Raise the oil temperature to 350°F and return the chicken to the pot. Fry for an additional 1–2 minutes per side, just enough to seal the crust. This second quick blast gives the signature crunch.
⚠️ Common Mistake to Avoid: Skipping the second fry makes the coating soggy.
Step 7: Make Gravy
Reserve ¼ cup of the cooking oil in a pan over medium‑high heat. Stir in ⅓ cup flour and cook for a minute. Gradually whisk in 2 cups milk until smooth, heating until thickened. Season with salt, pepper, and a pinch of cayenne for a bright kick.
💡 Pierre’s Pro Tip: For a richer gravy, sauté the flour in butter instead of oil.
Step 8: Plate and Serve
Serve the fried chicken on a platter and pour the warm gravy over each piece. Garnish with fresh parsley and a squeeze of lemon for brightness. Pair with mashed potatoes or a crisp green salad.
⚠️ Common Mistake to Avoid: Serving the gravy too late can cause the coating to lose its crispness.
| Step | Action | Duration | Key Visual Cue |
|---|---|---|---|
| 1 | Heat oil to 325°F | 5 mins | Oil bubbles slowly, no steam |
| 2 | Coat chicken | 10 mins | Crust adheres firmly |
| 3 | First fry | 8‑10 mins total | Golden edges, brown crust |
| 4 | Second fry | 2‑3 mins total | Smaller golden burst |
| 5 | Gravy | 5 mins | Thick silky sauce |
| 6 | Plate | 2 mins | Coating remains crisp |
Serving & Presentation
Arrange the chicken pieces on a rustic wooden board for a touch of Moroccan charm. Drizzle the warm gravy in a small copper saucepan to add a glossy finish. Snap a handful of fresh parsley for a pop of greenery—this also echoes the Moroccan herbs I grow in my kitchen garden.
Serve alongside a classic French “Pommes Purée” or a New York‑style carrot‑roast for balanced flavor. The buttery, smoky gravy pairs beautifully with the peppery undertones of the chicken and the bright freshness of the greens. A chilled glass of crisp white wine or a cold beer with a hint of spice completes the meal.
| Pairing Type | Suggestions | Why It Works |
|---|---|---|
| Side Dish | Mashed potatoes, roasted carrots, green beans | Provides soft, earthy contrast to crispy chicken |
| Sauce / Dip | Caramelized onion aioli, lemon-herb yogurt, spicy harissa aioli | Enhances both heat and freshness |
| Beverage | Chilled Sauvignon Blanc, IPA beer, sparkling water with lime | Rinses palate after rich gravy |
| Garnish | Fresh parsley, lemon zest, toasted almonds | Adds texture, color, and aroma |
Make-Ahead, Storage & Reheating
When New York is busy, my secret is prep‑and‑store. I finish the first fry, let the chicken rest, and wrap each piece in parchment. Store them in airtight containers and refrigerate up to 3 days. For longer run‑down, freeze them whole; thaw overnight and reheat with a quick second fry for crispness.
| Method | Container | Duration | Reheating Tip |
|---|---|---|---|
| Refrigerator | Tight‑sealing zip‑top bag or plastic container | 3 days | Microwave 2‑min, then finish 4‑5 min in skillet |
| Freezer | Food‑grade freezer bag | 3 months | Thaw overnight, seal with 30‑sec quick fry |
| Make-Ahead | Paper towel‑lined plate | 24 hours in advance | Reheat as above; keep gravy on stovetop until serving |
Reheating is often the trickiest part because air temperature can shrink the coating. I recommend a hot skillet over medium heat with a dash of water to create a mini steam burst, helping the crust maintain its crunch. For gravy, simply pour into a small saucepan and warm until steaming—no need to simmer too long so it doesn’t thicken too much.
Variations & Easy Swaps
| Variation | Key Change | Best For | Difficulty Impact |
|---|---|---|---|
| Spicy Harissa Crust | Swap hot sauce for harissa paste; add cumin | Spice lovers | Same |
| Gluten-Free | Use rice flour + corn starch; remove all‑purpose | GF diners | Easy |
| Herb‑Infused | Add dried oregano & thyme to coating | Herb fans | Same |
Spicy Harissa Crust
When the season is hot, I replace the standard hot sauce with North African harissa paste. The smokey heat from the paprika, cumin, and chili flakes pairs beautifully with the French flour batter, creating a flavor that bursts both in spice and in warmth. It’s a simple swap that adds a global kick without altering the basic cooking method.
Gluten-Free Version
To get a safe GF option, replace the all‑purpose flour with a 1:1 blend of riced wheat (or quinoa) flour and cornstarch, and add a pinch of xanthan gum. The texture remains crisp, while the subtle nutty undertone brightens the dish. I’ve tested it with a family member who is gluten sensitive; she loved the result.
Herb‑Infused Variant
For a green herb lift, sprinkle dried oregano and thyme into the flour coating before dredging. The herby touch is a nod to my time in the greenhouses of Marrakech, and it provides an earthy counterpoint to the sweet chicken. After a quick second fry, the chicken develops an aromatic crust that’s simply irresistible.
How do I know if the oil is hot enough?
A quick test is to drop a single breadcrumb or a pinch of the flour mixture into the oil. If it sizzles immediately and rises to the surface, the oil is around 325‑330°F, which is ideal for the first fry. If it floats slowly or doesn’t react, increase the heat slightly. Keeping the temperature consistent ensures a crisp exterior without soaking the chicken in oil, a common mistake many new cooks get right at the start.
Can I use a deep fryer instead of a skillet?
Yes, the technique works well in a deep fryer. Set the fryer to 325°F for the first fry and then a quick 350°F burst for the second fry. The deep fryer allows for a more even cooking environment and reduces the risk of uneven browning. Just remember to monitor the temperature accurately; some fryers have a thermostat that may need manual adjustment if the oil’s heat fluctuates.
What can I serve with this chicken?
A classic pairing is mashed potatoes with a splash of cream, giving a silky contrast to the crunchy exterior. Alternatively, a crisp green salad with a citrus vinaigrette helps cut through the rich gravy. A roasted carrot or parsnip medley adds sweetness, while a simple herb crusted bread complements the dish. When in doubt, anything with a mild, tangy flavor works to balance the spicy, buttery chicken.
Is this recipe suitable for a gluten‑free diet?
I’ve crafted a gluten‑free version in the variations section, substituting the all‑purpose flour with a mix of rice flour and cornstarch plus xanthan gum to maintain the crisp texture. The batter’s texture will mirror the original, while keeping the dish safe for those with celiac disease or gluten intolerance. Adjust the seasoning to taste, and the result remains deliciously moist and crunchy.
I’ve crafted a gluten‑free version in the variations section, substituting the all‑purpose flour with a mix of rice flour and cornstarch plus xanthan gum to maintain the crisp texture. The batter’s texture will mirror the original, while keeping the dish safe for those with celiac disease or gluten intolerance. Adjust the seasoning to taste, and the result remains deliciously moist and crunchy.
How do I store leftovers?
Wrap each chicken piece in parchment paper and place it in an airtight container for refrigeration. Store for up to 3 days. For longer storage, freeze the coated chicken in a freezer‑grade bag; thaw overnight, then re‑heat in a hot skillet or oven to revive the crispness. If you’re re‑heating with a gravy, keep the gravy on the stove until it’s steaming hot to prevent the crust from becoming soggy.
What kind of oil should I use for frying?
Choose an oil with a high smoke point like canola, peanut, or sunflower oil. These oils can maintain the 325‑350°F temperatures required for frying without imparting a strong flavor that could overpower the chicken. In a pinch, vegetable oil works well too, but it may have a slightly sweeter note. Keep the oil fresh and change it after about 5‑6 fry cycles to preserve taste and texture.
How can I achieve an extra crispy crust?
The secret lies in the double‑frying step and the coating consistency. Press down the flour onto the chicken after the liquid bath to create a thick, adhered crust. Let the first fry sear the surface, then let the chicken rest briefly before the second, high‑heat fry. Also, removing excess coating before the first fry helps the oil reach the meat efficiently. Finally, avoid overcrowding the pan; adding too many pieces at once lowers the temperature and yields a soggy crust.
Can I use a lower temperature for frying?
Using a lower temperature (e.g., 300°F) will cause the coating to absorb more oil and become greasy, while the inside may not cook quickly enough and risk food safety. The 325‑350°F range balances a golden crust with a fully cooked interior. If you need to lower the heat, adjust the time—allow each side 4‑5 minutes—though be vigilant to prevent the chicken from drying out.
What happens if I use whole chicken pieces instead of sliced breasts?
Whole thighs or legs can be cooked similarly, but the cooking times will differ due to varying thickness. Adjust the frying time to ensure the meat reaches an internal temperature of 165°F without overcooking the exterior. Smaller cuts like wings also work; just be sure they’re evenly coated and that oil temperature is consistent so every piece crisps simultaneously.
Where can I find high‑quality buttermilk?
You can source real buttermilk at most grocery stores in the dairy aisle or purchase a “buttermilk” flavoring mix that replicates the acid content. If you prefer the fermented version, check specialty markets like Whole Foods or local farmers’ markets for pasture‑raised dairy products. A simple buttermilk substitute is milk plus a tablespoon of vinegar or lemon juice; let it sit for 5 minutes before using.
You can source real buttermilk at most grocery stores in the dairy aisle or purchase a “buttermilk” flavoring mix that replicates the acid content. If you prefer the fermented version, check specialty markets like Whole Foods or local farmers’ markets for pasture‑raised dairy products. A simple buttermilk substitute is milk plus a tablespoon of vinegar or lemon juice; let it sit for 5 minutes before using.
Share Your Version!
I’d love to taste you’re own take on this chicken fried chicken. Drop a star rating in the comments below, let me know what variations you tried, and share a photo on Instagram or Pinterest — don’t forget to tag @spicemingle. If you tweaked the spice level or used a different type of oil, share your results — I’m always curious how a small change can create a whole new flavor profile.
From my NYC kitchen to yours — I hope this recipe brings as much warmth to your table as it does to mine. — Pierre 🧡
Love This Recipe? Save It to Pinterest!
If you enjoyed this Chicken Fried Chicken recipe, don’t let it get lost in your browser tabs! 😄 Pin it now so you can find it again anytime — and explore hundreds more tried-and-tested recipes waiting for you on my Pinterest boards.
👉 Follow Pierre on Pinterest @chefrecipes2
📌 Pin this recipe · 🔁 Re-pin your favorites · 💬 Tag me when you make it — I love seeing your creations!

Chicken Fried Chicken
Description
Easy and delicious this Chicken Fried Chicken is a quick and flavorful dinnertime recipe that brings the whole family to the table, with minimal ingredients it’s a simple and comforting meal.
Ingredients
- 6–8 thin sliced chicken breasts
- 2 cups flour
- 2 tsp baking powder
- 1 tsp baking soda
- 1 tsp salt
- 1 tsp pepper
- 1 tsp garlic powder
- 1 1/2 cup buttermilk
- 1 egg
- 1 Tbs hot sauce
- Oil for frying
- 1/4 cup reserved oil from frying
- 1/3 cup flour
- 2 cup milk
- Salt & pepper
Instructions
- Heat oil in deep fryer or large pan on stove (a few inches deep) to 325.
- In large bowl whisk together your flour, baking powder, baking soda, salt, pepper and garlic powder.
- In another bowl whisk together buttermilk, egg and hot sauce.
- Dredge your chicken in the flour mixture then dip into the egg mixture than back into the flour mixture making sure to press down flour to get stuck on the steak real good.
- Place chicken in pan/deep fryer and fry on each side 3-5 minutes until golden brown, remove and drain on paper towel lined plate, repeat with all chicken.
- To make your gravy, in large pan add 1/4" of oil from cooking and heat on medium-high, stir in your flour until absorbed and cook for about 1 minute.
- Slowly add in your milk whisking to blend and heat until thickened then stir in salt and pepper to desired taste.
- Pour gravy over individual chicken before serving.



