Table of Contents
Baked Parmesan Zucchini Fries: Crispy Summer Sides — A Game-Changing Twist from My Kitchen
The first time I made crispy baked Parmesan zucchini fries, I was standing in my mother’s tiny kitchen in Marrakech, surrounded by the scent of cumin and sizzling olive oil. She had just handed me a pile of summer zucchini from the souk, and I was itching to try something new—something that married the crunchy, golden textures I’d learned in Paris with the fresh, sun-drenched produce of my childhood. That’s when I created this recipe: a foolproof way to turn humble zucchini into a addictive, oven-baked side that rivals any fried favorite. Not just another vegetable side dish: crispy baked Parmesan zucchini fries are the best way to make this summer star shine, and I’m going to show you exactly how to nail it every time.
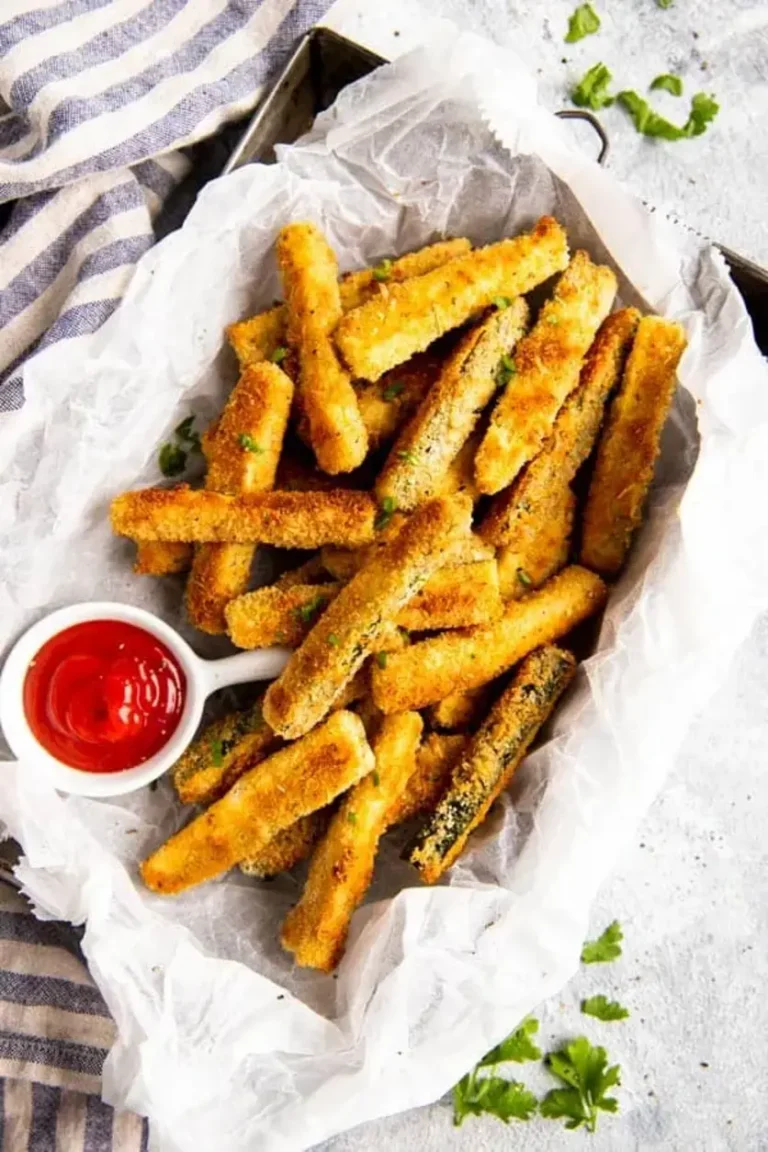
Imagine biting into a perfectly golden, crunchy exterior that shatters to reveal a tender, juicy zucchini interior—each piece kissed by nutty Parmesan and fragrant Italian seasoning. The breadcrumb-Parmesan coating is deeply savory, with just a whisper of garlic and black pepper, while the zucchini itself stays sweet and slightly firm. As they bake, the kitchen fills with the warm, toasty aroma of cheese and herbs—a promise of the crisp, satisfying bite to come. I learned in Paris that the key to any great dish is layering texture, and here I use a three-step breading station (flour, egg, breadcrumbs) to build that irresistible crunch that rivals any deep-fried version, but without the grease.
You might think oven-baked fries are tricky—I’ve seen so many turn out soggy and sad. But my version, honed during my years as a professional cook in NYC, eliminates that risk with one critical technique: the right baking surface. I’ll share my secret for perfect crispiness (hint: avoid parchment paper and silicone mats) and walk you through a simple, three-step breading method that even beginners can master. Plus, I’ll reveal a common mistake to avoid that could ruin your batch. Trust me, after one bite of these crunchy, cheesy fries, you’ll never look at zucchini the same way again.
Why This Baked Parmesan Zucchini Fries Recipe Is the Best
The flavor secret is in the double dose of Parmesan and Italian seasoning. Unlike many recipes that skimp on cheese, I use a generous 1/3 cup of grated Parmesan mixed into the breadcrumb coating and a touch of garlic powder in every layer. This gives each fry a deep, savory richness that caramelizes in the oven, creating a crust that’s both crunchy and intensely flavorful. It’s a technique I borrowed from classic French gratinée—a little cheese goes a long way when you layer it properly.
Perfected texture comes from the three-step breading process: a thin flour dusting to dry the zucchini, a beaten egg wash to bind, and a thick, herby breadcrumb coating for maximum crunch. During my training at Le Cordon Bleu in Paris, I learned that the spacing of the crumb matters—too tight and it gets soggy, too loose and it falls off. My method creates a perfect matrix that stays crispy even after 20 minutes in a hot oven. The key is to coat each fry generously, almost like you’re building a little armor of flavor.
Foolproof and fast—this recipe is designed for busy weeknights when you want something impressive without the fuss. With just 15 minutes of prep and 20 minutes of baking, you can have a restaurant-quality side dish on the table. It’s forgiving enough for beginners (the flour helps the egg stick, and the egg helps the breadcrumbs cling) but refined enough to impress dinner guests. I’ve tested it with my own NYC clients, and even the pickiest eaters go back for seconds.
Baked Parmesan Zucchini Fries Ingredients
I pick up my zucchini from the Union Square Greenmarket in Manhattan—those little summer squashes with firm, glossy skin and a sweet, milky interior. The best zucchini are about 6–8 inches long, with no soft spots or blemishes. For the Parmesan, I always reach for a block of Parmigiano-Reggiano from Murray’s Cheese shop in the West Village; pre-shredded cheese often contains anti-caking agents that dull the flavor. This recipe is a celebration of simple, quality ingredients that come together beautifully.
Ingredients List
- cooking spray OR oil (for greasing the baking sheet)
- 1/3 cup all-purpose flour
- 1/2 teaspoon garlic powder (for the flour mix)
- 1/4 teaspoon salt (for the flour mix)
- 1 large egg
- 3/4 cup plain breadcrumbs (or panko for extra crunch)
- 1/3 cup grated Parmesan cheese
- 1 tablespoon Italian seasoning
- 1/2 teaspoon garlic powder (for the breadcrumb mix)
- 1/4 teaspoon salt (for the breadcrumb mix)
- ground black pepper to taste
- 1 pound zucchini (about 2 medium), cut into 1/2-inch sticks
Ingredient Spotlight
Zucchini: The star of the show. Choose firm, unblemished zucchini with bright green skin. Avoid oversized ones (they can be watery and seedy). Summer squash or yellow squash work identically—both have the same moisture content and texture. For a fun twist, try heirloom varieties like Costata Romanesco.
Parmesan Cheese: The flavor backbone. Always grate fresh from a block—pre-grated versions lack the nutty, umami punch. Pecorino Romano works as a substitute for a saltier, sharper taste. For a dairy-free version (with slightly less browning), use nutritional yeast or a high-quality vegan Parmesan.
Breadcrumbs: The crunch maker. Plain breadcrumbs give a classic, even coating. For extra crispy results, swap in panko breadcrumbs (Japanese-style)—they create a lighter, airier crunch. Gluten-free breadcrumbs (like those from Ian’s or a simple almond meal) also work, though the crust may be slightly denser.
Italian Seasoning: The aromatic lift. This blend typically includes oregano, basil, rosemary, and thyme. If you don’t have it, mix 1 teaspoon dried oregano + 1 teaspoon dried basil + 1/2 teaspoon dried thyme. For a Moroccan twist, add 1/2 teaspoon ground cumin to the breadcrumb mix—it’s a flavor my mother swore by.
| Original Ingredient | Best Substitution | Flavor / Texture Impact |
|---|---|---|
| Zucchini | Yellow squash or pattypan squash | Similar texture and moisture; yellow squash is slightly sweeter. |
| Parmesan cheese | Pecorino Romano or vegan Parmesan | Pecorino: saltier, sharper. Vegan: less browning, slightly nuttier. |
| Breadcrumbs | Panko breadcrumbs or gluten-free breadcrumbs | Panko: lighter, airier crunch. GF: slightly denser, more rustic. |
| Italian seasoning | Dried oregano + basil + thyme + cumin | Cumin adds a warm, Moroccan-inspired note that pairs beautifully. |
How to Make Baked Parmesan Zucchini Fries — Step-by-Step
This is a straightforward process, but the little details—like the order of breading and the baking surface—make all the difference. Follow along, and you’ll have a pan of perfectly golden, crunchy fries in no time.
Step 1: Prep the Oven and Baking Sheet
Preheat your oven to 425°F. Coat a large baking sheet generously with cooking spray or a thin layer of oil. I recommend lining the sheet with aluminum foil for easy cleanup—though the fries may be slightly less crispy. Do not use silicone baking mats or parchment paper, as they trap moisture and lead to soggy fries. The direct heat from the metal sheet is essential for browning.
💡 Pierre’s Pro Tip: For extra crispy results, place the baking sheet in the oven while it preheats. The hot surface will help the zucchini sear immediately when placed down.
Step 2: Set Up Your Breading Station
In a shallow dish (or a large zip-loc bag), combine the 1/3 cup flour, 1/2 teaspoon garlic powder, and 1/4 teaspoon salt. In a second shallow dish, beat the egg well with a fork until frothy. In a third dish—I like using a 7×11 baking pan for easy dipping—mix together the 3/4 cup breadcrumbs, 1/3 cup grated Parmesan, 1 tablespoon Italian seasoning, 1/2 teaspoon garlic powder, 1/4 teaspoon salt, and a generous grind of black pepper. Have a clean plate or tray ready for the coated fries.
⚠️ Common Mistake to Avoid: Don’t skip the flour step! It might seem unnecessary, but the thin flour layer helps the egg stick to the zucchini surface, preventing the breading from peeling off during baking.
Step 3: Coat the Zucchini Fries
Working with a handful of zucchini sticks at a time, toss them in the flour mixture (shake off excess), then dip into the beaten egg, letting the excess drip off. Finally, press each stick into the breadcrumb mixture, coating all sides generously. Place the coated fries on the prepared baking sheet in a single layer—don’t overcrowd, or they’ll steam instead of crisp. Repeat with all the zucchini.
💡 Pierre’s Pro Tip: Use one hand for the dry ingredients (flour and breadcrumbs) and the other for the egg. This keeps your hands from getting too messy and prevents clumping.
Step 4: Bake to Perfection
Bake the fries for 20 minutes, flipping them halfway through (at the 10-minute mark) using tongs or an offset spatula. They should be golden brown and crispy on the outside, tender on the inside. If any stick to the pan, don’t rip them off—use an offset spatula to gently loosen them. A well-greased sheet should prevent sticking. Serve immediately while hot and crunchy.
⚠️ Common Mistake to Avoid: Don’t skip the flip! The bottom of the fries will brown faster than the top. Turning them ensures even cooking and all-around crispiness.
| Step | Action | Duration | Key Visual Cue |
|---|---|---|---|
| 1 | Prep oven and sheet | 5 mins | Oven reaches 425°F; sheet is greased and shiny. |
| 2 | Set up breading station | 5 mins | Three dishes ready: flour, egg, breadcrumbs. |
| 3 | Coat zucchini fries | 10–12 mins | Each fry is evenly coated; no dry spots. |
| 4 | Bake | 20 mins | Golden brown, crispy edges; flip after 10 mins. |
Serving & Presentation
These fries are best served hot, straight from the oven, when the crunch is at its peak. Arrange them on a platter lined with a clean kitchen towel to catch any excess oil—a trick I picked up from a street vendor in Marrakech. Garnish with a sprinkle of fresh parsley or basil for a pop of color, and serve with a side of your favorite dip. For a truly stunning presentation, stack them in a rustic pile on a wooden board, or serve in a paper cone for a fun, casual vibe.
In my NYC kitchen, I love pairing these fries with a cooling dip like ranch dressing, a tangy marinara, or a dollop of garlic aioli for a French twist. They’re perfect as a side for grilled chicken, burgers, or a simple salad. And if you’re hosting a party, they make an incredible appetizer—just double the batch because they disappear fast.
| Pairing Type | Suggestions | Why It Works |
|---|---|---|
| Side Dish | Grilled chicken, roasted fish, veggie burgers | The crunch contrasts with tender mains; neutral flavor complements all. |
| Sauce / Dip | Ranch, marinara, garlic aioli, tzatziki | Creamy or tangy dips balance the savory Parmesan crust. |
| Beverage | Sparkling water with lemon, crisp white wine (Sauvignon Blanc), iced green tea | Light, acidic drinks cut through the richness of the cheese coating. |
| Garnish | Fresh parsley, basil, chopped chives, lemon zest | Herbs add freshness; lemon zest brightens the whole dish. |
Make-Ahead, Storage & Reheating
Plan ahead for busy weeknights without sacrificing texture. These fries are best fresh, but I’ve tested a few methods to keep them crispy when needed. As a busy NYC food blogger, I often prep the breaded, unbaked fries and store them in the fridge—then bake just before serving.
| Method | Container | Duration | Reheating Tip |
|---|---|---|---|
| Refrigerator | Airtight container lined with paper towels | Up to 3 days
Print Baked Parmesan Zucchini FriesDescriptionNot just another vegetable side dish: Crispy Baked Parmesan Zucchini Fries are the best way to make this summer star! Ingredients
Scale
Instructions
About Me Hey! I’m Pierre, the heart behind Meaty Delights. Cooking has always been my passion, and I love creating bold, flavorful recipes that make every meal truly memorable.
Recent Recipes |


