“`html
Table of Contents
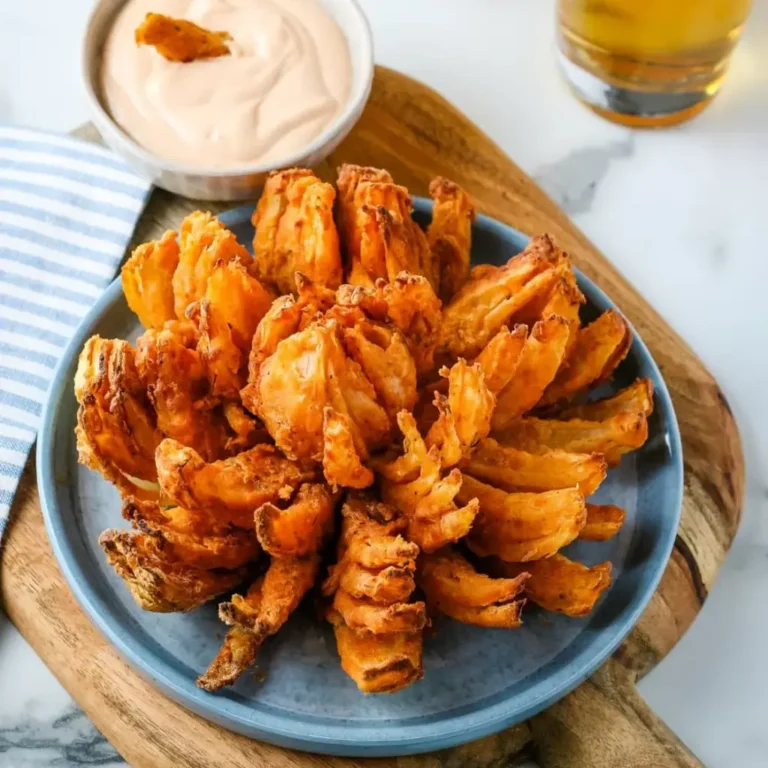
Air Fryer Blooming Onion – Restaurant Quality at Home
Growing up in Morocco, my mother always found a way to elevate simple ingredients into something magical. This Air Fryer Blooming Onion is a nod to those evenings – a dish that’s visually stunning and bursting with flavor. I’ve taken the classic restaurant appetizer and streamlined it for the home cook, using the air fryer to achieve that perfect crispy texture without the mess of deep frying. It’s a fun, shareable appetizer that’s sure to be a hit!
Imagine slicing into this golden-brown beauty, the layers gently giving way to reveal a tender, oniony heart. The aroma of paprika and cayenne pepper fills the air, hinting at the spicy-sweet explosion to come. Each petal is perfectly crisp, offering a satisfying crunch with every bite. This isn’t just an appetizer; it’s an experience. My time training in Paris taught me that presentation is everything, and this dish delivers on spectacle.
I’ve perfected this recipe over several iterations, focusing on achieving a consistently crispy exterior and a tender interior. Many recipes fall short on texture, resulting in a soggy onion. I’ll share my secrets, including a double-breading technique and the importance of a good oil spray. Plus, I’ll point out a common mistake to avoid—trust me, you don’t want to skip the resting period! Let’s get started, and bring a little restaurant magic to your kitchen.
Why This Air Fryer Blooming Onion Recipe Is the Best
The secret to this Air Fryer Blooming Onion lies in the spice blend, a subtle nod to the vibrant spices of my North African heritage. Paprika, cumin, and a touch of cayenne create a warm, complex flavor profile that complements the sweetness of the onion beautifully. It’s a far cry from the bland, often greasy versions you find elsewhere.
Achieving the perfect texture requires a bit of technique. My double-breading method, learned through years of culinary training, ensures a consistently crispy exterior that holds up beautifully even with the air fryer’s circulating heat. The key is to press the flour mixture firmly onto the onion petals, creating a robust coating that won’t fall off during cooking. Patience is key!
This recipe is incredibly foolproof, even for beginner cooks. The air fryer eliminates the need for messy deep frying, and the step-by-step instructions, coupled with my pro tips, will guide you through the process with ease. It’s a quick and convenient appetizer that’s guaranteed to impress, making it perfect for game day gatherings or a casual weeknight snack.
Air Fryer Blooming Onion Ingredients
I love sourcing my produce from Union Square Greenmarket here in New York City when in season, but you can find great sweet onions at most well-stocked grocery stores. The quality of the onion really does make a difference! Remember to look for one that’s firm and free from blemishes.
Ingredients List
- 1 large sweet onion
- 2 ½ cups all-purpose flour
- 1 tablespoon paprika
- 1 teaspoon cayenne pepper
- ½ teaspoon ground cumin
- ½ teaspoon dried thyme
- ½ teaspoon dried oregano
- 2 large eggs
- 1 cup milk
- 1 cup water
- Salt and pepper to taste
- Oil in a spray bottle
Ingredient Spotlight
Sweet Onion: Opt for a large, firm sweet onion like Vidalia or Walla Walla. These varieties have a higher sugar content, which caramelizes beautifully during cooking, resulting in a sweeter, more flavorful onion. If you can’t find a sweet onion, a yellow onion will work in a pinch, but the flavor won’t be quite as nuanced.
Paprika: I prefer Spanish smoked paprika (pimentón) for a deeper, smokier flavor, but regular paprika works well too. The paprika is essential for giving the blooming onion that classic restaurant look and taste. Don’t substitute with chili powder, as it will be too spicy.
All-Purpose Flour: Provides the base for the crispy coating. You can substitute with a gluten-free all-purpose blend, but the texture might be slightly different. I’ve tested this with Bob’s Red Mill 1-to-1 baking flour with good results. Add a teaspoon of cornstarch to the flour blend if possible, to aid in crisping.
| Original Ingredient | Best Substitution | Flavor / Texture Impact |
|---|---|---|
| Sweet Onion | Yellow Onion | Slightly less sweet flavor. |
| Smoked Paprika | Sweet Paprika | Less smoky depth, but still delivers color and aroma. |
| All-Purpose Flour | Gluten-Free 1-to-1 Blend | Texture may be slightly softer. |
How to Make Air Fryer Blooming Onion — Step-by-Step
Let’s get started! This recipe is more about technique than complex skills. Follow these steps carefully, and you’ll be enjoying a restaurant-quality blooming onion in no time.
Step 1: Preparing the Onion
Slice the onion to make it bloom. Start by cutting off 1/2 inch from the top of the onion, then peel the outer skin from the onion.
💡 Pierre’s Pro Tip: Make sure to cut off just enough of the top – you want to leave the root end intact, as this will hold the petals together during cooking.
Step 2: Making the Battering Mixture
Place the onion cut-side down. Starting about 1/2 inch from the root, make a downward cut all the way through to the cutting board.
⚠️ Common Mistake to Avoid: Don’t cut all the way through the root! The root end needs to stay intact to hold all the petals together.
Step 3: Coating the Onion with Flour
Repeat to make four evenly spaced cuts around the onion. Make 3 additional cuts between each section until you have 16 evenly spaced cuts.
💡 Pierre’s Pro Tip: The number of cuts don’t have to be exact, but strive for equal spacing to ensure even cooking.
Step 4: Coating the Onion with Egg Mixture
Turn the onion over and set aside for 5 minutes to allow the petals to relax.
⚠️ Common Mistake to Avoid: Don’t skip the resting period! This allows those petals to separate for optimal breading.
Step 5: Final Coating
Prior to breading use your fingers to gently separate the outer pieces.
Step 6: Resting the Onion
Whisk the flour, paprika, cayenne, cumin, thyme, oregano, salt and pepper in a large bowl. In a medium deep bowl, whisk the eggs, milk, and water.
💡 Pierre’s Pro Tip: Taste the flour mixture and adjust seasonings as needed to create a flavor profile you love.
Step 7: Air Frying the Onion
Place the onion in a clean bowl, cut-side up, and pour the flour mixture on top. Using a large spoon to coat the onion with the flour mixture, especially between the onion petals. Turn the onion over and pat off the excess flour. Reserve the bowl of flour.
Put the onion in the egg mixture and coat evenly. Remove and let the excess drip off. Then transfer the onion back into the reserved flour mixture and repeat the flouring process. Be sure you gently tap off extra flour. There will be leftover flour in the bowl when you are done. Place the onion in the refrigerator.
| Step | Action | Duration | Key Visual Cue |
|---|---|---|---|
| 1 | Prepare Onion | 5 mins | Petals are separated. |
| 2 | Make Batter | 5 mins | Smooth, consistent mix. |
| 3 | Bread Onion (1st Coat) | 5 mins | Evenly coated in flour. |
| 4 | Egg Wash | 2 mins | Fully submerged, excess drips off. |
| 5 | Bread Onion (2nd Coat) | 3 mins | Thick, even coating. |
| 6 | Rest in Fridge | 10 mins | Chilled, firm to touch. |
| 7 | Air Fry | 25 mins | Golden brown and crispy. |
Serving & Presentation
The beauty of this dish lies in its dramatic presentation. I like to serve it on a large platter, surrounded by a ramekin of creamy dipping sauce (a spicy mayo works beautifully). A sprinkle of fresh chives adds a pop of color and freshness. In the bustling brasseries of Paris, presentation is never an afterthought — and it shouldn’t be here either!
Pair it with a crisp, dry white wine like Sauvignon Blanc to cut through the richness. A side of garlic fries or a simple green salad completes the meal. Consider a spicy ranch dipping sauce—a nod to the American diners I frequent here in New York—or a classic French aioli for a touch of elegance.
| Pairing Type | Suggestions | Why It Works |
|---|---|---|
| Side Dish | Garlic Fries, Coleslaw | Complements the spicy flavor. |
| Sauce / Dip | Spicy Mayo, Ranch, Aioli | Adds creaminess and flavor contrast. |
| Beverage | Sauvignon Blanc, Iced Tea | Cuts through the richness. |
| Garnish | Fresh Chives, Parsley | Adds color and freshness. |
Make-Ahead, Storage & Reheating
As a busy New Yorker, I’m always looking for ways to streamline my cooking process. While this is best served immediately, you can prep some components ahead of time to save time. The spice blend can be mixed a day or two in advance and stored in an airtight container. The onion can be prepped (cut, but not breaded) a few hours ahead, stored in water to prevent browning.
| Method | Container | Duration | Reheating Tip |
|---|---|---|---|
| Refrigerator | Airtight container | Up to 2 days | Re-air fry for 5-7 minutes to crisp up. |
| Freezer | Freezer-safe container | Up to 1 month | Re-air fry from frozen for 10-12 minutes. |
| Make-Ahead | Bowl of Ice Water | Up to 2 hours | Drain and pat dry before breading. |
Keep in mind that the texture will degrade with time, so it’s best enjoyed fresh. If reheating, be sure to spray it with a little oil to help restore some of the crispness.
Variations & Easy Swaps
| Variation | Key Change | Best For | Difficulty Impact |
|---|---|---|---|
| Spicy Blooming Onion | Increase cayenne pepper | Spice lovers | Easy |
| Gluten-Free Blooming Onion | Use gluten-free flour | Gluten-free diet | Easy |
| Mediterranean Blooming Onion | Add oregano and feta cheese | Flavor exploration | Medium |
Spicy Blooming Onion
For those who like a real kick, increase the cayenne pepper to 2 teaspoons or add a pinch of chili flakes to the flour mixture. This variation is reminiscent of the spicy harissa pastes I grew up with in Morocco, offering a delightful heat that complements the sweetness of the onion.
Gluten-Free Blooming Onion
To make this recipe gluten-free, simply substitute the all-purpose flour with a gluten-free all-purpose blend. I recommend using a blend that contains xanthan gum for the best results, as it helps to bind the ingredients together. The texture might be slightly different, but the flavor will still be fantastic.
Mediterranean Blooming Onion
Add a Mediterranean twist by incorporating dried oregano into the flour mixture. After frying, sprinkle the blooming onion with crumbled feta cheese and a drizzle of olive oil. This variation takes inspiration from the fresh, vibrant flavors of the Mediterranean and adds a delightful salty tang.
Can I make this blooming onion ahead of time?
While this is best served immediately for optimal crispiness, you can prep some steps ahead! The spice blend can be mixed a day or two in advance. You can also slice the onion (and store it in a bowl of ice water to prevent browning) up to 2 hours before you plan to bread it. Just ensure you fully dry the onion before coating.
Can I bake this blooming onion instead of air frying?
Yes, you can! Preheat your oven to 400°F (200°C). Place the breaded onion on a baking sheet lined with parchment paper and bake for 20-25 minutes, flipping halfway through. Keep in mind that baking won’t achieve the same level of crispiness as air frying, but it’s a good alternative if you don’t have an air fryer. Spray it with oil during baking to help with the crisping.
What’s the best dipping sauce for a blooming onion?
There are so many delicious options! A classic creamy horseradish sauce is a favorite. However, a spicy mayo, ranch dressing, or even a tangy barbecue sauce works wonderfully. I personally love a French aioli—the garlic pairs beautifully with the onion. Feel free to experiment and find your perfect match!
How do I prevent the onion from falling apart?
The key is to leave the root end intact—this holds the petals together. Also, be gentle when separating the petals. Don’t force them apart! The resting period after slicing is also crucial, as it allows the petals to relax. Thoroughly coating the onion with the flour and egg mixture helps everything stay together as well.
Can I use a different type of onion?
While a sweet onion (like Vidalia or Walla Walla) is ideal due to its sugar content, you *can* use a yellow onion. Just know that the flavor won’t be as sweet or have as much depth. Red onions are not recommended as they can become bitter when cooked. A large white onion would also provide a similar result to a yellow onion.
Why is my blooming onion soggy?
Sogginess is likely due to not getting a crispy enough coating or overcrowding the air fryer. Ensure you coat the onion thoroughly with flour and egg, pressing to adhere. Avoid overcrowding the basket—work in batches if necessary. And remember to spray generously with oil—this is *crucial* for achieving that golden-brown crispiness.
I don’t have an air fryer, can I deep fry it?
While this recipe is optimized for air frying, you *can* deep fry it. Heat about 3 inches of oil to 350°F (175°C). Carefully lower the breaded onion into the hot oil and fry for 3-5 minutes, until golden brown and crispy. Drain on paper towels before serving—but be aware deep frying will result in a much oilier finished product.
Can I adjust the spice level?
Absolutely! Feel free to adjust the amount of cayenne pepper or add a pinch of chipotle powder for a smoky heat. If you prefer a milder flavor, you can omit the cayenne pepper altogether. You can also control the heat in your dipping sauce – a spicy mayo provides a nice balance to the sweetness of the onion!
Share Your Version!
I absolutely love seeing your takes on my recipes! If you try this Air Fryer Blooming Onion, please leave a star rating and let me know how it turned out in the comments below. Share a picture of your creation on Instagram or Pinterest and tag @spicemingle! I’m always happy to answer questions and help you achieve bloom-fection. What dipping sauce did *you* try?
From my NYC kitchen to yours — I hope this recipe brings as much warmth to your table as it does to mine. — Pierre 🧡
Love This Recipe? Save It to Pinterest!
If you enjoyed this Air Fryer Blooming Onion recipe, don’t let it get lost in your browser tabs! 😄 Pin it now so you can find it again anytime — and explore hundreds more tried-and-tested recipes waiting for you on my Pinterest boards.
👉 Follow Pierre on Pinterest @spicemingle
📌 Pin this recipe · 🔁 Re-pin your favorites · 💬 Tag me when you make it — I love seeing your creations!
“`
Print
Air Fryer Blooming Onion
Description
Learn how to make this restaurant quality appetizer at home for a fun game day snack that your family and friends will love!
Ingredients
- 1 large sweet onion
- 2 ½ cups all-purpose flour
- 1 tablespoon paprika
- 1 teaspoon cayenne pepper
- ½ teaspoon ground cumin
- ½ teaspoon dried thyme
- ½ teaspoon dried oregano
- 2 large eggs
- 1 cup milk
- 1 cup water
- Salt and pepper to taste
- Oil in a spray bottle
Instructions
- Slice the onion to make it bloom. Start by cutting off 1/2 inch from the top of the onion, then peel the outer skin from the onion.
- Place the onion cut-side down. Starting about 1/2 inch from the root, make a downward cut all the way through to the cutting board.
- Repeat to make four evenly spaced cuts around the onion. Make 3 additional cuts between each section until you have 16 evenly spaced cuts.
- Turn the onion over and set aside for 5 minutes to allow the petals to relax.
- Prior to breading use your fingers to gently separate the outer pieces.
- Whisk the flour, paprika, cayenne, cumin, thyme, oregano, salt and pepper in a large bowl. In a medium deep bowl, whisk the eggs, milk, and water.
- Place the onion in a clean bowl, cut-side up, and pour the flour mixture on top. Using a large spoon to coat the onion with the flour mixture, especially between the onion petals. Turn the onion over and pat off the excess flour. Reserve the bowl of flour.
- Put the onion in the egg mixture and coat evenly. Remove and let the excess drip off.
- Then transfer the onion back into the reserved flour mixture and repeat the flouring process. Be sure you gently tap off extra flour. There will be leftover flour in the bowl when you are done.
- Place the onion in the refrigerator.
- Preheat the air fryer for 10 minutes to 350ºF.
- Remove the onion from the refrigerator and spray generously with vegetable oil from a spray bottle.
- After making a sling from a sheet of aluminum foil transfer the onion cut side up into the fryer basket.
- Set the timer for 25 minutes and cook. Spray the onion with the cooking oil 2-3 times as you cook it. If any spots still have visible flour spray them with the oil.
- After 25 minutes remove onion using the aluminum foil sling and season with salt and pepper.
- Serve with the blooming onion dip.