“`html
Table of Contents
Chocolate Peanut Butter Cookies: A Delicious Blend – The Ultimate Comfort Bake
Growing up in Morocco, my mother always said a little sweetness can brighten any day. That spirit moved with me to Paris, where I learned the precision of French baking, and now it finds a home in my New York City kitchen. These Chocolate Peanut Butter Cookies are born from this heritage, a delightful marriage of flavors that evokes warm memories and satisfies any sweet craving. The unique blend of rich chocolate and creamy peanut butter, made perfectly tender with a few simple techniques, makes these cookies a household favorite.
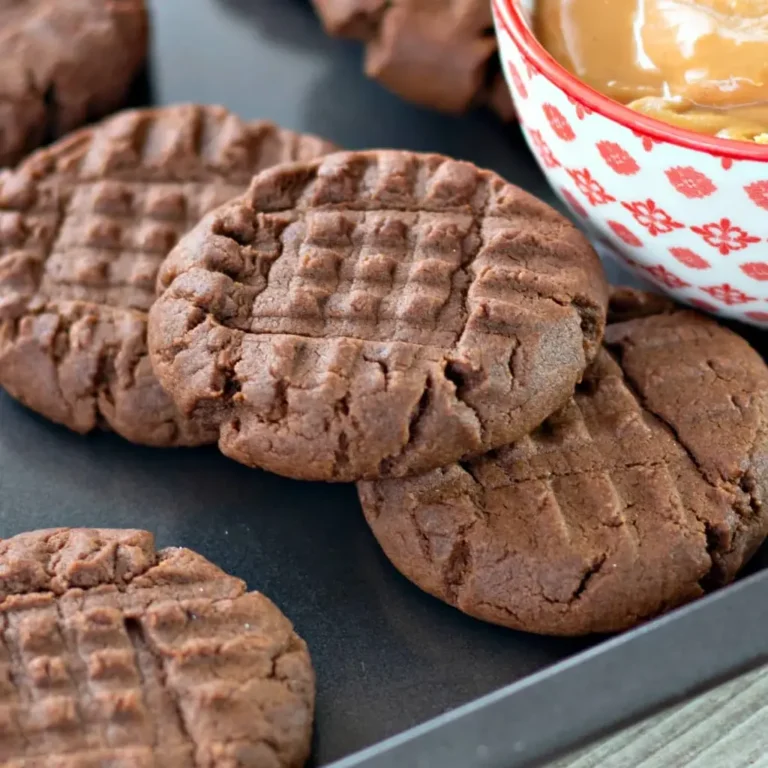
Imagine sinking your teeth into a soft, chewy cookie. The aroma of cocoa dances with the nutty scent of peanut butter. The texture is a beautiful contrast – slightly crisp edges giving way to a soft, melt-in-your-mouth center. I use a touch of brown sugar, which not only adds moisture but also creates a subtle molasses note that elevates the entire flavor profile. It’s a symphony of textures and tastes, truly irresistible.
As a professional cook, I’ve spent years perfecting classic recipes. This isn’t just *another* peanut butter cookie recipe. I’ve made subtle, crucial adjustments to the technique– ensuring these cookies stay soft and chewy every single time. I’ll share my pro-tip for guaranteeing perfectly tender cookies, and also point out a common mistake to avoid. Trust me, once you try them, you won’t go back!
Why This Chocolate Peanut Butter Cookies Recipe Is the Best
The secret to these outstanding cookies lies in the quality of the ingredients and a strategic use of brown sugar. I always opt for a creamy, natural peanut butter – the kind you have to stir – for the most robust flavor. Years of training as a pastry chef taught me that the quality of your ingredients directly impacts the final product. These cookies are a testament to that principle.
Achieving that perfect, soft-baked texture isn’t accidental. The key is to *slightly* underbake them. Rather than relying solely on time, I recommend looking for the edges to set but the center to remain slightly soft. Carrying over the technique of ‘fridge resting’ from French baking, resting the dough for even 30 minutes before baking firms up the fat and produces a thicker, chewier cookie.
This recipe is incredibly foolproof, even for beginner bakers. The instructions are clear, concise, and accompanied by helpful tips. I’ve streamlined the process so you can enjoy warm, freshly baked cookies without spending hours in the kitchen. It’s the perfect treat for a weeknight dessert or a weekend baking project.
Chocolate Peanut Butter Cookies Ingredients
I love sourcing my ingredients at the Union Square Greenmarket here in New York City. The quality and freshness are unparalleled. However, you can easily find fantastic ingredients at any well-stocked grocery store. A good quality peanut butter is key here; I always go for the ones with only peanuts and perhaps a touch of salt.
Ingredients List
- ½ cup shortening (regular or butter flavor)
- ¾ cup creamy peanut butter
- 1 ½ cups brown sugar (packed)
- 3 tablespoons milk
- 1 teaspoon vanilla extract
- 1 large egg
- 1 ¼ cups all-purpose flour
- ½ cup unsweetened cocoa powder
- 1 teaspoon baking soda
- ½ teaspoon salt
Ingredient Spotlight
Peanut Butter: Using a creamy, natural peanut butter elevates the flavor significantly. Ensure it’s well-stirred if oil separation has occurred. If you only have crunchy peanut butter, you can use it, but the texture of the cookies will be slightly different.
Cocoa Powder: High-quality unsweetened cocoa powder is crucial for a rich chocolate flavor. Dutch-processed cocoa powder will provide a darker color and a milder flavor, while natural cocoa powder will have a more intense, slightly acidic taste.
Brown Sugar: Brown sugar adds moisture and chewiness thanks to its molasses content. Light or dark brown sugar can be used; dark brown will impart a deeper molasses flavor. Don’t substitute granulated sugar as it will impact the texture.
| Original Ingredient | Best Substitution | Flavor / Texture Impact |
|---|---|---|
| Creamy Peanut Butter | Crunchy Peanut Butter | Slightly different texture; cookies will have bits of peanuts. |
| Unsweetened Cocoa Powder | Dutch-processed Cocoa Powder | Milder chocolate flavor, darker color. |
| Brown Sugar | Granulated Sugar + Molasses | May result in a crunchier cookie and lack of molasses flavor. |
How to Make Chocolate Peanut Butter Cookies — Step-by-Step
Let’s begin! This recipe is simpler than it looks, and with a few key steps, you’ll be enjoying warm, delicious cookies in no time.
Step 1: Preheat the Oven
Preheat your oven to 375°F (190°C). Line a baking sheet with parchment paper.
💡 Pierre’s Pro Tip: Using parchment paper prevents the cookies from sticking and makes cleanup a breeze! It’s a small step that makes a big difference.
Step 2: Combine Wet Ingredients
In a large mixing bowl, beat together the shortening, peanut butter, brown sugar, milk, and vanilla extract with an electric mixer until well blended. Add the egg and mix just until combined.
⚠️ Common Mistake to Avoid: Overmixing the dough after adding the egg can result in tough cookies. Mix only until everything is just combined.
Step 3: Mix Dry Ingredients
In a small mixing bowl, whisk together the flour, cocoa powder, baking soda, and salt.
Step 4: Scoop and Shape Cookies
Add the dry mixture to the wet mixture and stir until *just* combined. Scoop the cookie dough onto the prepared baking sheet to form 1 to 1 ½ inch dough balls. Use a fork to press the dough down and create the traditional crisscross pattern on each cookie.
💡 Pierre’s Pro Tip: Chilling the dough for 30 minutes before baking helps the cookies hold their shape and prevents spreading.
Step 5: Bake the Cookies
Bake for 7-8 minutes at 375°F (190°C) just until set around the edges. Cool for 2 minutes on the cookie sheet, then transfer to a wire cooling rack to cool completely.
| Step | Action | Duration | Key Visual Cue |
|---|---|---|---|
| 1 | Preheat Oven | 5-10 mins | Oven reaches 375°F (190°C). |
| 2 | Combine Wet Ingredients | 3-5 mins | Smooth, well-combined mixture. |
| 3 | Mix Dry Ingredients | 1-2 mins | No lumps, evenly combined. |
| 4 | Scoop & Shape | 5-7 mins | Evenly spaced dough balls with fork marks. |
| 5 | Bake | 7-8 mins | Edges set, centers slightly soft. |
Serving & Presentation
These cookies are best enjoyed warm, with a glass of cold milk or a steaming cup of coffee. For an extra touch of indulgence, serve them with a scoop of vanilla ice cream. In France, we often pair delicate cakes with a light, fruity tea – a similar principle applies here. The rich chocolate and peanut butter complement the subtle notes of a quality tea perfectly.
| Pairing Type | Suggestions | Why It Works |
|---|---|---|
| Side Dish | Fresh Berries, Sliced Bananas | The fruit cuts through the richness, adding freshness. |
| Sauce / Dip | Warm Chocolate Sauce, Peanut Butter Glaze | Enhances the chocolate and peanut butter flavors. |
| Beverage | Cold Milk, Black Coffee, Earl Grey Tea | The beverages balance the sweetness of the cookies. |
| Garnish | Crushed Peanuts, Sea Salt Flakes | Adds texture and visual appeal. |
Make-Ahead, Storage & Reheating
Balancing work and passion projects in New York City requires a little planning! I often bake a double batch of these cookies and freeze half for quick desserts during the week. They freeze beautifully and are just as delicious when reheated.
| Method | Container | Duration | Reheating Tip |
|---|---|---|---|
| Refrigerator | Airtight Container | Up to 5 days | Bring to room temperature or briefly warm in the microwave. |
| Freezer | Freezer-Safe Bag or Container | Up to 3 months | Thaw at room temperature or reheat directly from frozen in a 350°F (175°C) oven for 5-10 minutes. |
| Make-Ahead | Cookie Dough (covered) | Up to 2 days | You can scoop the dough and chill it unbaked and bake it when needed. |
For best results, always store the cookies in an airtight container to maintain their texture. Freezing already-baked cookies works well, too! Just make sure they’re cooled completely before popping them into the freezer.
Variations & Easy Swaps
| Variation | Key Change | Best For | Difficulty Impact |
|---|---|---|---|
| Dark Chocolate | Use dark cocoa powder | Chocolate lovers! | Easy |
| Gluten-Free | Use gluten-free flour blend | Those with gluten sensitivities | Easy |
| Peanut Butter Cup Cookies | Press a mini peanut butter cup into the center of each cookie before baking | Extra indulgence | Easy |
Chocolate Peanut Butter Cookie Variation 1: Darker Chocolate
For a more intense chocolate flavor, substitute half of the unsweetened cocoa powder with black cocoa powder. This powder from the Netherlands is known for its deep color and rich, bittersweet taste. It’s a secret ingredient I often use when I want to add a sophisticated edge to my baking, reminiscent of the patisseries I visited in Paris.
Chocolate Peanut Butter Cookie Variation 2 — Gluten-Free
To make these cookies gluten-free, simply replace the all-purpose flour with a high-quality gluten-free flour blend. Ensure the blend contains xanthan gum, which helps bind the ingredients together. I’ve tested King Arthur Measure for Measure gluten-free flour and it works beautifully, providing a similar texture to the original recipe without compromising flavor.
Chocolate Peanut Butter Cookie Variation 3 — Peanut Butter Cup Cookies
For a truly decadent treat, press a mini peanut butter cup into the center of each cookie during the last 2 minutes of baking. The chocolate will melt slightly, creating a gooey, irresistible surprise. This is a crowd-pleaser, and my friends always ask for this variation when I bake for gatherings.
Can I substitute shortening with butter?
Yes, you can! While shortening provides a very soft texture, you can substitute it with equal parts unsalted butter. However, the cookies might spread a bit more. Chilling the dough for at least 30 minutes before baking will help minimize spreading and ensure a good shape. It will also impart a buttery flavor, which some people prefer!
Can I make this recipe vegan?
Making these cookies fully vegan requires several substitutions. You’ll need to replace the egg with a flax egg (1 tablespoon ground flaxseed mixed with 3 tablespoons water), use a vegan butter substitute for the shortening, and ensure your chocolate is dairy-free. The result will be a slightly chewier cookie, but equally delicious.
How do I prevent the cookies from spreading too much?
Several factors contribute to cookie spreading. Using cold dough, chilling the dough briefly, and using parchment paper help. Also, make sure your oven temperature is accurate. If your oven runs hot, the cookies will spread faster. And remember, slightly underbaking them leads to a softer, chewier cookie that maintains its shape better.
What’s the best way to store leftover cookies?
The best way to store leftover cookies is in an airtight container at room temperature. They’ll stay fresh for up to 5 days. For longer storage, you can freeze them for up to 3 months. Layer the cookies between sheets of parchment paper to prevent them from sticking together while frozen and allow for easy separation.
Can I add chocolate chips to this recipe?
Absolutely! Feel free to add ½ to 1 cup of chocolate chips to the dough for extra chocolatey goodness. Semi-sweet, milk chocolate, or even white chocolate chips would all be delicious additions. I sometimes like to toss in a handful of chopped walnuts for added texture and flavor as well!
What’s the best type of peanut butter to use?
I recommend using a creamy, natural peanut butter for the best flavor and texture, the kind you have to stir. Avoid peanut butters with added sugar or stabilizers. If you only have stabilized peanut butter, it will work, but the cookies may not have quite the same rich peanut butter flavor.
Why do you use both baking soda and brown sugar in the recipe?
That’s a great question! Baking soda helps the cookies rise and spread slightly, creating a softer texture. Brown sugar, thanks to its molasses content, adds moisture and chewiness. The combination of these two ingredients is what gives these cookies their perfect texture – soft, slightly chewy, and irresistible.
Can the dough be made ahead of time?
Yes, you can absolutely make the dough ahead of time! Prepare the dough as directed, then wrap it tightly in plastic wrap and refrigerate for up to 2 days. Letting the dough rest in the fridge actually enhances the flavor and texture of the cookies, making them even more delicious!
Are these cookies good for gifting?
Absolutely! These cookies make a wonderful gift. Package them in a decorative tin or a pretty box with a ribbon, and they’ll be sure to delight anyone who receives them. They’re always a hit at potlucks and holiday gatherings and are a symbol of thoughtfulness and warmth.
I don’t have vanilla extract, can I still make these cookies?
While vanilla extract enhances the overall flavor, you can technically make these cookies without it. However, if you have other extracts like almond or maple, a teaspoon of those can add a lovely nuance. Alternatively, you can simply omit it – the cookies will still be delicious, just slightly less complex in flavor.
Share Your Version!
I’d love to see your take on these Chocolate Peanut Butter Cookies! Once you’ve tried the recipe, leave a star rating and share your thoughts in the comments below. Feel free to share a photo of your delicious creations on Instagram and tag @spicemingle. If you have any questions, don’t hesitate to ask.
From my NYC kitchen to yours — I hope this recipe brings as much warmth to your table as it does to mine. — Pierre 🧡
Love This Recipe? Save It to Pinterest!
If you enjoyed this Chocolate Peanut Butter Cookies recipe, don’t let it get lost in your browser tabs! 😄 Pin it now so you can find it again anytime — and explore hundreds more tried-and-tested recipes waiting for you on my Pinterest boards.
👉 Follow Pierre on Pinterest @chefrecipes2
📌 Pin this recipe · 🔁 Re-pin your favorites · 💬 Tag me when you make it — I love seeing your creations!
“`
Print
Chocolate Peanut Butter Cookies
Description
Chocolate Peanut Butter Cookies are the perfect blend of rich chocolate and peanut butter. You will love this delicious twist on the classic peanut butter cookie!
Ingredients
- 1/2 cup shortening (regular or butter flavor)
- 3/4 cup creamy peanut butter
- 1 1/2 cups brown sugar (packed)
- 3 tablespoons milk
- 1 teaspoon vanilla extract
- 1 large egg
- 1 1/4 cups all-purpose flour
- 1/2 cup unsweetened cocoa powder
- 1 teaspoon baking soda
- 1/2 teaspoon salt
Instructions
- Preheat oven to 375F.
- In a large mixing bowl, beat together the shortening, peanut butter, brown sugar, milk, and vanilla with an electric mixer until well blended. Add the egg and mix just until combined.
- In a small mixing bowl, whisk together the flour, cocoa powder, baking soda, and salt. Add the dry mixture to the wet mixture and stir until combined.
- Scoop the cookie dough onto an ungreased cookie sheet to form 1 to 1 ½ inch dough balls. Use a fork to press the dough down and create the traditional crisscross pattern on each cookie.
- Bake for 7-8 minutes at 375F just until set around the edges. Cool for 2 minutes on the cookie sheet, then transfer to a wire cooling rack to cool.



