Table of Contents
Best Matilda’s Chocolate Cake One-Bowl Technique – Moist, Rich and Mirror-Finish Frosting
When I first tasted the silky, unfathomably moist chocolate cake I made in my mother’s narrow Fes kitchen, I was swept into a memory of dusty spice markets and the echo of French pastry workshops. That first bite—brown sugar kissed with cocoa—told me that magic can happen in a single bowl. Today, I bring that same alchemy to a New York kitchen, using a one‑bowl technique that keeps the cake irresistibly tender while letting the cocoa’s depth shine.
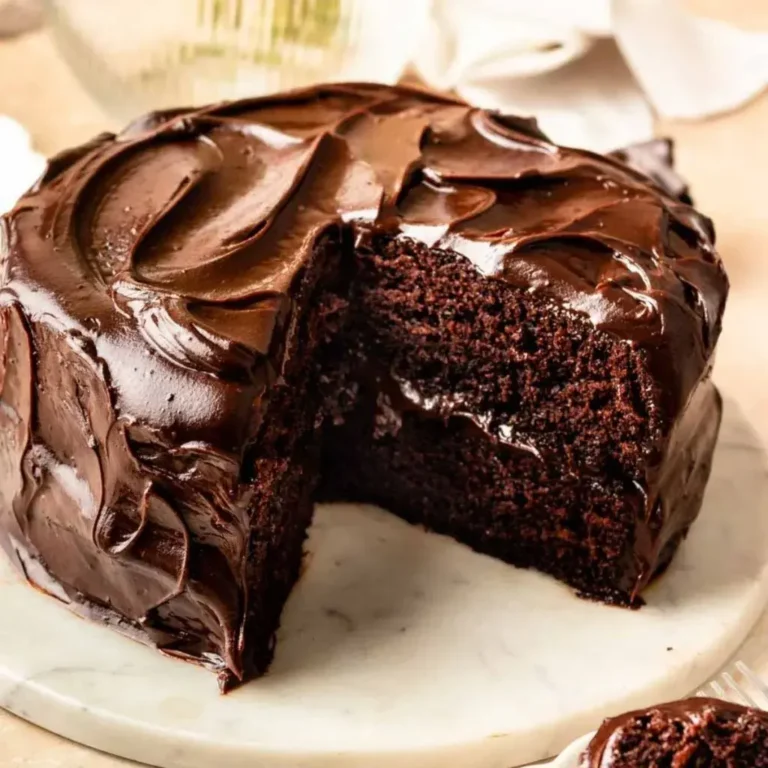
Imagine a crumb so light that it floats on your tongue yet drenched in a glossy, fudge‑sugar frosting that glistens like a jewel. The aroma of roasted dark chocolate mingles with burnt coffee, and a faint hint of vanilla carries you back to an early Parisian little café. This cake is not just a dessert; it’s a sensory journey from the bustling streets of Marrakesh to the chic rooftops of Manhattan.
What sets this version apart is its streamlined, one‑bowl method that eliminates whisk fatigue and delivers consistent results for every baker—from busy NYC professionals to seasoned pastry chefs. I’ll share a little secret: using Dutch‑processed cocoa boosts moisture retention, while adding a touch of coffee awakens the chocolate’s richness. And a common pitfall? Over‑mixing—once the flour’s fully incorporated, stir just enough to gather the ingredients.
Why This Best Matilda’s Chocolate Cake Recipe Is the Best
The Flavor Secret: My background in French pâtisserie taught me that true chocolate flavor emerges when cocoa is paired with a subtle bitter edge. By adding a two‑minute coffee pour, we deepen the chocolate’s profile without overpowering the vanilla’s warmth—an ingredient that screams nostalgia from my mother’s kitchen.
Perfected Texture: The secret to that ultra‑moist crumb lies in the gentle folding technique. After the dry mix, a quick whisk assures homogeneity while preserving the baby‑air bubble that keeps the cake light. If you’re new to the step, I recommend a stand mixer on low to avoid over‑beating.
Foolproof & Fast: Because every batch begins in a single bowl, you save both time and mess. The batter’s consistency is forgiving—just adjust the bitter chocolate or coffee to taste, and the frosting will be thick enough to hold its mirror‑finish shape on the top of the stacked cakes.
Chocolate Cake Ingredients
I source my cocoa powder from a small organic market on Harlem’s East End, and my dark chocolate from a specialty shop in SoHo where I’ve chased the finish of artisanal bars since 2014. Every component is hand‑picked to echo the flavors of my childhood and the precision of my culinary training.
Ingredients List
- 2 1/2 cups all‑purpose flour
- 1 3/4 cups granulated sugar
- 2 tsp baking powder
- 1 tsp baking soda
- 1/2 tsp kosher salt
- 1/2 cup Dutch‑processed cocoa powder
- 2/3 cup vegetable oil (or canola oil)
- 1 tsp vanilla extract
- 3 large eggs, room temperature
- 2/3 cup buttermilk
- 1 cup hot coffee
- 11.11 oz unsalted butter
- 14.1 oz dark chocolate (60‑70% cacao)
- 1/3 cup Dutch‑processed cocoa powder (for frosting)
- 1 1/3 cups heavy cream
- 1 1/3 cups powdered sugar
- 1/2 tsp kosher salt (for frosting)
- 1 tsp vanilla extract (for frosting)
Ingredient Spotlight
Dark Chocolate – I opt for 60‑70% cacao, which provides a balanced bitterness that plays beautifully against the milk‑sugar sweetness of the cake. In a U.S. grocery store, look for “specialty” or “premium” bars; if you’re on a budget, a regular baking chocolate works as a close substitute, though the final texture will be slightly less glossy.
Dutch‑Process Cocoa – This type of cocoa is alkalized, giving a smoother flavor and a darker hue that enriches the cake’s crumb. A regular natural cocoa can be used, but the batter may become more acidic; counteract with a pinch of baking soda.
Buttermilk – The acidic buttermilk reacts with the baking soda to create a lift that keeps the cake light. If you don’t have buttermilk, whisk 1 tbsp plain yogurt into 3/4 cup milk to mimic the acidity and thickness.
| Original Ingredient | Best Substitution | Flavor / Texture Impact |
|---|---|---|
| Dark Chocolate (60‑70% cacao) | Regular Baking Chocolate | Less glossy finish, slightly sweeter |
| Dutch‑Processed Cocoa | Natural Cocoa Powder | More acidic, richer chocolate bite |
| Buttermilk | Yogurt + Milk | Comparable acidity, slightly thicker texture |
How to Make Best Matilda’s Chocolate Cake — Step‑by‑Step
Begin by harmonizing “dry” and “wet” flavors. The one‑bowl method means less cleanup and more chocolate bliss.
Step 1: Whisk Dry Ingredients
In a large bowl, whisk together flour, sugar, baking powder, baking soda, salt, and 1/2 cup Dutch‑processed cocoa. The goal is a uniform mixture with no clumps.
💡 Pierre’s Pro Tip: Use a fine sifter for the cocoa to avoid gritty pockets and to make the crumb flawlessly smooth.
Step 2: Fold Wet Ingredients
Create a well in the dry mix. Add eggs, buttermilk, oil, and vanilla. Whisk by hand until the batter is silky and just combined.
⚠️ Common Mistake to Avoid: Over‑mixing the batter once the flour is incorporated; this develops gluten and makes the cake tough.
Step 3: Prepare Cocoa‑Coffee Mix
Whisk the hot coffee with 1/2 cup Dutch‑processed cocoa until no lumps. Let it cool slightly before adding.
💡 Pierre’s Pro Tip: Pour the cocoa‑coffee mixture slowly into the batter, swirling gently to keep the texture light.
Step 4: Assemble Full Batter
Gradually pour the cocoa‑coffee mix into the bowl, gently folding until uniform. The batter should be thick but pourable.
⚠️ Common Mistake to Avoid: Stirring vigorously—this aerates the batter too much and leads to uneven rise.
Step 5: Prepare Pans
Grease two 8‑inch cake pans and line bottoms with parchment. Preheat oven to 350°F (175°C).
💡 Pierre’s Pro Tip: Add a tablespoon of water on the parchment to promote a crisp bottom.
Step 6: Portion Batter
Dividing the batter evenly ensures symmetrical cakes. Fill pans to ¾ full and tap gently on the counter to release air bubbles.
⚠️ Common Mistake to Avoid: Overfilling the pans; this causes overflow and uneven baking.
Step 7: Bake Cakes
Bake for 30–35 minutes, or until the internal temperature reaches 205°F (96°C). Insert a toothpick; it should come out clean.
💡 Pierre’s Pro Tip: Center the pans on the middle rack to ensure even heating throughout.
Step 8: Cool Cakes
Allow cakes to cool in pans for 10 minutes, then transfer to a wire rack to cool completely. This stops the steam from turning into soggy crumbs.
⚠️ Common Mistake to Avoid: Removing the cake too early, which can trap steam and make the crumb gummy.
Step 9: Make Frosting
Combine chopped chocolate, butter, heavy cream, powdered sugar, ½ tsp salt, and 1 tsp vanilla in a saucepan. Warm over low heat, whisk until smooth.
💡 Pierre’s Pro Tip: Strain the frosting to eliminate small chocolate particles for that mirror finish.
Step 10: Cool Frosting
Pour frosting into a square pan, refrigerate, stirring occasionally until it thickens to a spreadable fudge consistency.
⚠️ Common Mistake to Avoid: Allowing the frosting to set too hard before assembly; it will crack.
Step 11: Assemble Cakes
Spread a generous layer of frosting on the first cake, place the second on top, and pipe frosting around the sides. Let the stack set slightly before final glare polish.
💡 Pierre’s Pro Tip: Pat the top edges to build a smooth plane that’s ready for a flourished glaze.
Step 12: Add Mirror Finish
Once the cake has built a firm base, create a glossy glaze by whipping a bit of powdered sugar and water until silky, then applying with a brush over the frosting.
⚠️ Common Mistake to Avoid: Applying glaze too late; it can spread and blur the frosting lines.
Step 13: Cool Cut
Let the cake chill for 30 minutes before slicing to keep frosting crisp and the texture crunchy.
💡 Pierre’s Pro Tip: Chill the slicer blade in the freezer for a clean, crisp cut.
| Step | Action | Duration | Key Visual Cue |
|---|---|---|---|
| 1 | Whisk dry ingredients | 5 min | Uniform pale brown mix |
| 2 | Fold wet ingredients | 3 min | Silky batter, no streaks |
| 3 | Prepare cocoa coffee | 2 min | Lubricated mixture, no lumps |
| 4 | Assemble full batter | 4 min | Uniform dark batter |
| 5 | Prepare pans | 3 min | Greased, parchment lined |
| 6 | Portion batter | 2 min | Even layers, no air pockets |
| 7 | Bake cakes | 30‑35 min | Golden edges, springy middle |
| 8 | Cool cakes | ||
| 9 | Make frosting | 5–7 min | Smooth, glossy mixture |
| 10 | Cool frosting | 30‑40 min chill | Spreadable fudge |
| 11 | Assemble cakes | 5 min | Smooth frosting top |
| 12 | Add glaze | 2 min | Shiny, mirror finish |
| 13 | Cool cuts | 30 min chill | Crisp edges, clear slices |
Serving & Presentation
Serve the cake on a polished marble slab to highlight the glaze’s reflective sheen. A dusting of lightly toasted almond slivers offers a Mediterranean crunch that pairs beautifully with the moist chocolate core. For a New York twist, add a splash of espresso or a drizzle of caramel flavored with sea salt.
I often welcome guests to a small citron‑cucumber infusion, its slight astringency cutting through the rich fudge. The cool acidity balances the sweetness, echoing an old Moroccan tea ceremony where sweet and bitter mingle in harmony.
Pairing suggestions enhance both flavor and presentation: a side of fresh berries, a slice of warm brioche, or a scoop of vanilla bean ice cream. These accompaniments bring textural contrast and a splash of bright color to the chocolate’s deep hue.
| Pairing Type | Suggestions | Why It Works |
|---|---|---|
| Side Dish | Stale brioche, fresh berries, or a leafy salad | Contrast sweetness and texture |
| Sauce / Dip | Espresso ganache, salted caramel, or citrus beurre blanc | Enhances chocolate intensity |
| Beverage | Espresso, cold brew, or a light-bodied red wine | Balances richness, echoes coffee notes in cake |
| Garnish | Edible gold dust, candied orange peel, or fresh mint | Adds sparkle and bright freshness |
Make‑Ahead, Storage & Reheating
In the hectic rhythm of an NYC life I often bake this cake on Friday evening, allowing it to cool fully before refrigerating. It makes for an impressive dessert ready to serve for brunch or a week‑long family dinner.
| Method | Container | Duration | Reheating Tip |
|---|---|---|---|
| Refrigerator | airtight cooler tin or glass jar | 3 days | Let sit at room temp 15 min before slicing |
| Freezer | vacuum‑sealed plastic bag | 2 months | Thaw overnight, warm slightly in oven 150°F |
| Make‑Ahead | Stacked cake with parchment between layers | 1 week in fridge | Assemble on assembly day, finish glaze before serving |
When reheating, I always reset the oven to a low temperature (around 150°F) and cover the cake with foil. This gently warms the cake without drying the frosting, preserving that glossy mirror finish I love.
Variations & Easy Swaps
| Variation | Key Change | Best For | Difficulty Impact |
|---|---|---|---|
| Almond Flour Swap | Replace 1/2‑cup flour with almond flour | Gluten‑free | No change |
| Citrus Twist | Add zest of one orange to batter | Seasonal Spring | Minor |
| Espresso Mascarpone | Replace heavy cream with mascarpone | Luxe flavor | Advanced (latter steps) |
Almond Flour Swap
The switch to almond flour gives the cake a nutty undertone and reduces gluten content. Keep the ratio of dry to wet ingredients the same; you may need to add a pinch of xanthan gum for structure if baking it fresh.
Citrus Twist
A sprinkle of orange zest brings bright acidity that lifts the deep chocolate notes, perfect for a spring brunch. The zest should be veined; a tiny grater removes bitterness while keeping aroma lively.
Espresso Mascarpone
Swapping heavy cream for mascarpone delivers a silky richness that complements the coffee extraction. Because mascarpone is sweeter, reduce powdered sugar subtly to maintain balance, and chill the frosting longer to attain the required firmness.
How long does the frosting stay fresh?
When stored in an airtight container in the refrigerator, this glossy chocolate fudge frosting keeps its dream‑like texture and sweetness for about three to four days. The dairy and cocoa keep the frosting stable, but if you notice any off‑odor or cloudiness, it’s best to discard and remake. For a longer shelf life, freeze the frosting in a sealed bag; thaw it at room temperature and stir just before use.
Can I use almond milk instead of buttermilk?
Almond milk can replace buttermilk, but the batter will need a higher acidity to trigger the baking soda reaction. Mix 1 tbsp white vinegar with 3/4 cup almond milk, let it sit for five minutes, and then use as the buttermilk substitute. The texture might be slightly lighter, and you’ll get a mild nutty flavor that pairs nicely with the chocolate.
What’s the best way to keep the cake moist after baking?
The trick to a moist cake is to let it cool entirely on a rack before frosting. If you’re heading back to bed, cover the chilled cake loosely with foil to trap steam and avoid the parchment becoming soggy. A light dusting of powdered sugar on the top before serving can also absorb excess moisture.
Do I need a special pan for two circles?
Standard 8‑inch round pans are fine. However, if you’re making a wedding cake or a fancy tiered dessert, consider using springform pans, which let you lift the whole cake without risking collapse. The key is the even heat distribution; center the pans on the middle rack during baking.
Standard 8‑inch round pans are fine. However, if you’re making a wedding cake or a fancy tiered dessert, consider using springform pans, which let you lift the whole cake without risking collapse. The key is the even heat distribution; center the pans on the middle rack during baking.
Is it possible to make this cake gluten‑free?
Absolutely. Replace the all‑purpose flour with a 1:1 blend of gluten‑free all‑purpose mix and xanthan gum. Use the almond flour swap or a mixture of rice and potato starch for a lighter crumb. Gluten‑free baking powders and buttermilk substitutes (plain yogurt or fermented oat milk) can keep the rise and acidity stable.
What type of coffee works best for this cake?
Any bold, medium‑roast brewed coffee that’s strong enough will bring a subtle yet bold depth to the cake. I personally prefer French press espresso or a Dutch coffee style. If you’re looking for a hint of tomatoate sweetness, opt for a dark drip brew or a cold‑brew concentrate added to room temperature. Avoid herbal or low‑caffeine varieties that don’t introduce enough flavor concentration.
How can I adapt this recipe for a festive holiday palette?
Infuse the frosting with a splash of peppermint extract or orange liqueur to give a seasonal twist. Swapping regular powdered sugar for maple‑infused sugar adds a subtle caramel note. Serving the cake with a dusting of pumpkin spice or a swirl of holiday-themed ganache creates an eye‑catching holiday display that speaks to nostalgic flavors.
Will the frosting stay firm if left at room temperature?
The fudge‑style frosting will soften and lose its glossy sheen after a few hours at room temperature, especially if the humidity is high. For best results, keep the frosting chilled until just before serving, then let it sit on a plate covered with a clean cloth for about 10–15 minutes to help maintain its shape and moisture balance.
Can I prepare the frosting in advance?
Definitely! Chill the frosting once made and it will keep smoothly in the refrigerator for up to five days. Each time you use it, simply fluff it with a fork to restore its velvet texture before spreading on fresh cake layers. For a quarterly batch, freeze the frosting and thaw in the fridge; a quick whisk will revive its spreadability.
What’s a quick fix if my cake turns out slightly dry?
If the cake looks dry, drizzle a simple syrup (equal parts water and sugar boiled to a light syrup) over the surface before frosting, or sprinkle a tiny bit of melted butter over the cooled cake. These light layers of moisture help the frosting absorb and prevents a brittle finish. It’s a quick fix that brings instant life back to the crumb.
Share Your Version!
When you finally slice a piece of this wonderfully reflective cake, we’d love to see how you made it your own. Drop a rating, leave a comment, or tag me in your photo on Instagram or Pinterest. Because every crumb tells a story, share what extra whisper of spice or a creative garnish brightened your dessert.
From my NYC kitchen to yours — I hope this recipe brings as much warmth to your table as it does to mine. — Pierre 🧡
Love This Recipe? Save It to Pinterest!
If you enjoyed this Best Matilda’s Chocolate Cake recipe, don’t let it get lost in your browser tabs! 😄 Pin it now so you can find it again anytime — and explore hundreds more tried‑and‑tested recipes waiting for you on my Pinterest boards.
👉 Follow Pierre on Pinterest @chefrecipes2
📌 Pin this recipe · 🔁 Re-pin your favorites · 💬 Tag me when you make it — I love seeing your creations!
Have you tried a one‑bowl chocolate masterpiece before? Let me know in the comments, and if you’ve discovered a personal twist—share it on our forum and join the conversation!
Best Matilda’s Chocolate Cake
Description
This easy one-bowl Matilda chocolate cake is incredibly moist, rich, and topped with a glossy chocolate fudge frosting.
Ingredients
- 2 1/2 cups Flour (AP, plain flour)
- 1 3/4 cups Granulated sugar
- 2 tsp Baking powder
- 1 tsp Baking soda
- 1/2 tsp Kosher salt
- 1/2 cup Cocoa powder (Dutch processed cocoa powder)
- 2/3 cup Vegetable oil (or canola oil)
- 1 tsp Vanilla extract
- 3 Eggs (room temperature large eggs)
- 2/3 cup Buttermilk
- 1 cup Coffee (hot)
- 11.11 oz Butter (unsalted)
- 14.1 oz Dark chocolate (about 60%-70%)
- 1/3 cup Cocoa powder (Dutch processed )
- 1 1/3 cups Heavy cream
- 1 1/3 cups Powdered sugar
- 1/2 tsp Kosher salt
- 1 tsp Vanilla extract
Instructions
- Preheat the oven to 350°F (175°C). Grease two 8-inch cake pans and line the bottoms with parchment paper.
- Whisk the hot brewed coffee and Dutch-processed cocoa powder in a small bowl until smooth. Set aside.
- Sift the flour, sugars, baking soda, baking powder, and salt into a large mixing bowl. Whisk briefly to combine.
- Create a well in the dry ingredients. Add the eggs, buttermilk, oil, and vanilla. Whisk by hand until the batter is smooth.
- Slowly pour the warm cocoa-coffee mixture into the main bowl. Gently stir until the batter is uniform.
- Divide the batter evenly between the pans. Bake for 3035 minutes, or until the internal temperature hits 205°F (96°C).
- Let the cakes cool in the pans for 10 minutes before transferring to a wire rack to cool completely.
- Add the chopped chocolate, butter, heavy cream, and sifted powdered sugar into a saucepan.
- Place over the lowest heat setting possible. Whisk constantly until the chocolate is melted and the sugar is fully dissolved.
- Pour the warm frosting through a fine-mesh strainer into a square pan to ensure a perfectly smooth, bubble-free texture.
- Place the pan in the refrigerator. Let it chill, stirring occasionally, until it thickens to a spreadable, fudge-like consistency.
- Place the first cake layer on a plate and spread a generous amount of thickened frosting over the top.
- Add the second layer and coat the top and sides. The frosting should be thick enough to hold its shape while maintaining its signature mirror-shine.



