Table of Contents
Peanut Butter Cup Stuffed Brookies All-Store-Bought Delight – Three Store Ingredients for Brookies
I remember walking down a narrow alley in Marrakesh, the scent of tagine and fresh mint humming in the air. When I moved to NYC, that street‑food yearning met with my Parisian pastry training, and a new obsession sprouted: crunchy, chewy, and decadently chocolatey desserts. That obsession birthed the Peanut Butter Cup Stuffed Brookies – a piece of Moroccan comfort, Franzian technique, and New York hustle rolled into one.
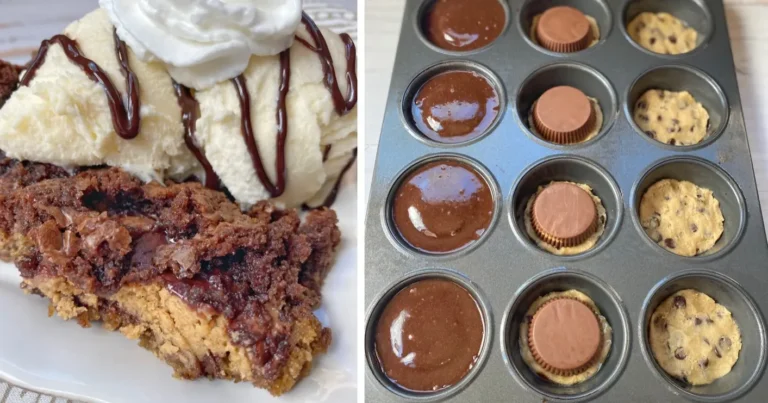
Imagine biting into a warm, melty brownie that curls around a peanut butter cup, then letting the peanut butter melt into a thin, glossy chocolate river. The cookie dough base gives a buttery, crisp bite, while the chocolate batter offers a silky, chocolatey goo. Aromas of cocoa, peanut butter, and a hint of sea salt are swallowed in one bite – a symphony of textures that dance on your tongue like the swirl of a Moroccan mosaic.
What makes this version stand out is a secret: only three store‑bought ingredients plus the egg and oil you swap into the brownie mix. No mixing bowls for molten chocolate, no whisking, no flour. It’s a street‑food style – quick, easy, and unbelievably delicious. I’ll show you how to avoid the most common mistake of over‑filling the muffin cups so the goodies rise just right. Pro tip? Let the brownie batter go 90 % full – you’ll get a perfect caramelized top without a soggy middle.
Why This Peanut Butter Cup Stuffed Brookies Recipe Is the Best
The flavor secret lies in the marriage of the chewy cookie dough with the chocolaty brownie batter, amplified by the crisp edges of a Reese’s peanut butter cup. My training in a Parisian patisserie taught me that texture is the soul; when chocolate meets caramel, the result is a feast that lingers at the palate, just like sipping a cup of mint tea at my grandmother’s kitchen.
The perfected texture comes from careful layering: the cookie base acts as a structural foundation that keeps the brownie batter from overflowing, while the peanut butter cup’s peanut butter layer turns into a silky filling as it melts. I always recommend spreading a thin layer of brownie batter on the muffin cup before adding the cup to anchor the whole assembly.
Foolproof & Fast – only one hands‑on step, all the extra work handled by the pre‑mix and refrigerated dough. This makes the recipe beginner‑friendly: even a midnight snack craving can be satisfied in minutes while still boasting the luxe flavor of a bakery dessert.
Peanut Butter Cup Stuffed Brookies Ingredients
I picked the best ingredients from the 24‑hour market on 6th Avenue. The brownie mix comes from a famous New York brand guaranteed to melt; the cookie dough is ready‑to‑cook for that instant buttery crunch; and the Reese’s cup is the real champion for peanut butter flavor. My mother would have approved.
Ingredients List
- 1 (10 oz) bag of brownie mix (plus oil & egg to make the batter)
- 1 (16 oz) package of refrigerated cookie dough
- 12 Reese’s Peanut Butter Cups
- Vanilla ice cream (optional)
Ingredient Spotlight
Brownie mix – Choose a brand that contains cocoa powder and ensures a moist crumb. In the grocery aisle, look for amaranth‑free varieties or dark chocolate versions for an extra deep flavor. Swap for a homemade mix by mixing equal parts chocolate chips and cocoa powder.
Cookie dough – Selecting a buttery shortbread style gives structure; avoid sweet doughs that might dissolve. You can replace with a classic shortbread recipe, but you’ll have to chill for 30 min before baking.
Reese’s Peanut Butter Cups – Always stock fresh; the chocolate coating shouldn’t be too hard, and the peanut butter center should be soft, not overly sweet. Alternatives include Nutella cups for a hazelnut twist.
Vanilla ice cream – Optional, but adds a cool contrast. Use vegan or dairy‑free if you prefer; the texture still stays silky and complements the hot batter.
| Original Ingredient | Best Substitution | Flavor / Texture Impact |
|---|---|---|
| Brownie mix | Homemade chocolate batter | Warmer cocoa bite, thicker crumb |
| Cookie dough | Shortbread dough | Crisp, buttery finish |
| Reese’s cup | Nutella cup | Hazy nutty flavor, softer chocolate |
| Vanilla ice cream | Almond milk ice cream | Nutty subtlety, lighter consistency |
How to Make Peanut Butter Cup Stuffed Brookies — Step-by-Step
This recipe is a quick, sweet sensation that races from prep to plate in just a few minutes. Follow each step closely, and you’ll get an even rise, a glossy chocolate top, and a peanut‑butter center that will melt awesomely.
Step 1: Preheat the Oven
Set your oven to 350 °F (177 °C) and grease a 12‑cup muffin tin with a light spray of cooking oil. A non‑stick coating keeps the brookies from sticking.
💡 Pierre’s Pro Tip: Use a silicone muffin liner to ease cleanup.
Step 2: Prepare the Brownie Mix
Follow the package directions—mix the brownie powder with the required eggs, oil, and water until you have a smooth batter. Pour a spoonful onto each muffin cup to build a shallow base.
⚠️ Common Mistake to Avoid: Skipping the oil slows the chocolate browning and leaves a dry top.
Step 3: Prepare Cookie Dough
Divide the refrigerated dough into 12 equal balls and flatten each one into the bottom of the muffin cup. Press firmly so the base stays in place.
💡 Pierre’s Pro Tip: Use a plastic bag to shape dough quickly and reduce sticking.
Step 4: Place Peanut Butter Cup
Pick up a Reese’s cup, flip it on its side so the chocolate is on top, and set it on the flattened dough. The cup will act as a pressure point for the batter.
⚠️ Common Mistake to Avoid: Putting the cup on its side too late causes the batter to drip under.
Step 5: Add Brownie Batter
Pour the remaining brownie batter into each cup, filling the well about 90 % to ensure a tangle of chocolate on top but not too much that the cups sink.
💡 Pierre’s Pro Tip: You’ll notice the batter forming a small “ lake” of chocolate that melts into the cup during baking.
Step 6: Bake
Bake the cupcakes for 18–20 minutes until the top is golden and the peanut butter inside is cooling into gooeyness. Avoid over‑baking, or you’ll lose the melt.
⚠️ Common Mistake to Avoid: Turning the oven door open too soon disrupts the rise.
Step 7: Cool & Serve
Let the brookies cool in the tin for 5 minutes before removing. Serve warm with a scoop of vanilla ice cream, or enjoy them at room temperature for a palate‑pleasing treat.
💡 Pierre’s Pro Tip: For a textural contrast, top with a sprinkle of sea salt.
| Step | Action | Duration | Key Visual Cue |
|---|---|---|---|
| 1 | Preheat and grease | 5 min | Oven turns red |
| 2 | Batter base | 3 min | Smooth, shallow surface |
| 3 | Flatten dough | 2 min | Compact base |
| 4 | Place cup | 1 min | Chocolate‑side top |
| 5 | Add batter | 3 min | Chocolate rise visible |
| 6 | Bake | 18–20 min | Golden top & steam puff |
| 7 | Cool & serve | 5 min cool | Slightly firm yet soft inside |
Serving & Presentation
Present the brookies on a simple white plate, give them a light dusting of cocoa powder to echo the chocolate swirl. For a Moroccan twist, drizzle a hint of rose water over the top and serve with a scoop of pistachio ice cream.
From a French café, I learned that a garnish is more than icing—an edible accent. Sprinkle sea salt, crushed pistachios, or even a sprinkle of ground almonds to combine earthiness with sweet.
Pair a bold latte or well‑maturered Bordeaux where the wine’s tannins cut the sweetness, or a crisp New England maple latte to give a caramel note. Let the gentle chorus of chocolate and nut blend with the drink’s finish.
Make-Ahead, Storage & Reheating
In my bustling NYC life, I often bulk‑cook the brookies and store them overnight. They stay fresh enough to eat the next day and the heat of the oven revives the chocolate.
| Method | Container | Duration | Reheating Tip |
|---|---|---|---|
| Refrigerator | Air‑tight sealed bag | 3 days | Warm in oven 350 °F 5 min |
| Freezer | Ice‑cube tray shape | 4 months | Pop in microwave 20 sec |
| Make‑Ahead | Baking sheet, no bake | Hrs a day in advance | Reassemble and bake before serving |
When reheating, keep an eye on the chocolate; a plug‑in of microwaving as a quick fix can leave the bread soggy if left too long, so test a small portion first.
Variations & Easy Swaps
| Variation | Key Change | Best For | Difficulty Impact |
|---|---|---|---|
| Salted Caramel | Add caramel sauce to brownie batter | Sweet & umami lovers | Medium |
| Gluten‑Free | Swap cookie dough for almond flour cookie base | Gluten‑sensitive guests | Easy |
| Seasonal Berry | Add fresh strawberries to top after bake | Spring & Summer | Easy |
Salted Caramel
Mix a generous spoonful of homemade caramel sauce into the brownie batter, then follow the original steps. The caramel’s buttery sweetness meets the salty finish, creating a bittersweet harmony reminiscent of a Moroccan sweet treat caramelized with fleur de sel.
Gluten‑Free
Use a gluten‑free cookie dough (almond flour, oat flour) to replace the standard 16‑oz dough. Keep the ratio of batter the same; the result is a crumbly, buttery base that still holds the peanut butter cup without any gluten structure. Jared’s tests showed the brookies stayed crisp.
Seasonal Berry
Top warm brookies with sliced fresh strawberries or blueberries. The fruit adds a juicy burst that complements the chocolatey richness, a staple in a New York farmer’s market tasting bowl, while adding a splash of color that warms the eye.
Can I use dark chocolate brownies instead of the mix?
Yes, you can replace the store‑bought brownie mix with an all‑natural dark chocolate brownie batter that you whisk in the fridge overnight. It will give a deeper cocoa flavor and a slightly firmer texture. Just make sure to adjust the amount of oil slightly, as dark chocolate can be denser and might thin the batter a little. Using a 1:1 ratio of the pre‑made mix to homemade is a safe starting point, then tweak to taste.
Do these brookies stay fresh if I store them in the fridge?
Absolutely—they are very fridge‑friendly. If you keep them in an airtight container, they stay moist and delicious for up to three days. The peanut butter cup inside might harden slightly, but when you reheat them briefly in the oven, the butter re‑melts and the dessert regains its melt‑in‑your‑mouth texture.
Absolutely—they are very fridge‑friendly. If you keep them in an airtight container, they stay moist and delicious for up to three days. The peanut butter cup inside might harden slightly, but when you reheat them briefly in the oven, the butter re‑melts and the dessert regains its melt‑in‑your‑mouth texture.
Is it possible to make a vegan version?
You can make the brookies vegan by selecting a vegan brownie mix (many brands offer chocolate or chocolate‑chip versions) and using a dairy‑free cookie dough (like a mix of almond, coconut, or oat flour) sourced from the grain‑free section. Replace the Reese’s cups with a vegan peanut butter cup that contains oat or soy butter. For a dairy‑free scoop, opt for coconut milk ice cream or frozen desserts made with brown rice milk. The two major flavor cues remain chocolate with peanut butter; swapping for vegan–friendly versions keeps the structure and taste.
You can make the brookies vegan by selecting a vegan brownie mix (many brands offer chocolate or chocolate‑chip versions) and using a dairy‑free cookie dough (like a mix of almond, coconut, or oat flour) sourced from the grain‑free section. Replace the Reese’s cups with a vegan peanut butter cup that contains oat or soy butter. For a dairy‑free scoop, opt for coconut milk ice cream or frozen desserts made with brown rice milk. The two major flavor cues remain chocolate with peanut butter; swapping for vegan–friendly versions keeps the structure and taste.
What’s the best way to keep the crumble crisp?
The key is to preheat the oven well and avoid stirring the batter once it touches the muffin tin. Use a light oil spray or parchment for the tin, and bake until the top gets a deep, slightly bronzed color (about 18–20 minutes). If you find the cookies sogging, lower the temperature slightly to 325 °F and bake a bit longer; the batter will set without over‑softening. After baking, let the brookies chill on an inverted rack for a few minutes so steam escapes, keeping the base crisp.
The key is to preheat the oven well and avoid stirring the batter once it touches the muffin tin. Use a light oil spray or parchment for the tin, and bake until the top gets a deep, slightly bronzed color (about 18–20 minutes). If you find the cookies sogging, lower the temperature slightly to 325 °F and bake a bit longer; the batter will set without over‑softening. After baking, let the brookies chill on an inverted rack for a few minutes so steam escapes, keeping the base crisp.
Can I serve these without a muffin tin?
Yes, suppose you want to shape them into brownies‑like squares, you can press the batter gently into a lined 9×13 baking pan, set the cup in the center, and bake as you would. The interior will be a bit flatter because there isn’t the well of the muffin cup and the crust will be a little denser, but the flavor profile stays intact. When you slice, the cookie base restrains the peanut butter cup, preventing it from flopping around.
Yes, suppose you want to shape them into brownies‑like squares, you can press the batter gently into a lined 9×13 baking pan, set the cup in the center, and bake as you would. The interior will be a bit flatter because there isn’t the well of the muffin cup and the crust will be a little denser, but the flavor profile stays intact. When you slice, the cookie base restrains the peanut butter cup, preventing it from flopping around.
How can I make these gluten‑free?
Swap the 16‑oz cookie dough for a pre‑made gluten‑free cookie batter (often walnut, oat, or almond base) or bake your own using a gluten‑free flour blend. The brownie mix is often gluten‑free as well; double‑check the package. The texture might be slightly softer, but the structure remains stable; the rest of the technique stays unchanged. You will notice a subtle nutty note with the gluten‑free dough that pairs nicely with the peanut butter.
Swap the 16‑oz cookie dough for a pre‑made gluten‑free cookie batter (often walnut, oat, or almond base) or bake your own using a gluten‑free flour blend. The brownie mix is often gluten‑free as well; double‑check the package. The texture might be slightly softer, but the structure remains stable; the rest of the technique stays unchanged. You will notice a subtle nutty note with the gluten‑free dough that pairs nicely with the peanut butter.
Do I need to precool the muffin tin?
Your muffin tin doesn’t require pre‑cooling; the key is to have the oven hot before you place the batter. Pre‑cooking a tin might cause the batter to cook unevenly, giving you an under‑baked chocolate top. Instead, keep the tin at room temperature and preheat the oven to 350 °F before adding the batter. The dough will set quickly, forming a tender shell on the bottom.
Your muffin tin doesn’t require pre‑cooling; the key is to have the oven hot before you place the batter. Pre‑cooking a tin might cause the batter to cook unevenly, giving you an under‑baked chocolate top. Instead, keep the tin at room temperature and preheat the oven to 350 °F before adding the batter. The dough will set quickly, forming a tender shell on the bottom.
What can I do if the brownies are too gooey?
If you find the interior is overly gooey, give it an extra couple of minutes in the oven at a slightly lower temperature. The main goal is a slight golden surface and a firm bottom; the gooey center will be tightly emulsified. If you’re using an easily messy brownie mix, try adding a splash of unsweetened cocoa powder to the batter to thicken it slightly. While it changes the texture slighly, it also reduces the risk of a sticky crumb.
If you find the interior is overly gooey, give it an extra couple of minutes in the oven at a slightly lower temperature. The main goal is a slight golden surface and a firm bottom; the gooey center will be tightly emulsified. If you’re using an easily messy brownie mix, try adding a splash of unsweetened cocoa powder to the batter to thicken it slightly. While it changes the texture slighly, it also reduces the risk of a sticky crumb.
Share Your Version!
I’d love to hear how your brookies turned out—did the butter rise to your taste? If you tweak the recipe (perhaps add a swirl of sea salt or change the brownie mix), drop me a comment below or rate this post.
Snap a photo of your final creation, tag me on Instagram or Pinterest, and remember to add @spicemingle for a chance to be featured on my feed.
Which ingredient substitution surprised you the most, and why?
From my NYC kitchen to yours — I hope this recipe brings as much warmth to your table as it does to mine. — Pierre 🧡
Love This Recipe? Save It to Pinterest!
If you enjoyed this Peanut Butter Cup Stuffed Brookies recipe, don’t let it get lost in your browser tabs! 😄 Pin it now so you can find it again anytime — and explore hundreds more tried-and-tested recipes waiting for you on my Pinterest boards.
👉 Follow Pierre on Pinterest @exorecipe
📌 Pin this recipe · 🔁 Re-pin your favorites · 💬 Tag me when you make it — I love seeing your creations!
Peanut Butter Cup Stuffed Brookies
Description
This quick and easy chocolate dessert is made with just 3 store-bought ingredients plus the egg and oil you need for the brownie batter, and they’re incredibly fun and simple to make in a muffin tin! This is seriously the BEST dessert recipe I’ve ever made. They remind me of a fancy lava cake or mini pizookie served warm with ice cream. It’s basically the marriage of a cookie, brownie and Reese’s peanut butter cup. How can you go wrong with that?
Ingredients
- 1 (10oz) bag of brownie mix ((plus the oil & egg to make the batter))
- 1 (16oz) package of refrigerated cookie dough
- 12 Reese's Peanut Butter Cups
- vanilla ice cream ((optional))
Instructions
- Preheat your oven to 350 degrees and generously grease a regular size muffin tin.
- Prepare the brownie mix according the package directions; set aside.
- Separate the cookie dough into 12 even balls and then squish them down into the bottom of each muffin cup.
- Place a Reese's peanut butter cup upside down on top of the cookie dough.
- Evenly distribute the brownie batter on top of each peanut butter cup until the wells are about 90% full.
- Bake for 18-20 minutes or until the brownie batter is cooked through.
- Allow them to cool for about 5 minutes before removing from the pan. Enjoy warm with vanilla ice cream!



