Table of Contents
4 Ingredient Peanut Butter Banana Bars Recipe – Moroccan Flair Meets NYC Simplicity
There are some recipes that feel like they’ve been with you forever, even the first time you make them. That’s exactly how I feel about these 4 ingredient peanut butter banana bars. Born from a late-night craving in my tiny NYC kitchen after a long day at the farmers market, I wanted something deeply satisfying but ridiculously simple. My mother back in Morocco would make banana cakes with just a few pantry staples, and her philosophy of letting the fruit do the heavy lifting stuck with me. These bars are my homage to that simplicity, but with a New York twist—they’re portable, snackable, and utterly addictive.
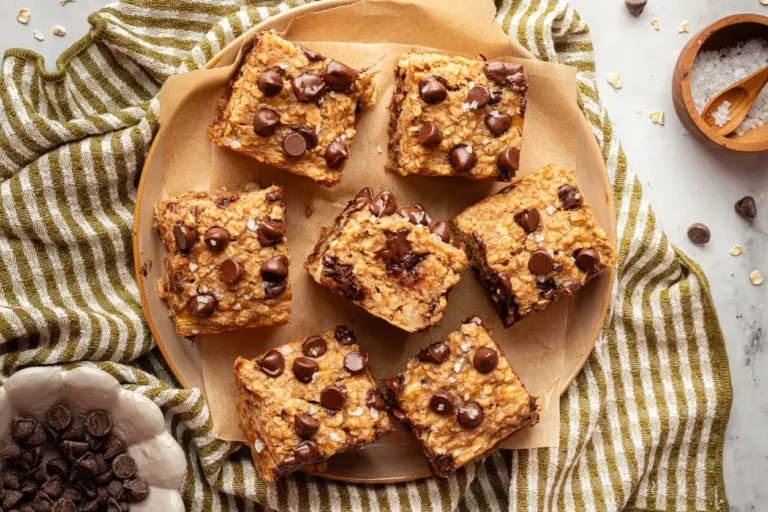
When you pull these bars from the oven, the aroma is pure comfort: sweet, caramelized banana mingles with the warm, nutty scent of peanut butter, and the chocolate chips are just starting to melt into glossy puddles. The texture is tender and moist, almost like a cross between a dense granola bar and a soft cookie. Each bite offers a gentle chew from the oats, a creamy richness from the peanut butter, and sweet pockets of chocolate. It’s simple, honest food—and that’s exactly the kind of cooking I love sharing from my NYC kitchen.
Now, I know what you might be thinking: “Only four ingredients?” But trust me when I say these bars deliver big flavor with minimal fuss. With my background in French pastry, I’ve learned that the best baking often comes from restraint—a few excellent ingredients, handled right, are all you need. In this post, I’ll share my pro tip for getting the perfect chewy texture without any added sugar or flour. Plus, I’ll warn you about one common mistake that can make these bars too dry. Let’s get started!
Why This 4 Ingredient Peanut Butter Banana Bars Recipe Is the Best
The Flavor Secret. The secret to these 4 ingredient peanut butter banana bars is the bananas themselves. In my mom’s kitchen in Marrakech, we never threw away overripe bananas. Instead, she’d mash them into every sweet treat, letting their natural sweetness and moisture do the job of both sugar and oil. Here, I pair that ripe banana richness with a good-quality natural peanut butter. The slight saltiness of the peanut butter cuts through the sweetness beautifully, creating a balanced, crave-worthy flavor that’s far more complex than the short ingredient list suggests.
Perfected Texture. Achieving a bar that’s moist but not soggy, tender but not crumbling is a quest I took seriously. The key is the ratio of banana to oats. Too much banana and the bars turn mushy; too little, they’re dry. After testing in my tiny NYC test kitchen, I landed on three very ripe bananas to 1 ¼ cups of oats. The oats absorb the moisture perfectly during baking, creating a chewy, almost muffin-like crumb. A touch of baking powder provides just enough lift to keep them from being dense. This is texture perfection, chef’s touch style.
Foolproof & Fast. This is the kind of recipe I turn to on a busy Tuesday when I need a healthy snack for the week ahead. It’s truly one-bowl, no mixer required. You mash, stir, pour, and bake. It’s so simple that even beginner bakers can nail it on the first try. Plus, the recipe is endlessly flexible. Swap the chocolate chips for nuts, seeds, or dried fruit. Use a different nut butter. It’s a forgiving formula that always delivers. That’s the beauty of real, whole-food baking.
Peanut Butter Banana Bars Ingredients
When I shop for these ingredients, I head straight to my favorite bodega in Brooklyn for the bananas, and I pick up the rest from the Union Square farmers market. The quality of your core ingredients matters here because there are so few of them. Let me walk you through what to look for.
Ingredients List
- 3 very ripe bananas (spotty brown skin is ideal)
- 1/4 cup smooth (natural peanut butter) — stirred well
- 1 teaspoon vanilla extract
- 1 1/4 cup instant or quick cooking oats
- 1/4 teaspoon salt
- 1/2 teaspoon baking powder
- 1/2 cup chocolate chips (divided)
Ingredient Spotlight
Very Ripe Bananas: This is the heart of the recipe. The riper the banana, the sweeter and starchier it is. Look for bananas with plenty of brown spots on the peel—that’s when the natural sugars have fully developed. In NYC, I usually let my bananas sit on the counter for 3-4 days until they reach this stage. You can speed it up by placing them in a paper bag with an apple. A last-minute substitute: unsweetened applesauce (using 1 cup for 3 bananas), but the flavor will be lighter and less intense.
Natural Peanut Butter: I recommend a natural peanut butter where the only ingredients are peanuts and maybe salt. Avoid the sugary, hydrogenated oil varieties—they won’t provide the same creamy consistency or healthy fats. My go-to is the kind you grind yourself at the health food store, or a brand like Smucker’s Natural. For a twist, try almond butter or cashew butter. Just make sure it’s well-stirred and not too runny.
Instant Oats: Quick-cooking or instant oats are non-negotiable here. They absorb moisture evenly and create the perfect tender binder. Do not use steel-cut or rolled oats, as they won’t soften enough and will result in a crunchy, dry bar. I’ve tested this—trust me. If you only have rolled oats, pulse them a few times in a food processor to break them down, but the texture won’t be quite as ideal.
| Original Ingredient | Best Substitution | Flavor / Texture Impact |
|---|---|---|
| Very ripe bananas | Unsweetened applesauce (1 cup) | Lighter sweetness, less dense, more cake-like |
| Natural peanut butter | Almond butter or sunbutter | Milder nutty flavor, works well, same texture |
| Quick-cooking oats | Pulsed rolled oats | More rustic texture, slightly chewier |
How to Make 4 Ingredient Peanut Butter Banana Bars — Step-by-Step
Making these peanut butter banana bars is so straightforward, you’ll wonder why you didn’t try them sooner. Follow each step, and you’ll have a batch of perfect bars ready in under an hour.
Step 1: Prepare and Mash
Preheat your oven to 350°F. Grease a 9×5-inch loaf pan with butter or non-stick spray, or line it with parchment paper for easy removal. In a large bowl, add the three very ripe bananas. Using a fork or potato masher, mash them until they are almost smooth, with only a few small lumps remaining. The smoother your mash, the more uniform the texture of the bars will be.
💡 Pierre’s Pro Tip: For the best flavor and texture, use bananas that are heavily speckled with brown spots. If your bananas aren’t ripe enough, the bars will lack sweetness and be less moist.
Step 2: Combine Wet Ingredients
Add the ¼ cup of natural peanut butter and 1 teaspoon of vanilla extract to the mashed bananas. Stir everything together until the peanut butter is fully incorporated and the mixture is smooth and creamy. Make sure to scrape the sides of the bowl well. This is the flavor base that will bind everything together.
⚠️ Common Mistake to Avoid: Using cold or un-stirred peanut butter can make it difficult to incorporate evenly. Let it come to room temperature for easier mixing, and always stir the jar well before measuring.
Step 3: Add Dry Ingredients
Pour in the 1 ¼ cups of instant oats, ¼ teaspoon of salt, and ½ teaspoon of baking powder. Mix with a spatula or wooden spoon until the dry ingredients are fully moistened and the batter is thick and cohesive. There should be no dry patches of oats visible. This is the structural core of the bars.
💡 Pierre’s Pro Tip: Be gentle when mixing the oats in. Over-mixing can break down the oat structure and make the bars gummy. Stop as soon as everything is combined.
Step 4: Fold and Pour
Fold in ⅓ cup of the chocolate chips, reserving the remaining ¼ cup for the top. Use a gentle folding motion to distribute the chips evenly without crushing them. Pour the mixture into your prepared loaf pan. Using the back of a spoon or a small spatula, spread it out evenly into the corners and smooth the top. Press the reserved chocolate chips into the surface of the batter.
⚠️ Common Mistake to Avoid: Don’t press the chocolate chips too deep into the batter. Placing them on top ensures they stay visible and create an attractive, melty finish.
Step 5: Bake and Cool
Bake in the preheated oven for 25-30 minutes. The bars are done when a knife or toothpick inserted into the center comes out clean, or with just a few moist crumbs attached. The top should be golden brown and feel firm to the touch. Let the bars cool in the pan for at least 10 minutes before transferring to a wire rack to cool completely. Cutting them while they are still warm will cause them to crumble.
💡 Pierre’s Pro Tip: For perfectly clean slices, let the bars cool completely to room temperature. Then use a sharp, serrated knife and saw gently through the bars. Wipe the knife clean between cuts for neat edges.
| Step | Action | Duration | Key Visual Cue |
|---|---|---|---|
| 1 | Mash bananas | 2 mins | Smooth with few lumps |
| 2 | Mix wet ingredients | 1 min | Uniformly combined |
| 3 | Add dry ingredients | 1-2 mins | No dry patches |
| 4 | Fold & pour | 2 mins | Evenly spread in pan |
| 5 | Bake | 25-30 mins | Golden top, knife clean |
Serving & Presentation
These peanut butter banana bars are wonderfully versatile. I love them straight from the fridge for a cool, dense, chewy snack—perfect for my morning commute on the subway. They also shine at room temperature, soft and tender. For a real treat, warm a bar in the microwave for 10-15 seconds and serve it with a scoop of vanilla ice cream. The contrast of warm, gooey chocolate and cold, creamy ice cream is pure magic.
When I serve these to friends after a dinner party, I often cut them into smaller squares and arrange them on a rustic wooden board. A light dusting of flaky sea salt (like Maldon) on top before baking adds a sophisticated touch that my French pastry chef friends always compliment. For a drizzle, melt a little extra peanut butter with a touch of coconut oil and spoon it over the bars. It’s a simple way to elevate a humble snack into something special.
| Pairing Type | Suggestions | Why It Works |
|---|---|---|
| Side Dish | Greek yogurt, fresh berries, sliced apple | Tangy and fresh contrast to sweet, dense bars |
| Sauce / Dip | Warm peanut butter drizzle, chocolate sauce, honey | Adds richness and fudgy texture |
| Beverage | Cold milk, hot coffee, iced chai latte | Balances sweetness and nuttiness |
| Garnish | Flaky sea salt, chopped peanuts, shredded coconut | Adds texture and flavor depth |
Make-Ahead, Storage & Reheating
In my busy NYC life, meal prep is a must. These bars are my secret weapon for a grab-and-go breakfast or a 3 PM snack. You can easily double the batch and freeze half for later. Just make sure they are completely cool before storing to prevent sogginess. Let me tell you exactly how to keep them at their best.



