Table of Contents
Teriyaki Chicken Skewers with Homemade Glaze – Sticky, Sweet, and Savory Perfection
I still remember the first time I made teriyaki chicken skewers in my tiny Parisian apartment, a world away from my mother’s kitchen in Marrakech. I had just learned the art of balancing sweet and savory at culinary school, and tasting that first batch of sticky, caramelized chicken—with the smoke from my little electric grill mixing with the scent of fresh ginger—I knew I had found my voice. These teriyaki chicken skewers are the perfect marriage of technique and soul, featuring a deeply flavorful homemade teriyaki sauce that delivers that glossy, restaurant-quality finish. The key to perfect teriyaki chicken is not in the shortcut; it’s in the love you pour into the sauce, and that’s exactly what this recipe brings.
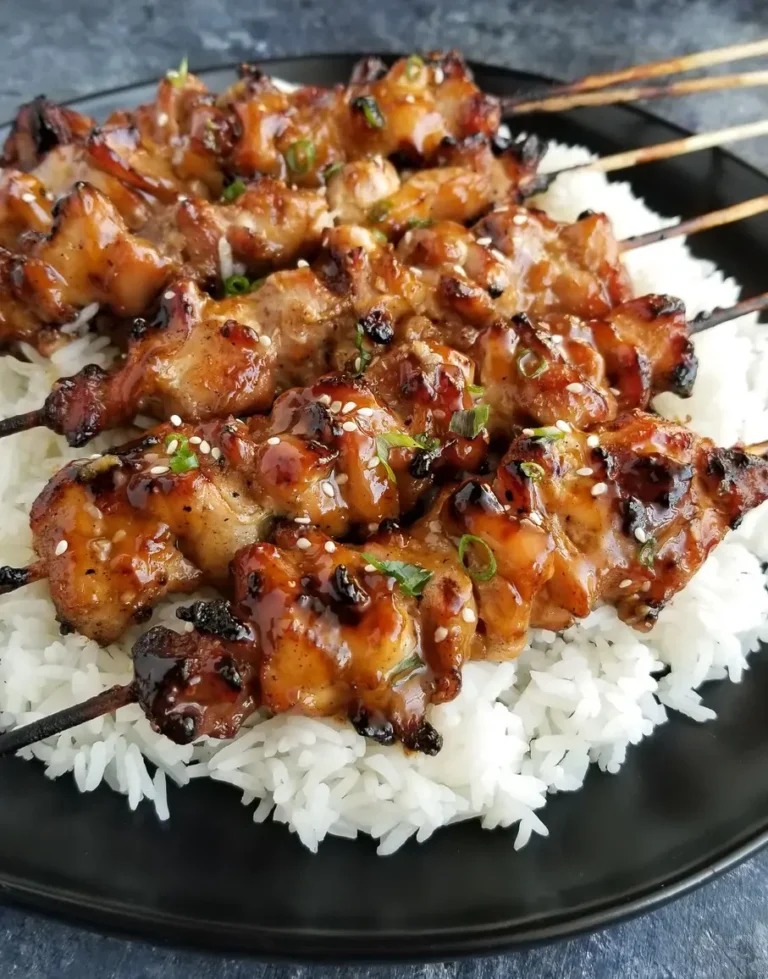
Picture this: tender, juicy chicken pieces, each one glistening with a sweet-savory dark brown glaze that clings like a promise. The aroma hits you first—soy sauce, garlic, ginger, and a hint of sesame oil—then the taste: a perfect harmony of salty, sweet, and umami with a whisper of tang from rice vinegar. The first bite reveals a slight char from the grill, giving way to impossibly moist meat that practically melts in your mouth. I love finishing them with a sprinkle of sesame seeds and fresh green onions; the nutty crunch and vibrant color are the final flourish that elevates this dish from simple to spectacular.
What makes my version of teriyaki chicken skewers stand out is the method. Many recipes rush the sauce, but I insist on cooling it completely before marinating—a trick I learned from a Parisian saucier who taught that temperature control is everything. This prevents the chicken from cooking prematurely and locks in the full depth of flavor. Oh, and here’s a little secret: I use a touch of cornstarch in the sauce to create that ideal, glossy thickness without corn syrup. Whether you’re a seasoned cook or new to the grill, this recipe is foolproof. Let me show you how to make these irresistible teriyaki chicken skewers.
Why This Teriyaki Chicken Skewers Recipe Is the Best
The Flavor Secret. The magic starts with the homemade teriyaki sauce—a rich blend of low sodium soy sauce, brown sugar, honey, ginger, and garlic that I’ve perfected over years of testing. Unlike store-bought versions that can be overly sweet or one-dimensional, this sauce builds layers: a deep, almost molasses-like sweetness from the brown sugar, a floral note from the honey, and a clean finish from the rice vinegar. I learned the importance of balance from my mother, who always said the best Moroccan tagines were about harmony—not domination. That principle carries through here.
Perfected Texture. The basting technique I use is critical. By reserving half the sauce for later and applying it during the last few turns on the grill, each layer of glaze thickens and caramelizes without burning. This creates a sticky, shiny crust that is unmistakably teriyaki. I also choose chicken thighs over breasts for their superior fat content, which ensures the meat stays wonderfully moist under high heat. A chef from my time in Paris once told me that the best protein for skewers has a little marbling, and he was right.
Foolproof & Fast. With a total active time of just 30 minutes plus a quick marination, this recipe is designed for busy weeknights or weekend entertaining. The steps are straightforward: make the sauce, marinate the chicken, grill, and baste. Even if you’ve never grilled before, the clear visual cues—thickened sauce, golden-brown edges, an internal temperature of 165°F—will guide you to perfect results every time. I’ve made these for friends in my tiny NYC kitchen with nothing but a grill pan, and they still disappear in minutes.
Teriyaki Chicken Skewers Ingredients
I love sourcing the freshest ingredients for my teriyaki chicken skewers. In New York, I head to the Union Square farmers market for local ginger and garlic, and a good soy sauce from a Japanese market in the East Village. Remembering my mother’s souk in Morocco, where she would pick out the most fragrant spices, I still insist on quality—it makes all the difference. Here is your complete ingredient list.
Ingredients List
- 2 lbs. chicken thighs (or breasts) (cut into 1″ cubes)
- 2 tbsp cornstarch
- 1 cup water
- 1/3 cup brown sugar
- 1/3 cup soy sauce (*low sodium recommended)
- 2 cloves garlic (minced)
- 1 tbsp rice vinegar
- 1/2 tbsp fresh ginger (minced)
- 1 tbsp honey
- 1/2 tsp sesame oil
- 8 skewers (soaked in water for 30 minutes if wooden)
- Sesame seeds (for garnish, optional)
- Chopped green onion (for garnish, optional)
Ingredient Spotlight
Soy Sauce. This is the backbone of any teriyaki dish. I strongly recommend low sodium soy sauce to control the saltiness, especially since the sauce is reduced. A good quality Japanese soy sauce, like Kikkoman, gives a clean, balanced flavor. If you need a gluten-free version, tamari works beautifully with almost no difference in taste.
Fresh Ginger. Do not even think about using dried ginger here. Fresh ginger adds a warm, zesty punch that cuts through the sweetness. When buying, look for smooth skin and a firm texture. A little goes a long way—just 1/2 tablespoon is enough. Store any leftover ginger in the freezer; it grates beautifully from frozen.
Chicken Thighs. They are my first choice for these skewers because of their higher fat content, which guarantees juicy, flavorful meat that doesn’t dry out on the grill. Boneless, skinless thighs are easiest. If you use chicken breasts, reduce cooking time slightly and watch the internal temperature carefully to prevent drying.
Brown Sugar. The deep, molasses-like sweetness of brown sugar is essential for that authentic teriyaki glaze. It caramelizes beautifully on the grill. Light or dark brown sugar both work; dark will give a richer, more complex flavor. I use dark brown sugar when I want a more intense color and taste.
| Original Ingredient | Best Substitution | Flavor / Texture Impact |
|---|---|---|
| Soy Sauce | Tamari (gluten-free) or coconut aminos | Slightly milder, less salt; coconut aminos adds subtle sweetness. |
| Chicken Thighs | Chicken breasts (skinless, boneless) | Less fat; can dry out. Reduce grill time by 3-5 minutes. |
| Brown Sugar | Coconut sugar or maple syrup (reduce water slightly) | Coconut sugar: less sweet, more earthy. Maple syrup: thinner glaze, more floral. |
| Fresh Ginger | 1/2 tsp ground ginger in a pinch | Lacks fresh heat and aroma; still acceptable if necessary. |
| Rice Vinegar | Apple cider vinegar or white wine vinegar | Slightly more acidic; use 1 tsp less to maintain balance. |
How to Make Teriyaki Chicken Skewers — Step-by-Step
Making the perfect teriyaki chicken skewers is easier than you think. Follow these steps, and you’ll have a beautiful, crowd-pleasing dish in no time.
Step 1: Make the Teriyaki Sauce
In a small bowl, whisk together 2 tablespoons of cornstarch and 1 cup of cold water until smooth. In a medium saucepan, combine this slurry with all remaining sauce ingredients: brown sugar, soy sauce, minced garlic, rice vinegar, minced ginger, honey, and sesame oil. Place over medium heat and stir frequently. The mixture will darken and begin to thicken after about 4-6 minutes. Once it reaches a consistency that coats the back of a spoon (like heavy cream), remove it from the heat.
💡 Pierre’s Pro Tip: Do not let the sauce boil too vigorously or it may become too thick. A gentle simmer is perfect. I like to let it cool completely in the fridge—this step is vital because warm sauce can partially cook the chicken during marinating, leading to less tender meat. In my Paris training, cooling sauce was part of the ritual for flavor preservation.
Step 2: Marinate the Chicken
Once the teriyaki sauce is completely cooled, place the cubed chicken pieces into a large ziplock bag. Pour half of the cooled sauce over the chicken. Seal the bag and gently shake to coat every piece evenly. Reserve the other half of the sauce in a separate bowl—this will be your basting sauce. Place the bag in the refrigerator and let the chicken marinate for at least 30 minutes. A longer marination (up to 2 hours) will deepen the flavor, but don’t go beyond 4 hours or the acid from the vinegar can start to break down the meat’s texture.
⚠️ Common Mistake to Avoid: Do not discard any of the sauce. You need half for marinating and half for basting. If you mix them together, the raw chicken juice could contaminate your final basting sauce. Always keep them separate!
Step 3: Skewer and Preheat
When the chicken is done marinating, thread the cubes onto skewers. If using wooden skewers, soak them in water for 30 minutes beforehand to prevent burning. Pack the chicken pieces snugly but not too tightly, leaving a little space for even cooking. Preheat your grill to medium heat (about 350-400°F). You can also use a grill pan or an outdoor grill.
💡 Pierre’s Pro Tip: For the best char, lightly oil the grill grates with a paper towel dipped in vegetable oil before placing the skewers. This prevents sticking and helps create those beautiful crosshatch marks. I also recommend using flat metal skewers, which conduct heat better and cook the chicken from the inside out.
Step 4: Grill and Baste
Place the skewers on the hot grill. Cook for about 20-30 minutes total, turning every 3-4 minutes to ensure even browning. During the final 5-6 minutes of cooking (the last two turns), use a basting brush to apply the reserved sauce to all sides of the chicken. The sauce will caramelize quickly, creating that signature sticky, glossy finish. The chicken is done when it reaches an internal temperature of 165°F in the thickest part of the meat.
⚠️ Common Mistake to Avoid: Basting too early can cause the sugar in the sauce to burn before the chicken is cooked through. Always wait until the last few minutes. Also, do not pile the skewers on the grill—they need space for the heat to circulate. Overcrowding will steam the chicken, not char it.
Step 5: Rest and Serve
Remove the skewers from the grill and let them rest for 2-3 minutes on a cutting board. This allows the juices to redistribute, ensuring every bite is moist. Serve immediately, garnished with a sprinkle of sesame seeds and fresh chopped green onions. The contrast of the warm, sticky chicken with the cool green onions is one of my favorite flavor combinations.
💡 Pierre’s Pro Tip: For an extra layer of flavor, I sometimes add a tiny pinch of chili flakes to the garnish for a subtle heat. And if you want to impress guests, serve the skewers on a bed of steamed jasmine rice and drizzle any extra sauce from the basting bowl over the top. My mother would always say that the sauce is the soul of the dish.
| Step | Action | Duration | Key Visual Cue |
|---|---|---|---|
| 1 | Make the sauce | 6-8 mins | Thickens to coat a spoon, dark brown |
| 2 | Marinate chicken | 30 min – 2 hrs | Chicken fully coated, no raw spots |
| 3 | Skewer & preheat | 10 mins | Skewers assembled, grill at medium heat |
| 4 | Grill & baste | 20-30 mins | Golden-brown char, internal temp 165°F |
| 5 | Rest & serve | 2-3 mins | Juices settle, shiny glaze |
Serving & Presentation
I love serving these teriyaki chicken skewers in a way that makes the table feel like a celebration. Arrange them on a large wooden platter, garnished with a generous sprinkle of sesame seeds and fresh green onions, and serve alongside a bowl of steamed jasmine rice. The rice soaks up any extra sauce and provides a perfect neutral canvas for the bold flavors. For a fresh contrast, I often add a simple cucumber salad with a rice vinegar dressing—it cuts through the richness beautifully.
For a more interactive meal, let everyone pull the chicken off the skewers themselves. I usually offer small bowls of extra sesame seeds, chili flakes, and a dollop of sriracha mayo for dipping. In New York, I’ve seen these disappear at summer BBQs; in Paris, they’d be the star of a picnic in the Luxembourg Gardens. The key is to keep the presentation simple, letting the glossy chicken speak for itself.
| Pairing Type | Suggestions | Why It Works |
|---|---|---|
| Side Dish | Steamed jasmine rice, cucumber salad, or edamame | Rice absorbs sauce; salad offers crunch; edamame adds protein |
| Sauce / Dip | Extra teriyaki sauce, sriracha mayo, or soy-ginger dip Teriyaki Chicken SkewersDescriptionThe most delicious marinated teriyaki chicken grilled to perfection and finished with a delicious teriyaki sauce. Serve with a sprinkle of sesame seeds, fresh chopped green onions over steamed rice. Ingredients
Scale
Instructions
About Me Hey! I’m Pierre, the heart behind Meaty Delights. Cooking has always been my passion, and I love creating bold, flavorful recipes that make every meal truly memorable.
Recent Recipes |


