Table of Contents
Stuffed Taco Peppers (Low Carb + High Protein) – A Keto-Friendly Taco Night That’s Naturally Gluten-Free
I still remember the first time I made stuffed taco peppers. It was a busy Tuesday night in my tiny NYC apartment, and I was craving the bold flavors of taco night but wanted something lighter. Back in Morocco, my mother would fill bell peppers with spiced ground meat and rice, but here I swapped the rice for a creamy, low-carb filling that keeps all the satisfaction. This stuffed taco peppers recipe is my answer to a high-protein, low-carb dinner that doesn’t skimp on flavor. With tender bell peppers, seasoned ground beef, and melted cheddar, it’s everything you love about tacos—minus the carbs.
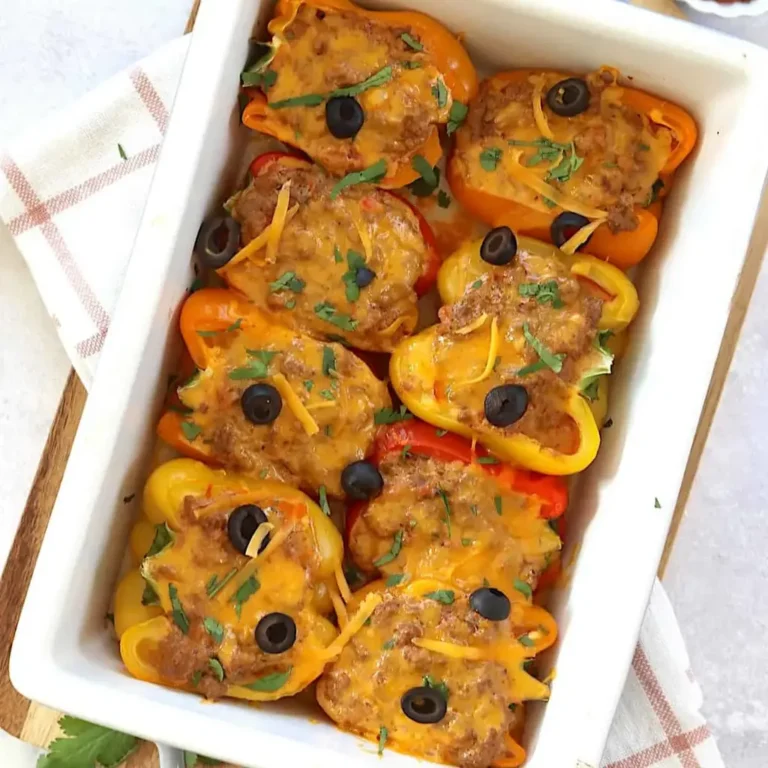
When these peppers come out of the oven, the cheese is bubbly and golden, the peppers are soft but not mushy, and the filling is rich with taco seasoning, tangy sour cream, and chunky salsa. The aroma alone—think warm cumin, garlic, and smoky chili—fills my entire kitchen. It reminds me of the spice souks in Marrakech, where you can smell the cumin and paprika from a block away. Each bite gives you that perfect contrast: the slightly sweet pepper against the savory, almost creamy beef mixture. It’s comfort food that actually makes you feel good.
What I love most about this recipe is how it brings together my three culinary worlds. The technique of par-cooking the peppers in the microwave comes straight from my Paris training—it ensures they finish perfectly tender in the oven without getting watery. The bold, layered seasoning and the way I balance the sour cream with the salsa is a nod to my mother’s North African cooking, where dairy and spice often dance together. And the whole concept—taco night, but healthier—is pure New York. Let me share a game-changer: microwaving the peppers first not only saves time but also guarantees they’re not crunchy. Skip this step and you might end up with undercooked peppers after the baking time. This is one low carb dinner that’s foolproof when you follow these simple steps.
Why This Stuffed Taco Peppers (Low Carb + High Protein) Recipe Is the Best
The Flavor Secret: The magic lies in the combination of taco seasoning, sour cream, and salsa stirred directly into the cooked beef. Instead of a dry filling, you get a creamy, cohesive mixture that clings to every bite of pepper. The sour cream mellows the heat from the taco seasoning while adding richness—a technique I learned in pastry school (yes, balancing acidity and fat applies everywhere). Plus, the double layer of cheddar—first mixed in, then sprinkled on top—creates an irresistible crust that locks in moisture.
Perfected Texture: The key to perfect stuffed peppers is the par-cooking step. By microwaving the pepper halves with a little water before stuffing and baking, they start to soften evenly. Then, during the 20 to 30 minutes in the oven, they finish cooking to that ideal tender-but-sturdy texture. No sogginess, no crunch—just bell peppers that yield gently to your fork. This is a professional cook’s trick I picked up in Paris—it’s all about controlling the cooking process step by step.
Foolproof & Fast: This recipe is designed for busy weeknights. You can have the filling ready in under 10 minutes, and the oven does the rest. It’s a complete meal in one dish, with minimal cleanup. Even if you’re new to cooking, the instructions are clear and the visual cues—like “cheese is melted” and “peppers are soft”—make it impossible to mess up. I’ve tested this dozens of times in my NYC kitchen, and it works every single time.
Stuffed Taco Peppers Ingredients
I use simple, everyday ingredients that you can find at any grocery store—even in a small Manhattan bodega. The key is to pick fresh, colorful bell peppers (I love mixing red, yellow, and orange for natural sweetness) and good-quality ground beef. On weekends, I sometimes visit the Union Square Greenmarket for the sweetest peppers, but any variety works.
Ingredients List
- 4 medium bell peppers, any color (seeded and halved)
- 1½ pounds lean ground beef
- 1 recipe or packet taco seasoning mix (use gluten free if needed)
- ¾ cup water
- 1½ cup cheddar cheese, shredded
- 1 cup sour cream
- ½ cup salsa (mild or medium)
Ingredient Spotlight
Bell Peppers: They are the vessel for this entire dish, so choose peppers that are firm, glossy, and free of blemishes. Red, yellow, or orange peppers are naturally sweeter and less bitter than green—perfect for taco flavors. If you only find green, consider adding a pinch of sugar to the filling to balance out the bitterness.
Lean Ground Beef: Using 85/15 or 90/10 lean ground beef keeps the filling moist without being greasy. If you use a higher-fat blend, be sure to drain the excess fat thoroughly after browning, or the peppers may become soggy. Ground turkey or chicken also work beautifully—just add a tablespoon of olive oil to the pan to keep them moist.
Cheddar Cheese & Sour Cream: These two ingredients create the creamy, tangy base that makes the filling so luscious. I prefer sharp cheddar for its bold flavor, but mild cheddar or even Monterey Jack are excellent substitutes. Full-fat sour cream is best because it holds up better during baking; low-fat versions can separate and make the filling watery.
| Original Ingredient | Best Substitution | Flavor / Texture Impact |
|---|---|---|
| Lean ground beef | Ground turkey (93/7) | Leaner, slightly milder flavor; add 1 tbsp oil |
| Cheddar cheese | Monterey Jack or Pepper Jack | Creamier/milder or spicier; melts similarly |
| Sour cream | Plain Greek yogurt (full-fat) | Tangier, slightly thicker; less rich, still creamy |
| Taco seasoning packet | Homemade: chili powder, cumin, paprika, garlic powder, onion powder, oregano | Customizable heat level, lower sodium, fresher taste |
How to Make Stuffed Taco Peppers — Step-by-Step
I’ll walk you through each step so you feel confident. The process is straightforward, but a few small details make a big difference — and my Paris-trained chef’s eye for technique ensures everything comes out perfect.
Step 1: Prepare the Peppers
Wash the bell peppers well, then slice each one lengthwise from stem to bottom. Remove the seeds and the white membranes with a small knife or your fingers. Try to keep the halves intact — they should look like little boats. If the peppers wobble on the cutting board, trim a thin slice off the bottom so they sit flat.
💡 Pierre’s Pro Tip: Save the pepper tops! Dice them finely and sauté them with the ground beef for extra flavor and less waste. It’s a trick from my mother’s Moroccan kitchen — never throw away vegetable scraps that can add flavor.
Step 2: Microwave the Peppers
Place the pepper halves cut-side up in a microwave-safe casserole dish. Add ¼ cup water to the bottom of the dish — this creates steam that gently softens the peppers. Cover the dish with a microwave-safe lid or plastic wrap (leave a small vent). Microwave on high for 5 to 6 minutes, or until the peppers are just starting to soften but still hold their shape. Carefully drain any excess water — use an oven mitt, the dish will be hot!
⚠️ Common Mistake to Avoid: Overcooking the peppers in the microwave. They should be pliable but not falling apart. If they are too soft, they’ll collapse during baking. If they are too firm, they’ll still be crunchy after the oven. 5 to 6 minutes is the sweet spot for medium peppers.
Step 3: Brown the Meat
While the peppers are cooking, heat a large skillet over medium heat and add the ground beef. Cook, breaking it up with a spoon or spatula, until no longer pink — about 6 to 8 minutes. If your beef is not lean, drain off the excess fat now. Stir in the taco seasoning packet (or your homemade blend) and ¾ cup water. Bring to a simmer and cook for 2 to 3 minutes, stirring occasionally, until the liquid thickens and the mixture becomes glossy and aromatic.
💡 Pierre’s Pro Tip: For deeper flavor, let the beef develop a nice brown crust before breaking it up too much. I call this ‘the Paris sear’ — it adds a savory, caramelized note that takes the filling from good to exceptional.
Step 4: Make the Filling
Remove the skillet from the heat. Stir in the sour cream, salsa, and 1 cup of the shredded cheddar cheese. Mix until everything is fully combined and the cheese starts to melt into the beef. The filling should look creamy and cohesive, not dry. Taste and adjust seasoning if needed — I sometimes add a pinch more cumin if I want that Moroccan-inspired warmth.
⚠️ Common Mistake to Avoid: Adding the cheese while the pan is still very hot can cause it to clump or separate. Let the skillet cool off the heat for about 30 seconds first, then stir. This gives you a smooth, even filling.
Step 5: Fill and Bake
Arrange the par-cooked pepper halves in a 9×13-inch baking dish (sprayed with nonstick spray). Divide the beef mixture evenly among the 8 halves, mounding it slightly. Sprinkle the remaining ½ cup cheddar cheese over the top of each pepper. Bake at 350°F for 20 to 30 minutes, or until the peppers are soft and tender when pierced with a fork, the filling is heated through, and the cheese is bubbly and golden brown.
💡 Pierre’s Pro Tip: For an extra golden, slightly crispy cheese topping, switch the oven to broil for the last 2 minutes of baking. Watch it closely — broilers are powerful, and you want a beautiful brown crust, not burnt cheese!
| Step | Action | Duration | Key Visual Cue |
|---|---|---|---|
| 1 | Prepare peppers | 5 mins | Halves are seedless and sit flat |
| 2 | Microwave peppers | 5-6 mins | Peppers are pliable, not collapsed |
| 3 | Brown meat | 6-8 mins | Beef is browned, mixture thickens |
| 4 | Make filling | 2 mins | Creamy, homogeneous mixture |
| 5 | Fill and bake | 20-30 mins | Cheese golden, peppers tender |
Serving & Presentation
These stuffed taco peppers are a meal on their own, but they love a few bright, fresh toppings to balance the richness. I like to serve them with a dollop of extra sour cream, a sprinkle of fresh cilantro (or parsley if you’re not a cilantro fan), and a few slices of avocado. The creamy avocado is a perfect foil to the warm, spicy filling — a combination I first fell in love with at a taco stand in Brooklyn’s Smorgasburg. For a touch of crunch, add some shredded lettuce or a few crushed tortilla chips (if you’re not strictly low-carb).
When I serve these for guests, I arrange the pepper halves on a platter, cut side up, and let everyone choose their own toppings from small bowls — kind of like a deconstructed taco bar. It’s interactive and fun, and the colors of the peppers (red, yellow, orange) make the table look beautiful. I also love pairing this dish with a simple side salad dressed with lime and olive oil, or some Mexican street corn (elote) if I’m feeling indulgent.
| Pairing Type | Suggestions | Why It Works |
|---|---|---|
| Side Dish | Cauliflower rice, green salad, roasted zucchini | Keeps the meal low-carb / fresh and light |
| Sauce / Dip | Extra sour cream, guacamole, hot sauce | Adds creaminess, richness, or heat |
| Beverage | Agua fresca, light beer, sparkling water with lime | Refreshing, not heavy; cuts richness |
| Garnish | Fresh cilantro, sliced avocado, pickled jalapeños | Brightens flavor adds texture and color |
Make-Ahead, Storage & Reheating
As a busy NYC food blogger, I rely on meals like this for my weekly meal prep. You can easily assemble these stuffed peppers a day or two ahead, then bake them when you’re ready. The filling also freezes beautifully — great for doubling the recipe and storing half for later. Here’s how I manage it in my tiny Manhattan kitchen.



