Table of Contents
Lattice Apple Pie – The Best Foolproof Recipe for Thanksgiving
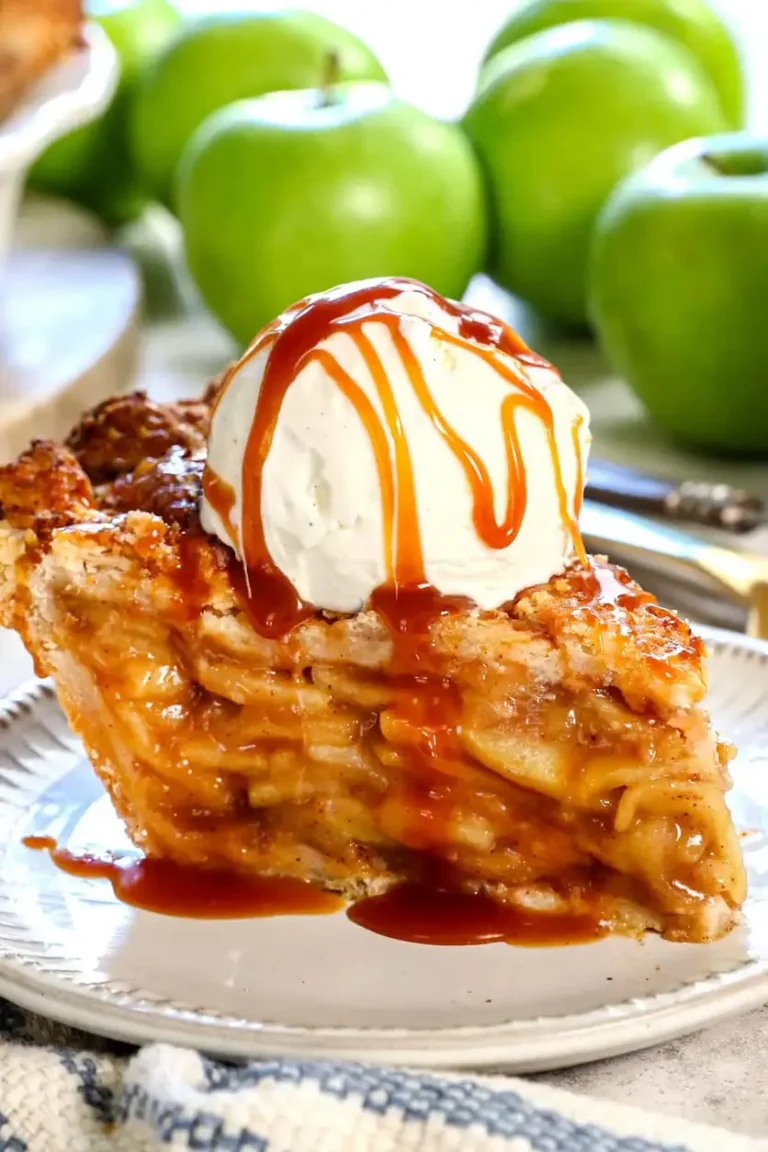
I still remember the first lattice apple pie I baked after moving to New York City. I was fresh out of culinary school in Paris, standing in my tiny East Village kitchen, surrounded by Honeycrisp apples from the Union Square Greenmarket. My mother back in Morocco would never have dreamed of weaving dough into a lattice top — her pies were always rustic, covered with a simple crust. But that day, I wanted to create something that felt both elegant and deeply comforting. This is the BEST 100% foolproof apple pie recipe, so bring it to Thanksgiving with confidence! By following my technique, you and your guests will sink your teeth into a mountain of perfectly tender, flavorful apples enveloped in a caramel-like sauce that is never runny, the right balance of sweet and tart, and a golden, never-soggy crust. See the post for step-by-step photos and helpful tips and tricks.
Let’s talk about that filling for a moment. It’s a symphony of textures and flavors — the Honeycrisp apples offer a sweet crunch, while the Granny Smith apples bring a tart brightness that cuts through the richness. The spices — cinnamon, ginger, nutmeg, and allspice — are layered in just the right proportions, creating a warm, aromatic aroma that fills your kitchen as it bakes. The sauce is thick enough to coat each apple slice like a gentle caramel, but never stiff or gluey. And the crust? We’re talking browning perfection, flaky layers, and a bottom that stays crisp even after a few days. It’s technique, not luck.
This recipe is the culmination of everything I learned in Paris about pastry structure and temperature control, combined with the bold, generous spirit of American home baking. My secret weapon? Pre-cooking the filling on the stovetop. This one step changes everything — it locks in the apple’s flavor, caramelizes the sugars, and, most importantly, prevents that dreaded runny pie. I’ll share all the details below, plus my foolproof lattice weaving method. One common mistake people make is skipping the chill time. Don’t worry — I’ve got your back with a tip for that, too.
Why This Lattice Apple Pie Recipe Is the Best
The Flavor Secret: This pie is built on a foundation of layered, spiced apple flavors. The key is pre-cooking the filling. In my French culinary training, we call this a “confits” approach — you gently cook the fruit in its own juices with sugar and spices. This concentrates the apple flavor without turning it into mush. Plus, using a blend of Honeycrisp and Granny Smith apples ensures a perfect balance of sweet and tart that is impossible to achieve with a single variety. This is a unique angle you won’t find in most recipes.
Perfected Texture: The crust is everything. I’ve spent years perfecting a dough that is both flaky and sturdy enough to hold a generous filling. The trick is to keep your butter cold and to rest the dough properly. The lattice top adds visual drama, but it’s also structural — it allows steam to escape while the crust bakes to a golden brown that is simply breathtaking. No soggy bottoms here, just pure, crispy delight.
Foolproof & Fast: This recipe is designed for American home cooks. I’ve broken it down into clear, manageable steps. The pre-cooked filling means you don’t have to worry about under-baked apples. The make-ahead components (you can prepare the dough and filling days in advance) remove all the last-minute stress. Perfect for a holiday like Thanksgiving, or any day you want to wow your family with a classic dessert that tastes like you spent forever on it.
Lattice Apple Pie Ingredients
One of my favorite things about this recipe is shopping for it. On a crisp fall morning, I’ll wander over to the Greenmarket right by my apartment. The smell of apples and cinnamon fills the air. I hand-pick each Honeycrisp and Granny Smith, feeling their weight and smelling their sweet perfume. It reminds me of my mother’s kitchen, where she would always have a bowl of fresh fruit, and of the perfect pommes we used in tarts in Paris. Here’s everything you’ll need for this unforgettable Lattice Apple Pie.
Ingredients List
- 2 recipes Homemade Pie Crust (1 for bottom crust and 1 for lattice top)
- Egg wash: 1 egg beaten with 1 TB heavy cream (may sub milk)
- Optional: Coarse raw sugar for sprinkling on lattice topping
- 3 1/2 pounds Honeycrisp apples
- 1 1/2 pounds Granny Smith apples
- 2/3 cup packed light brown sugar
- 1/2 cup granulated sugar
- 1/3 cup + 1 TB all-purpose flour
- 2 tablespoons lemon juice, divided
- 1 1/2 teaspoons ground cinnamon
- 1/2 tsp EACH ground ginger, ground nutmeg, allspice
- 1/8 teaspoon salt
- 1 teaspoon vanilla extract
Ingredient Spotlight
Honeycrisp Apples: These are my absolute favorite for pie. They hold their shape beautifully and offer a sweet, juicy bite. When choosing, look for firm apples with a rich red and green color. Avoid any with soft spots or bruises. They are widely available at most US grocery stores from September through spring.
Granny Smith Apples: These tart green apples provide the perfect balance to the sweet Honeycrisps. They break down slightly more, helping to create that creamy caramel-like sauce. I always pick a few that feel heavy for their size — a sign they are full of juice.
Light Brown Sugar: This is non-negotiable for the signature caramel flavor. It adds molasses notes that granulated sugar simply cannot replicate. Always pack it firmly into your measuring cup for accuracy.
All-Purpose Flour: This acts as the thickener for the filling. It’s important to use exactly the amount listed to ensure a thick, never-runny sauce. Do not use cornstarch as a substitute without adjusting the quantity.
| Original Ingredient | Best Substitution | Flavor / Texture Impact |
|---|---|---|
| Honeycrisp Apples | Fuji or Braeburn | Slightly sweeter, still hold shape well. |
| Granny Smith Apples | Pink Lady or Cortland | Less tart but still good balance; Cortland breaks down more. |
| Light Brown Sugar | Dark Brown Sugar | Stronger molasses flavor, darker color. |
| All-Purpose Flour | Tapioca Starch | Gluten-free option; use 2 TB less. Creates a clearer gel. |
How to Make Lattice Apple Pie — Step-by-Step
Alright, let’s get baking! This lattice apple pie might look fancy, but I promise you, with a little patience, you can absolutely nail it. Remember, the secret to a perfect lattice is cold dough. Let’s begin.
Step 1: Prepare the Pie Dough
Note: The Apple Pie Filling can be made at any time and refrigerated until ready to add to the pie pan. See Note/Warning if using a glass pie pan before you begin. Make the initial part of the dough by preparing one pie crust recipe through step 6 under “Make Dough.” Then prepare the second pie crust through “Roll Dough” using a standard 9-10-inch pie pan (1 1/2-inches deep).
💡 Pierre’s Pro Tip: Always work with chilled butter and ice water. In my Paris training, we learned that cold butter creates steam pockets in the oven, making the crust flawlessly flaky.
Step 2: Brush and Chill the Bottom Crust
Lightly brush the bottom and sides of the crust in the pan (not the edges that will be fluted) with the egg wash. Reserve the leftover egg wash in the refrigerator. I find it easiest to do this after the pie dough has firmed up a bit, so place the pie in the freezer for 20 minutes. After adding the egg wash, immediately cover the pie and refrigerate it while you prep the rest of the recipe (at least 45 minutes up to 5 days before baking).
⚠️ Common Mistake to Avoid: Don’t skip the egg wash on the bottom crust. It forms a seal that prevents the filling from making the bottom soggy.
Step 3: Roll and Cut the Lattice Strips
Place a large piece of parchment paper on a baking sheet and generously dust with flour. Roll the dough disc into a rough 11×11-inch rectangle on the parchment paper. Cover and freeze the dough (on the baking sheet) for 20-30 minutes for easier, cleaner slices. After chilling, use a ruler and a pizza cutter, pastry wheel, or sharp knife to cut the dough into 1-inch-wide strips. Cover with plastic wrap and freeze for 30 minutes or refrigerate for up to 24 hours for MUCH easier-to-handle lattices. When you’re ready, make the apple pie filling first.
💡 Pierre’s Pro Tip: A pastry wheel gives you those beautiful, scalloped edges on your lattice strips. It’s a small detail that makes a big visual difference.
Step 4: Slice and Cook the Apples
Peel the apples and make 4 slices around the core to remove it. Lay the 4 remaining apple segments, cut side down, on a cutting board, and slice into 1/8-inch slices. Transfer the apples to a large Dutch oven as you go. Add the sugars, flour, 1 tablespoon of lemon juice, and spices to the sliced apples and set over medium heat. Gently stir until evenly coated. Cover and cook for 15-20 minutes, stirring every couple minutes. The apples are done when they reach YOUR desired tenderness — they will not become more tender in the oven. They should be fork-tender but still hold their shape. Once tender, stir in the remaining 1 tablespoon of lemon juice and the vanilla.
⚠️ Common Mistake to Avoid: Overcooking the apples at this stage will make them mushy. You want them to be tender but still have a slight bite, as they will cook again in the oven.
Step 5: Cool the Filling
Line a rimmed baking sheet with parchment paper or a silicone baking mat for easy cleanup. Transfer the apples and their caramel juices to the baking sheet. Pop the pan in the fridge or freezer to cool to room temperature for about 25 minutes. Once cooled, transfer them and the sauce to the chilled pie shell, rearranging and layering them horizontally to compact.
💡 Pierre’s Pro Tip: Cooling the filling is crucial. If you add hot filling to the cold dough, it will melt the butter and make the crust tough.
Step 6: Weave the Lattice Top
If the strips become too stiff to work with, let them rest on the counter for 10 minutes. Start by laying five horizontal strips evenly spaced over the pie (center the middle strip). Fold the first, third, and fifth horizontal strips back and place a vertical strip on the left side. Unfold the first, third, and fifth strips over the perpendicular strip and fold the second and fourth strips back. Add a second vertical strip, then unfold the second and fourth strip. Repeat for a total of ten strips, five running in each direction.
💡 Pierre’s Pro Tip: Don’t worry if it’s not perfect. The beauty of a lattice is in its imperfections. If a strip breaks, just press it back together — it will bond during baking.
Step 7: Edge and Glaze
Press the edges of the strips into the edges of the crust to seal. Flute, crimp, or create whatever edge design you prefer. Lightly brush the edges and the lattice top with the egg wash. Sprinkle the lattice top (avoid the edges) with coarse sugar if using. Chill the unbaked pie for 30 minutes. This step is critical to prevent shrinking.
⚠️ Common Mistake to Avoid: If using a glass pie pan, do not chill the pie for too long, as the temperature difference can cause the pan to shatter. Follow the specific note in the recipe.
Step 8: Bake and Cool
Immediately after transferring the pie to the fridge, place a baking sheet on the bottom rack of your oven and preheat the oven to 425 degrees F. Transfer the chilled pie to the rimmed baking sheet. Bake at 425 degrees F for 25 minutes (watch the crust). Reduce the heat to 375 degrees F and continue to bake for 35-45 minutes or until the filling is bubbling around the edges. If it’s not bubbling, your filling will be runny. Cover edges with a pie shield if they brown too quickly. After baking, let the pie rest for 4 hours to cool to room temperature.
💡 Pierre’s Pro Tip: The four-hour rest is non-negotiable. It allows the filling to set into a perfect sliceable consistency. I like to make this pie the night before serving.
| Step | Action | Duration | Key Visual Cue |
|---|---|---|---|
| 1 | Prepare Dough | 30 mins | Chilled, firm dough |
| 2 | Brush Bottom Crust | 5 mins | Glossy surface |
| 3 | Roll & Cut Strips | 20 mins | Even 1-inch strips |
| 4 | Cook Filling | 15-20 mins | Fork-tender apples |
| 5 | Cool Filling | 25 mins | Room temperature |
| 6 | Weave Lattice | 10 mins | Neat, woven pattern |
| 7 | Chill | 30 mins | Firm to the touch |
| 8 | Bake & Cool | 4 hrs total | Golden crust, bubbling edges |
Serving & Presentation
This lattice apple pie is a showstopper all on its own. The golden, woven crust, dotted with sparkling coarse sugar, is enough to make anyone’s mouth water. I like to serve it warm — not hot, but just warm enough to melt a scoop of vanilla bean ice cream. In New York City, you’ll find this combination in nearly every diner and bakeshop, but this homemade version is leagues better. A few fresh mint leaves on the plate add a pop of color and a
Print
Lattice Apple Pie
Description
This is the BEST 100% foolproof Apple Pie recipe, so bring it to Thanksgiving with confidence! By following my technique, you and your guests will sink your teeth into a mountain of perfectly tender, flavorful apples enveloped in a caramel-like sauce that is never runny, the right balance of sweet and tart, and a golden, never-soggy crust. See the post for step-by-step photos and helpful tips and tricks.
Ingredients
- 2 recipes Homemade Pie Crust ((1 for bottom crust and 1 for lattice top))
- Egg wash: 1 egg beaten with 1 TB heavy cream ((may sub milk))
- Optional: Coarse raw sugar for sprinkling on lattice topping
- 3 1/2 pounds Honeycrisp apples
- 1 1/2 pounds Granny Smith apples
- 2/3 cup packed light brown sugar
- 1/2 cup granulated sugar
- 1/3 cup + 1 TB all-purpose flour
- 2 tablespoons lemon juice, (divided)
- 1 1/2 teaspoons ground cinnamon
- 1/2 tsp EACH ground ginger, ground nutmeg, allspice
- 1/8 teaspoon salt
- 1 teaspoon vanilla extract
Instructions
- Note: The Apple Pie Filling can be made at any time and refrigerated until ready to add to the pie pan. See Note/Warning if using a glass pie pan before you begin.
- Make the Pie Dough: Prepare one pie crust recipe through step 6 under Make Dough (click HERE for the recipe.) Prepare the second pie crust through step 2 under Roll Dough using a standard 9-10-inch pie pan (1 1/2-inches deep).
- Make the Bottom Pie Crust: Lightly brush the bottom and sides of the crust in the pan (not edges that will be fluted) with the egg wash. Reserve the egg wash in the refrigerator for later. Tip: I find it easiest to add the egg wash after the pie dough has firmed up a bit, so I place the pie in the freezer for 20 minutes. After adding the egg wash, immediately cover the pie and refrigerate it while you prep the rest of the recipe (at least 45 minutes up to 5 days before baking).
- Roll Out the Dough for the Lattice Top: Place a large piece of parchment paper on a baking sheet and generously dust with flour. Roll the dough disc into a rough 11×11-inch rectangle on the parchment paper. At this point, I cover and freeze the dough (on the baking sheet) for 20-30 minutes for easier/cleaner slices.
- Make the Lattice Strips: After chilling, use a ruler and a pizza cutter, pastry wheel, or sharp knife to cut the dough into 1-inch-wide strips. Cover with plastic wrap and freeze for 30 minutes or refrigerate for up to 24 hours for MUCH easier-to-handle lattices. When you're ready to use the lattices, make the apple pie filling first:
- Slice the apples: Peel the apples and make 4 slices around the core to remove it. Lay the 4 remaining apple segments, cut side down, on a cutting board, and slice into 1/8-inch slices. Transfer the apples to a large Dutch oven as you go to keep the workspace clean.
- Apple pie filling: Add the sugars, flour, 1 tablespoon of lemon juice, and spices to the sliced apples and set over medium heat. Gently stir until evenly coated. Cover and cook for 15-20 minutes, stirring every couple minutes and replacing the lid. The apples are done when they reach YOUR desired apple pie tenderness they will not become more tender in the oven. They should be fork-tender but still hold their shape. (They will not become mushy when baked; see the science behind it in the post.) Once tender, stir in the remaining 1 tablespoon of lemon juice and the vanilla.
- Cool the Apples: Line a rimmed baking sheet with parchment paper or a silicone baking mat for easy cleanup. Transfer the apples and their caramel juices to the baking sheet. Pop the pan in the fridge or freezer to cool to room temperature for about 25 minutes.
- Assemble: Once the apples have cooled, transfer them and the sauce to the chilled pie shell, rearranging and layering them horizontally to compact.
- Weave the Lattice Top (See Post for Photos): If the strips become too stiff to work with, let them rest on the counter for 10 minutes. Start by laying five horizontal strips evenly spaced over the pie (center the middle strip). Fold the first, third, and fifth horizontal strips back and place a vertical strip on the left side. Unfold the first, third, and fifth strips over the perpendicular strip and fold the second and fourth strips back. Add a second vertical strip, then unfold the second and fourth strip. Repeat the process for a total of ten strips, five running in each direction.
- Make the Edges: Press the edges of the strips into the edges of the crust to seal. Flute, crimp, or create whatever edge design you prefer. Lightly brush the edges and the lattice top with the egg wash. Sprinkle the lattice top (avoid the edges) with coarse sugar if using.
- Refrigerate: Chill the unbaked pie for 30 minutes. Dont skip this stepit will help the crust not shrink unless you have a glass pie pan. Then, bake without chilling, or the pan can shatter (see Notes).
- Preheat the Oven: Immediately after transferring the pie to the fridge, place a baking sheet on the bottom rack of your oven and preheat the oven to 425 degrees F so the baking sheet can get very hot.
- Bake: Transfer the chilled pie to the rimmed baking sheet. Bake at 425 degrees F for 25 minutes (keep an eye on the crust so it doesn't become too brown). Reduce the heat to 375 degrees F and continue to bake for 35-45 minutes or until the filling is bubbling around the edges (if you dont wait for it to bubble, your filling will be runny). Cover the edges with a pie shield or the top with foil if they are browning too quickly.
- Cool: Transfer the pie to a cooling rack and let it rest for 4 hours to cool to room temperature so the filling can set. You can pop the pie in the fridge or freezer to speed up the cooling process. The pie can rest at room temperature for up to 2 days or be refrigerated for up to 5.
- Reheat: After the pie has cooled, you can reheat/refresh it in the oven. Tent the pie with foil and place it in a cold oven. Turn the oven to 375 degrees F, and when the preheat bell dings, leave the pie in for another 10-15 minutes or until warmed.



