Table of Contents
Chocolate Chip Cookies – The Perfectly Chewy, Ooey-Gooey Sweet Tooth Cure
Growing up in Morocco, my mother’s kitchen was a symphony of warm spices—cinnamon, cardamom, and turmeric dancing in tagines and couscous. But every Friday, she’d set aside the spices and bake something sweet: a tray of simple cookies that transported us. Now, living in New York City and trained at Le Cordon Bleu in Paris, I’ve developed my version of the perfect chocolate chip cookies: the perfectly chewy, chocolatey, ooey-gooey answer to those intense sweet tooth cravings. This recipe is my number one, the most popular cookie I make, and it’s ready in under 20 minutes.
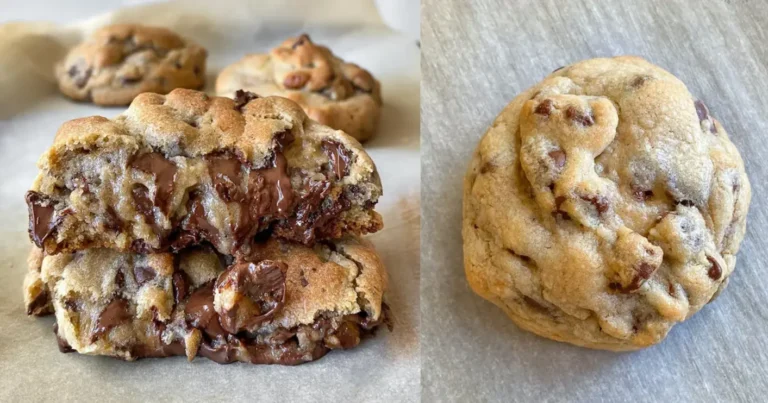
Imagine pulling a baking sheet from the oven, the air thick with the scent of browned butter and melted chocolate. The cookies are golden at the edges, soft and pillowy in the center, with each bite revealing pockets of gooey semi-sweet chocolate. The texture is pure magic—chewy yet tender, with a slight crispiness from the golden-brown tops. This isn’t just any chocolate chip cookie recipe; it’s a masterclass in balance, using cold butter and a high oven temperature to create that signature crackly top and soft interior.
What makes these chocolate chip cookies truly special? It’s the technique: using cold butter straight from the fridge, which slows down spreading and yields thicker, chewier cookies. I also add a touch of cornstarch for extra tenderness. In this post, I’ll share my foolproof method, including my secret for perfectly gooey centers every time, plus common mistakes to avoid. Whether you’re a beginner or a seasoned baker, this recipe will become your go-to. From my NYC kitchen to yours, let’s bake.
Why This Chocolate Chip Cookies Recipe Is the Best
The Flavor Secret: The magic starts with cold butter. In Paris, I learned that temperature controls texture. Using cold butter (instead of room temperature) forces the dough to spread less, resulting in chewier, thicker cookies. Combined with a double dose of sugars—granulated for crisp edges and brown sugar for deep molasses flavor—each cookie is perfectly balanced. I also use a full bag of semi-sweet chips, ensuring chocolate in every bite without overwhelming sweetness.
Perfected Texture: The cornstarch is my secret weapon. It tenderizes the gluten, making the cookies incredibly soft and pillowy. The high oven temperature—475°F instead of the typical 350°F—sets the edges quickly, creating a golden crust while the center stays gooey. This is a technique I adapted from a pastry chef in Paris, and it’s non-negotiable for achieving that ooey-gooey center.
Foolproof & Fast: With just 12 minutes of prep and 7 minutes of baking, these are the fastest, most reliable cookies I know. They’re perfect for beginners because the cold butter eliminates the guesswork of softening. Even if you overmix slightly, the cornstarch and high heat save the day. No chilling required, no special equipment—just a spoon, a bowl, and your oven.
Chocolate Chip Cookies Ingredients
I shop for my baking staples at the Union Square Greenmarket in NYC where I find the freshest butter and eggs. But this recipe works with pantry basics. The key is quality—good butter and real vanilla make all the difference. In Morocco, my mother used a local butter called “smen,” but here in the US, I rely on unsalted butter from a trusted brand like Kerrygold.
Ingredients List
- 1¼ cups all-purpose flour
- 3 tablespoons cornstarch
- ½ teaspoon salt
- ½ teaspoon baking soda
- ½ cup cold butter (1 stick, about 113g)
- 6 tablespoons granulated sugar
- 6 tablespoons brown sugar (packed)
- 1 large egg
- ½ teaspoon vanilla extract
- 1 bag (10-11 oz) semi-sweet chocolate chips (use half if you prefer less chocolate)
- ¼ cup walnut pieces (optional)
Ingredient Spotlight
Cold Butter: This is the star of the show. Cold butter (straight from the fridge) creates steam pockets during baking, leading to a taller, chewier cookie. If you use room-temperature butter, the cookies will spread too thin and become crispy. Substitute with cold margarine for a dairy-free option, but expect a slightly softer texture.
Cornstarch: This is my secret ingredient for pillowy softness. It inhibits gluten formation, making the cookies tender. Do not skip it—it’s the reason these cookies stay soft for days. If you’re gluten-free, substitute the flour with a 1:1 gluten-free blend and add an extra tablespoon of cornstarch.
Semi-Sweet Chocolate Chips: I prefer chips over chunks because they melt uniformly and create even pockets of chocolate. A 10-11 oz bag gives the perfect chocolate-to-dough ratio. For a darker flavor, use bittersweet chips (60% cacao). For a sweeter cookie, use milk chocolate chips. Avoid white chocolate, as it burns at this high temperature.
| Original Ingredient | Best Substitution | Flavor / Texture Impact |
|---|---|---|
| Cold Butter | Cold margarine or vegan butter | Slightly less rich, less spread |
| Cornstarch | Tapioca starch or arrowroot (same amount) | Similar tenderness, slight chew difference |
| Semi-sweet chips | Bittersweet chips (60% cacao) | Darker, less sweet, more intense flavor |
| Brown sugar | Coconut sugar (same amount) | Slightly fruity, less moist, less chewy |
How to Make Chocolate Chip Cookies — Step-by-Step
Ready to bake the most popular chocolate chip cookies in NYC? Don’t be intimidated—I’m here to guide you every step of the way. Follow these simple steps for perfectly chewy, ooey-gooey results every single time.
Step 1: Preheat and Prep
Preheat your oven to 475°F. This high temperature is key for creating that golden-brown crust and gooey center. Line two baking sheets with parchment paper to prevent sticking and ensure easy cleanup. Do not use wax paper—it burns at this temperature.
💡 Pierre’s Pro Tip: For extra crunchy bottoms, use a light-colored aluminum baking sheet. Dark sheets can cause the bottoms to burn before the tops are golden.
Step 2: Mix Dry Ingredients
In a small mixing bowl, whisk together the flour, cornstarch, salt, and baking soda. Cornstarch is the secret to these chocolate chip cookies being so soft—it’s a trick I learned from a Parisian pastry chef. Make sure there are no lumps; a whisk aerates the mixture for lighter cookies.
⚠️ Common Mistake to Avoid: Don’t overmix the dry ingredients. Just whisk until combined. Overmixing can develop gluten, which makes cookies tough.
Step 3: Cream Butter and Sugars
Cut the cold stick of butter into small cubes (about ½-inch pieces). In a large mixing bowl, combine the butter cubes, granulated sugar, brown sugar, egg, and vanilla extract. Use a wooden spoon or electric mixer on low speed—just until combined. The mixture will look slightly lumpy with small butter pieces. That’s perfect; those bits will create steam pockets later.
💡 Pierre’s Pro Tip: Use cold butter! This prevents the cookies from spreading too much. If the mixture seems dry, that’s normal—the butter will melt and hydrate the dough during baking.
Step 4: Combine Wet and Dry
Gently fold the dry ingredients into the wet mixture. Use a spatula or wooden spoon, mixing with a gentle hand. Stop as soon as no white streaks remain. Overmixing at this stage triggers gluten development, making cookies tough. The dough should be thick and slightly crumbly—don’t worry, it’ll come together.
⚠️ Common Mistake to Avoid: Do not use a mixer on high speed. The friction will warm the butter, causing excessive spreading. Fold by hand for the best texture.
Step 5: Add Chips and Form Dough Balls
Add the semi-sweet chocolate chips and optional walnut pieces. Mix gently until evenly distributed. Using a full-size spoon (a standard tablespoon), scoop out cookie dough balls and place them about 2 inches apart on the prepared baking sheets. Each ball should be about 1.5 tablespoons of dough—not too big, not too small.
💡 Pierre’s Pro Tip: For that bakery-style look, press a few extra chips onto the top of each dough ball before baking. This ensures a beautiful, chocolate-studded surface.
Step 6: Bake and Cool
Bake for 6-7 minutes, or until the tops are golden brown and the edges are set but the centers still look slightly soft. Keep a close eye on them—they brown quickly at 475°F. Remove from the oven and let them cool on the baking sheet for 5 minutes. The residual heat will finish cooking the centers, creating that ooey-gooey texture.
⚠️ Common Mistake to Avoid: Don’t overbake! The cookies will look underdone in the center when you take them out. Trust the cooling process. Overbaking leads to dry, crunchy cookies instead of soft and chewy.
| Step | Action | Duration | Key Visual Cue |
|---|---|---|---|
| 1 | Preheat oven, line sheets | 10 mins | Oven thermometer reads 475°F |
| 2 | Mix dry ingredients | 2 mins | Uniform powder, no lumps |
| 3 | Cream butter and sugars | 2 mins | Butter pieces visible, grainy mixture |
| 4 | Combine wet and dry | 1 min | No dry streaks, thick dough |
| 5 | Add chips, form balls | 3 mins | Even chocolate distribution, 1.5 tbsp balls |
| 6 | Bake and cool | 6-7 mins + 5 mins cool | Golden tops, soft centers |
Serving & Presentation
For the softest, most ooey-gooey cookies, eat them while they’re still warm—not totally cooled. That’s when the chocolate is molten and the texture is at its peak. I love serving them on a rustic wooden board, straight from the baking sheet, with a small bowl of flaky sea salt for sprinkling. A pinch of salt elevates the chocolate flavor beautifully.
In New York, I’ve seen these served with a glass of cold milk (a classic pairing) or a scoop of vanilla bean ice cream for an indulgent dessert. For a Moroccan twist, I sometimes dust them with a touch of cinnamon or serve them alongside a tiny cup of strong mint tea. The combination of warm cookies and aromatic tea is pure comfort.
| Pairing Type | Suggestions | Why It Works |
|---|---|---|
| Side Dish | Fresh fruit (berries, sliced banana) | Adds freshness, cuts richness |
| Sauce / Dip | Chocolate sauce, caramel, or peanut butter | Extra indulgence, flavor layers |
| Beverage | Cold milk, hot coffee, or mint tea | Balances sweetness, cleanses palate |
| Garnish | Flaky sea salt, cinnamon dust, extra chips | Enhances flavor, visual appeal |
Make-Ahead, Storage & Reheating
In my busy NYC life, I often prep these chocolate chip cookies dough balls ahead of time. They freeze beautifully, so I can bake fresh cookies in minutes whenever a craving strikes. Here’s how to store and reheat them for the best results.
Print
Chocolate Chip Cookies
Description
What is the most popular chocolate chip cookie? These are it! They are the perfectly chewy, chocolatey, ooey-gooey, answer to those intense sweet tooth cravings.
Ingredients
- 1¼ cups flour
- 3 tablespoons cornstarch
- ½ teaspoon salt
- ½ teaspoon baking soda
- ½ cup cold butter ((1 stick of butter is usually 1/2 cup))
- 6 tablespoons granulated sugar
- 6 tablespoons brown sugar
- 1 egg
- ½ teaspoon vanilla extract
- 1 bag semi-sweet chocolate chips. About 10-11 oz (or 1/2 a bag if you want less chocolate)
- ¼ cup walnut pieces (optional)
Instructions
- Preheat oven to 475°
- Prepare baking sheets with parchment paper to prevent sticking
- In the smaller mixing bowl, whisk together the flour, corn starch, salt, and baking soda
- Cut the stick of butter into smaller pieces (as seen in the video)
- In the larger mixing bowl, combine the butter, sugar, brown sugar, egg, and vanilla extract
- Gently stir the dry ingredients (flour, corn starch, salt, etc.) into the larger bowl with the butter/egg/sugar mixture (as seen in the video)
- Add in chocolate chips and optional walnuts. Mix gently until fully combined
- Using a full size spoon (tablespoon), make cookie dough balls and place them on the baking sheet
- Bake for 6-7 minutes or until the tops of the cookies get golden/brown (keep your eye on them:)
- Remove from the oven and let them cool. Theyll continue to cook on the inside while they cool
- For the softest cookies, eat them when they are warm, not totally cooled



