Table of Contents
Chocolate Lava Cake Instant Pot or Oven – Double-Method Magic
When I was a young chef in Marrakech, I’d dream of making a dessert that melted like the desert’s sand under the heat of the sun. Fast forward to Paris, I learned the art of caramelizing and balancing textures, and now in my NYC kitchen, I’ve blended those techniques with the convenience of modern appliances. Think of this – a chocolate lava cake that you can pop into an Instant Pot or pop onto a sheet pan and bake in 20 minutes, and you’ll have a gooey, decadent center with a crisp shell. It’s a recipe that satisfies the sweet cravings of New Yorkers while honoring the warmth of a Moroccan kitchen.
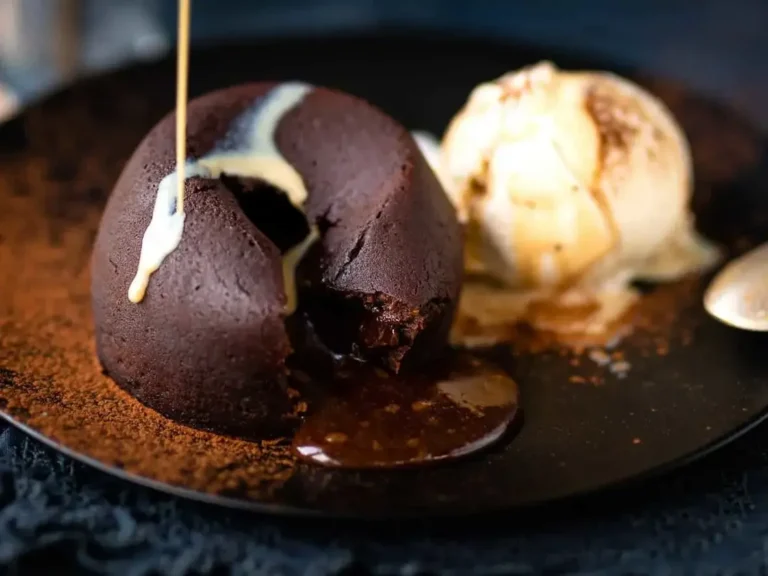
The moment you crack open the oven or turn on the Instant Pot, the aroma of rich chocolate and butter rises, filling the entire kitchen atmosphere. The gooey core, silky chocolate thickened with fine sugar and flour, contrasts against a crumbly, slightly crisp crust. Every bite delivers a symphony of textures – a molten center that shimmers like Moroccan lantern glass, light‑feathered foam, and the subtle hint of espresso that acts like a midnight night in Paris. The finish is finished with a light dusting of cocoa, producing a chocolatey bite that feels both indulgent and surprisingly light.
This version is special because it makes you think of “instant” not only in appliance terms but the instant type of pleasure you get when the lava cake emerges. I’ve experimented with different types of chocolate: dark chocolate with a hint of sea salt replicating a Moroccan salt finished. My one quick trick is to freeze the hot cake for a minute before serving so that the goo is controlled. A common pitfall is over‑cooking the cake, which leads to a dry interior; keep an eye on the timer, especially for the oven method. I’ve spent countless hours perfecting the tray placement in the Instant Pot, which is why I spritz every ramekin with butter before adding cocoa dust so the cakes release cleanly.
Why This Chocolate Lava Cake Recipe Is the Best
Flavor Secret – Drawing from my Moroccan background, I layer dark chocolate with a dash of espresso and a whisper of cinnamon, creating a depth that transports you to the bustling markets of Marrakech, all while highlighting the French pastry technique of silk‑smooth fillings.
Perfected Texture – Baking on a heavy tray and using a metal trivet in the Instant Pot ensures even heat distribution. The deliberate release process after pressure cooking guarantees that the subtle crisp shell remains while the gooey center remains in place.
Foolproof & Fast – The recipe’s secrets are embedded in simple steps that any beginner can follow. Because I’ve tested each step, you’ll never be left searching for “how long does it take to cook in a pressure cooker.” The result is a marvelous cake finished in half an hour.
Chocolate Lava Cake Ingredients
I shop for these goodies in the selective aisles of Chelsea Market in Manhattan—there’s an ethnic grocery that carries real dark chocolate from the valley of Benin, and the butter I choose is farm‑fresh from Buffalo, New York. These ingredients are essential for the cake’s depth and texture.
Ingredients List
- 1 cup (180g) dark chocolate chips (or chopped dark chocolate)
- ½ cup (113g) unsalted butter (cubed)
- 3 large eggs
- 1 tsp vanilla bean paste (or extract)
- 1 ½ cups (180g) powdered sugar (icing sugar)
- 7 tbsp all‑purpose flour
- 1 tsp instant espresso powder (optional)
- 1 tsp ground cinnamon
- ¼ tsp salt
- 4 tsp cocoa powder (or as needed)
- melted butter or cake release spray
- 2 tbsp Baileys (optional)
- vanilla ice cream (optional)
Ingredient Spotlight
Dark Chocolate Chips – using a high‑percent cocoa chocolate gives the lava center a bold depth. When you look for chocolate from Benin or Mullen’s in NYC, choose at least 70% cocoa for richer flavor. Swap with a dark chocolate bar if you prefer a smoother mix; the result will taste slightly less crunchy.
Unsalted Butter – butter is critical for mouthfeel. If you’re vegan, I recommend coconut oil, which provides a subtle nutty tone. The taste will shift, but the texture holds up well.
Eggs – eggs bind and provide lift. For a dairy‑free version, use silken tofu or a commercial egg replacer. The final cake will be lighter but still hold its shape.
| Original Ingredient | Best Substitution | Flavor / Texture Impact |
|---|---|---|
| Dark Chocolate Chips | Dark Chocolate Bar | Cleaner surface, slightly less granular. |
| Unsalted Butter | Coconut Oil | Nutty flavor, firmer texture. |
| Eggs | Silken Tofu | Light, airy, less binding. |
How to Make Chocolate Lava Cake — Step-by-Step
Let’s walk through each step and keep the process simple, especially if you’re new to pressure cooking or baking.
Step 1: Melt Chocolate and Butter
Put the chocolate and butter in a heat‑proof bowl and microwave for 30‑second bursts, stirring until smooth, or use a double boiler. Let it cool slightly for 2‑3 minutes before moving on.
💡 Pierre’s Pro Tip: You can add a pinch of sea salt while melting; it balances the richness of the chocolate.
Step 2: Add Eggs and Vanilla
Whisk the eggs and vanilla into the melted mixture until the texture thickens—this will help set the lava core.
⚠️ Common Mistake to Avoid: Overmixing can create a congealed batter that won’t set properly.
Step 3: Sift Dry Ingredients
Sift the flour, powdered sugar, espresso powder, cinnamon, and salt over the chocolate base. Fold gently until no streaks remain.
💡 Pierre’s Pro Tip: Make sure the flour is well sifted; this keeps the cake light and airy.
Step 4: Prep Ramekins or Molds
Lightly grease four ramekins or metal pudding molds with butter or spray. Dust with cocoa powder, swirling to coat but discarding excess.
⚠️ Common Mistake to Avoid: Not pre‑coating the molds may cause the cakes to stick, ruining the silky appearance.
Step 5: Set Trivet and Water
Place a metal trivet in your Instant Pot, add 1 cup (250 ml) water, then slide the ramekins onto the trivet. The water level must stay below the tops of the molds.
💡 Pierre’s Pro Tip: Ensure the water is only 1 inch deep to prevent the batter from floating.
Step 6: Cook in Instant Pot
Seal the lid and cook at high pressure for 10 minutes. Afterward, manually release the steam, and check if the cakes have risen and the tops are slightly set.
⚠️ Common Mistake to Avoid: Waiting too long on the pressure may overcook the cakes, leading to a dry center.
Step 7: Take Cakes Out and Dry
Remove the cakes, pat dry any condensation with a paper towel and cool for a minute before turning them out.
💡 Pierre’s Pro Tip: Use a kitchen paper towel quickly; moisture is the enemy of a good release.
Step 8: Cooling
Let them sit for 2 minutes; the gelatinous center will firm slightly, and the shell will settle nicely.
⚠️ Common Mistake to Avoid: Leaving the cakes too long can cause the goo to become too thick and solidify.
Step 9: Oven Preheat and Bake
Preheat your oven to 400 °F (200 °C). Place the molds on a heavy tray and bake for 18‑20 minutes or until edges are set but middle still soft.
💡 Pierre’s Pro Tip: Use a heavy non‑warping tray; this ensures even heat distribution.
Step 10: Air Fryer Option
Set the air fryer to 350 °F (180 °C) and bake for 10‑12 minutes—if you’re short on time, this is the fastest method.
⚠️ Common Mistake to Avoid: Overbaking in the air fryer will dry the cake core; keep a watchful eye.
Step 11: Invert and Serve
Let cakes cool 2 minutes, run a knife around the edges, then invert onto plates. Serve immediately so the molten center stays liquid and stretchy.
💡 Pierre’s Pro Tip: Pair a scoop of vanilla ice cream for contrast and a drizzle of Baileys for an extra indulgence.
Step 12: Final Touches
For a complete experience, you can drizzle a warm caramel sauce or sprinkle a pinch of sea salt. The chocolate lava pairs beautifully with coffee or a glass of red wine.
⚠️ Common Mistake to Avoid: Serving too late; the molten center can lose its fluidity.
| Step | Action | Duration | Key Visual Cue |
|---|---|---|---|
| 1 | Melt chocolate & butter | Smooth glossy mixture | No lumps |
| 2 | Add eggs & vanilla | Thickened, glossy | Smooth sheen |
| 3 | Fold dry ingredients | Even batter | No streaks |
| 4 | Prep molds | Cocoa touch | Smooth dusting |
| 5 | Add water, place molds | Water below top | Stability |
| 6 | Cook 10 min | Bubble rumble | Chore flat |
| 7 | Remove, dry | No drip | Clear glaze |
| 8 | Cooling 2 min | Soft centers | Visible set |
| 9 | Bake 18‑20 min | Golden crust | Edge firmness |
| 10 | Air Fry 10‑12 min | Smooth shake | Tiny bubbles |
| 11 | Invert, serve | Soft top | Feathered edges |
| 12 | Final touch, pair | Bright glaze | Visual appeal |
Serving & Presentation
When you plate the lava cakes, start by placing each molten masterpiece on a feathered plate coated lightly with espresso‑scented butter. Drizzle a swirl of caramel or espresso sauce for an extra depth. For a godly feel, scatter fresh mint leaves, a dusting of sea salt, or edible flower petals that echo the Moroccan market’s color vibrancy.
Pair the chocolate lava cake with crisp white wine or a bright orange apple juice for a contrast that mirrors the bright lights of a New York evening. If you’re indulging, add a scoop of vanilla ice cream or a swirl of Baileys. The caramelized chocolate and citrus from espresso create a balanced, multi‑sensory experience.
| Pairing Type | Suggestions | Why It Works |
|---|---|---|
| Side Dish | Plain whipped cream | Lightens the dense chocolate. |
| Sauce / Dip | Caramel sauce, espresso drizzle | Matches chocolate flavor, adds depth. |
| Beverage | Sparkling water, iced coffee | Clears palate, mimics Parisian coffee. |
| Garnish | Mint leaves, sea salt flakes | Visual contrast and flavor burst. |
Make-Ahead, Storage & Reheating
My busy NYC life means I often have to stock up during the weekend. I portion these cakes into clear silicone molds and refrigerate. When you’re ready to serve, let them sit at room temperature for 15 minutes to bring back that smooth molten center.
| Method | Container | Duration | Reheating Tip |
|---|---|---|---|
| Refrigerator | Clear silicone molds | 3–4 days | Let thaw before serving. |
| Freezer | Reusable silicone molds | 2–3 months | Microwave 30 sec, then let rest. |
| Make-Ahead | Pre‑filled molds | Up to 2 days in advance | Assemble just before serving. |
I’ve discovered that reheating in a 300 °F oven for 5 minutes rejuvenates the molten center without drying it. In the instant pot, a quick 2‑minute steam release will revive any cake that has solidified during storage.
Variations & Easy Swaps
| Variation | Key Change | Best For | Difficulty Impact |
|---|---|---|---|
| Spiced Chocolate | Add 1 tsp ground cardamom and ½ tsp cayenne | Spicy dessert lovers | None |
| Gluten‑Free | Replace flour with almond flour and use tapioca starch | Gluten sensitive guests | Minimal |
| Seasonal Twist | Swap vanilla for orange zest and add fresh basil | Spring & summer festivals | Low |
Spiced Chocolate
Infusing cardamom and a splash of cayenne transforms the classic lava cake into a fragrant spice dessert reminiscent of Moroccan tea. The warm spices melt together with the chocolate, creating a velvety, aromatic center perfect for winter evenings.
Gluten‑Free
Pair almond flour with a tablespoon of tapioca starch; the texture stays airy while catering to those avoiding wheat. The chocolate still stays molten and the final cake shares the same glossy, decadent feel.
Seasonal Twist
Swapping vanilla for orange zest and adding a touch of fresh basil gives the cake a bright citrus undertone with a herbal uplift. It pairs wonderfully with tart fruit desserts and open‑air brunches.
How long does it take to cook chocolate lava cake in an Instant Pot?
With the Instant Pot, you typically need to press the “sauté” or “manual” button for a 10‑minute high‑pressure cook time. After the pressure release, the cake will sit for a minute or two while it cools slightly. The whole process from start to finish is roughly 20 minutes, making it a perfect quick dessert for busy evenings.
Can I bake this cake in a microwave?
While you can melt the chocolate and butter in a microwave, the actual cake needs gentle, even heat that a conventional oven or Instant Pot delivers. Cooking directly in a microwave will likely result in uneven browning and a dry center. It’s better to use a 400 °F oven or pressurized cooking for superior texture.
What storage options work best for chocolate lava cake?
Store the cakes in a clear silicone mold sealed with a lid in the refrigerator for up to four days or freeze for up to three months. When you’re ready to serve, allow the cake to take a short resting period at room temperature to bring back the molten center. If re‑using a freezer approach, a quick 30‑second microwave reload works well.
Is it safe to use oil instead of butter in the recipe?
Yes, for a vegan version you can swap butter with coconut oil or a neutral‑flavored oil. Coconut oil adds a subtle tropical undertone, while a vegetable or canola oil preserves the chocolate’s integrity. Note that the cake’s moisture content will shift slightly, so you may need a small adjustment in liquid ingredients to keep the batter smooth.
What is the secret behind the gooey center?
The gooey core comes from balancing the ratio of chocolate to batter and using a quick, high‑pressure cook that sets the outer shell. The intense heat required to set the exterior while leaving the interior liquid creates a decadent molten experience. Adding a teaspoon of espresso or a pinch of sea salt during the melt phase also amplifies the richness and delays full setting.
Can I use this recipe with different chocolate varieties?
Absolutely! Dark, milk, or semi‑sweet chocolate all work. Dark chocolate (70 %+ cocoa) gives the richest flavor. Milk chocolate yields a smoother, sweeter bite, while semi‑sweet chocolate offers a balanced profile suitable for families. When switching varieties, keep the butter amount constant and adjust the sugar if you want a slightly sweeter cake.
What wine pairs best with chocolate lava cake?
Choose bold, fruity reds like Cabernet Sauvignon or a dessert wine such as Porto. The tannins cut through the chocolate’s richness, while the sweetness of the wine complements the baked flavor. If you prefer non‑alcoholic pairings, a spinach‑blackberry drink or even a poured coffee complement the dessert’s warmth.
How do I avoid the cake sticking to the ramekins?
Coat each ramekin or metal mold lightly with butter or cling‑film before adding cocoa dust. After adding the batter, sprinkle a thin rim of cocoa, swirl, and wipe away excess. This dual coat keeps the cakes from sticking while preventing the cocoa from clumping on the surface.
Is it necessary to use an Instant Pot over a conventional oven?
No, either method works. The Instant Pot is great for people who prefer minimal cleanup or are time constrained; the oven method offers a more traditional baking result that may satisfy purist tastes. In both cases, ensure the cake is not overcooked for that molten surprise.
What seasoning combinations can I add for a twist?
Feel free to experiment: cardamom, cinnamon, nutmeg, or a pinch of smoked sea salt give depth. Try adding a small amount of rosemary or thyme for a herbaceous nuance that balances the chocolate richness. These variations turn an everyday dessert into a memorable flavor adventure.
Share Your Version!
I’d love to hear how you’ve tuned this recipe to fit your own taste or cooking style. Drop a quick rating or comment below and tell me which method you used. If you capture the melt on camera, share a photo on Instagram or Pinterest and tag @spicemingle. Does the Moroccan spice blend make your chocolate melt better, or have you found a different secret? Let’s discuss — sharing your version fuels our collective kitchen wisdom!
From my NYC kitchen to yours — I hope this recipe brings as much warmth to your table as it does to mine. — Pierre 🧡
Love This Recipe? Save It to Pinterest!
If you enjoyed this Chocolate Lava Cake recipe, don’t let it get lost in your browser tabs! 😄 Pin it now so you can find it again anytime — and explore hundreds more tried‑and‑tested recipes waiting for you on my Pinterest boards.
👉 Follow Pierre on Pinterest @chefrecipes2
📌 Pin this recipe · 🔁 Re-pin your favorites · 💬 Tag me when you make it — I love seeing your creations!
Did you enjoy this molten marvel? Let me know by reviewing, commenting, or sharing your creative twists below. 🎉
Molten chocolate lava cakes
Description
These molten chocolate lava cakes (also known as chocolate fondants) hide a core of gooey chocolate inside their sponge shell. A delicious and easy dessert in your Instant Pot or oven.
Ingredients
- 1 cup (180g) dark chocolate chips (or chopped dark chocolate)
- ½ cup (113g) unsalted butter (cubed)
- 3 large eggs
- 1 tsp vanilla bean paste (or extract)
- 1 ½ cups (180g) cups powdered sugar ((= icing sugar))
- 7 tbsp flour (all purpose / plain)
- 1 tsp instant Espresso powder ((optional))
- 1 tsp ground cinnamon
- ¼ tsp salt
- 4 tsp cocoa powder (or as needed)
- melted butter (or cake release spray)
- 2 tbsp Baileys (optional)
- vanilla ice cream (optional)
Instructions
- Put the chocolate and butter in a bowl and microwave for 30 second bursts, stirring in between, until melted and smooth. Alternatively set the bowl over a pot of barely simmering water and allow the chocolate to melt gradually (double boiler method). Set aside to cool slightly.
- Add the eggs and vanilla. Mix together using a small balloon whisk. The chocolate will thicken.
- Sift the flour, icing sugar, espresso powder, ground cinnamon and salt over the chocolate. Fold together until you have a glossy, thick batter and no dry streaks remain.
- Spray four ramekins or metal pudding molds with cake release or brush with melted butter. Add a scant teaspoon of cocoa powder in each and swirl to cover. Discard any excess cocoa powder. Divide the batter between the prepared ramekins or molds.
- Place the metal trivet in your pressure cooker and add 1 cup / 250ml of water. Place the ramekins on the trivet – you should have enough space to fit them all in a single layer but if not you can stack them.
- Set vent to sealing and cook for 10 minutes at high pressure. Release the steam manually and remove them lava cakes from the cooker. If any condensation has collected on top of the cakes, pat it dry with kitchen paper.
- Leave to cool for a couple of minutes before serving. Carefully invert the lava cakes on plates (the moisture from the pressure cooker makes them really easy to release).
- Preheat your oven to 400°F / 200°C. Place the molds on a heavy baking tray (one that will not warp in the oven) and cook for 18-20 minutes. The lava cakes will rise slightly if they are very soft and squidgy on top you might need to cook them for a couple of minutes more.
- Leave to cool for two minutes. Carefully run a knife around the edge of the molds. Invert onto plates and serve.
- Preheat the air fryer to 350°F / 180°C. Place the molds in the air fryer basket and bake for 10-12 minutes until the lava cakes are set on top with a slight jiggle in the middle.
- Remove the lava cakes from the air fryer basket and leave them to cool for two minutes. Carefully run a knife around the edge of the molds. Invert onto plates and serve.
- Serve warm with a scoop of vanilla ice cream on the side and perhaps a little Baileys drizzled over.