Table of Contents
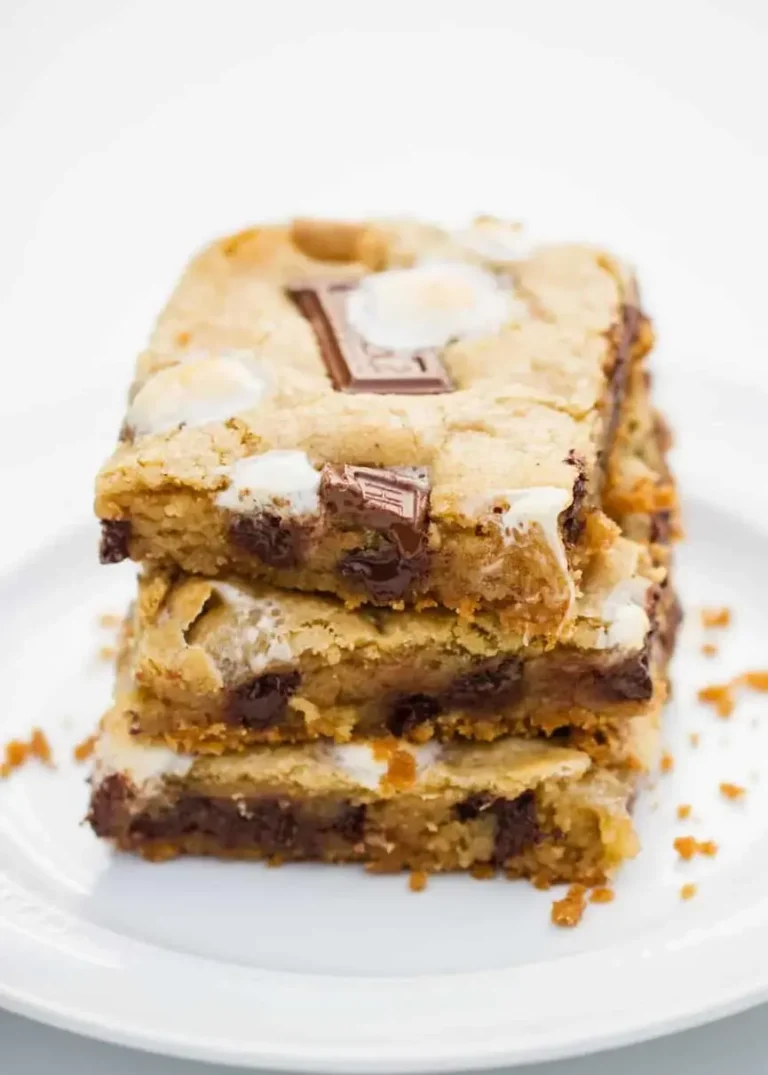
Gooey S’mores Bars double‑layer gooeyness – a campfire classic made chewy
When I was a kid in Tangier, the campfires on the docks were the center of family life. The sweet smell of toasted marshmallows and caramelized sugar floated over the harbor, mingling with sea breeze. Today, I bring that raw, rustic joy to my NYC kitchen, blending Moroccan spices with a French technique of double‑layer gooeyness that turns ordinary S’mores into a decadent cookie bar.
Imagine biting into a buttery graham‑cracker base, then sinking into a river of melted chocolate and marshmallows that gleam like tiny sunbursts. The texture transitions from slightly crisp to luxuriously chewy, while the caramel notes of brown sugar dance with the subtle almond undertone from the crumb. A single slice feels like the sun over the Sahara – warm, bright, and inviting.
I perfected this version by layering a crushed milk‑chocolate bar with a scatter of gluten‑free graham crumbs, then tossing mini marshmallows on top before baking. A pro tip: use a silicone spatula to press down the dough evenly; it yields a smoother top. A common mistake is over‑baking – keep the center slightly under‑done to preserve that gooey heart you love.
Why This Gooey S’mores Bars Recipe Is the Best
The flavor secret lies in the contrasting textures: a crisp yet buttery base balances the soft, molten center. My French pastry training taught me the value of a properly leavened cookie base – the baking powder and salt lift the density just enough to support the chocolate overlay.
Perfected texture comes from folding the chocolate chips and marshmallows into the dough just before pressing it onto the crust. This technique, borrowed from my Parisian pastry course, ensures the chocolate melts evenly while the marshmallows caramelize into tender pearls.
For beginners, the recipe is forgiving. You can use the same ingredients I find at a local farmers market in Brooklyn, tossed together in a single bowl, and the outcome remains consistently chewy, golden, and irresistibly sweet.
Gooey S’mores Bars Ingredients
I shop for these staples at the Village Green farmers market, where you can find freshly ground graham crackers, artisanal chocolate chips, and marshmallows straight from a local candy shop – all the ingredients that made my childhood memories taste like sunshine.
Ingredients List
- 1/2 cup butter, melted
- 1 ½ cups graham cracker crumbs
- 2 cups light brown sugar
- 2/3 cup salted butter, softened
- 2 eggs
- 2 ½ cups all‑purpose flour
- 2 ¼ teaspoons baking powder
- ½ teaspoon salt
- 1 teaspoon vanilla extract
- 1 cup semi‑sweet chocolate chips
- 1 cup mini marshmallows
- 1 milk chocolate candy bar, broken into pieces
- 1 graham cracker, broken into pieces
- ½ cup marshmallows
Ingredient Spotlight
Graham Cracker Crumbs: The backbone of the base, they provide a sweet, slightly nutty flavor. Look for 100% wheat with no added honey. If you’re on a gluten‑free diet, oat crushed graham layers work well and maintain the crumbly texture.
Semi‑Sweet Chocolate Chips: These bring rich, balanced chocolate notes. A higher percentage cacao (like 60%) will add depth without overwhelming the bars. As a substitute, dark chocolate chips add bitterness, suited for those who like a more dramatic finish.
Mini Marshmallows: They create that signature gooey crown. Fresh mini marshmallows stay softer; for extra crispness, add a thin layer of toasted marshmallow crumbs. You can also swap with standard marshmallows for a larger bite.
| Original Ingredient | Best Substitution | Flavor / Texture Impact |
|---|---|---|
| Graham Cracker Crumbs | Oat Crumbs | Crisper, slightly nutty; less sweet |
| Semi‑Sweet Chocolate Chips | Dark Chocolate Chips | Deeper, bittersweet; richer |
| Mini Marshmallows | Standard Marshmallows | Larger bite; softer melt |
How to Make Gooey S’mores Bars — Step-by-Step
Let’s build these brownies together, falling in love with each layer as we go.
Step 1: Preheat Oven and Form Crust
Preheat the oven to 325°F (163°C). Line a 9×13” baking dish with foil and lightly spray with non‑stick spray. In a small bowl, mix ½ cup melted butter with 1 ½ cups graham cracker crumbs until the mixture looks like moist sand. Press this crust firmly into the bottom of the dish.
💡 Pierre’s Pro Tip: Use a chilled glass pan to keep the crust from sliding during pressing.
Step 2: Cream Butter and Sugar
In a large mixing bowl, beat ⅔ cup softened butter with 2 cups light brown sugar until the mixture is fluffy. Add 2 eggs one at a time, then stir in 1 teaspoon vanilla. Mix until combined.
⚠️ Common Mistake to Avoid: Over‑mixing the batter; keep it just blended to avoid a tough cookie.
Step 3: Combine Dry Ingredients
In a separate bowl, whisk 2 ¼ teaspoons baking powder, ½ teaspoon salt, and 1 cup all-purpose flour. Gradually stir this flour mixture into the butter‑sugar mixture, mixing until just incorporated.
💡 Pierre’s Pro Tip: Sift the dry mix to remove lumps for an even crumb.
Step 4: Fold in Chocolate and Marshmallows
Fold in 1 cup semi‑sweet chocolate chips and 1 cup mini marshmallows until evenly distributed. Then press the dough on top of the crust with a spatula or floured hands.
⚠️ Common Mistake to Avoid: Skipping the crumble—without it the bars will look bland.
Step 5: Press Dough & Add Toppings
After pressing the dough evenly, scatter broken milk chocolate bar pieces, broken graham crackers, and an extra ½ cup marshmallows over the top. Gently press them into the dough so they are partially embedded.
💡 Pierre’s Pro Tip: Use a metal spatula to press toppings—helps them set nicely.
Step 6: Bake
Bake for 30–35 minutes at 325°F, or until the top is lightly golden brown. Insert a toothpick in the center; it should come out with a few moist crumbs but no liquid. Remember ovens vary—keep an eye on the edges.
⚠️ Common Mistake to Avoid: Removing too early; it firms up, losing the gooey finish.
Step 7: Cool & Serve
Let the bars sit in the pan on a rack for at least 20 minutes, then cut into squares. Serve warm with a scoop of vanilla ice cream or a thick glass of cold milk for the full campfire experience.
💡 Pierre’s Pro Tip: For a party, store a rack of bars in the fridge—you’ll find them tasting even better after cooling fully.
| Step | Action | Duration | Key Visual Cue |
|---|---|---|---|
| 1 | Preheat & crust | 5 min | Crust looks wet and presses smoothly |
| 2 | Cream butter & sugar | 4 min | Frothy, pale mixture |
| 3 | Mix dry into wet | 3 min | Even batter, no lumps |
| 4 | Fold chocolate & marshmallows | 2 min | Chocolate flakes evenly spread |
| 5 | Press dough & toppings | 2 min | Toppings set slightly into dough |
| 6 | Bake | 30–35 min | Top golden, edges slightly crisp |
| 7 | Cool & cut | 20 min | Bars set, easy to slice |
Serving & Presentation
Once cooled, cut the bars into rectangles that you can easily hold. A classic pairing is a scoop of creamy vanilla ice cream that melts into the warm chocolate center. If you’re in the mood for a city twist, drizzle a splash of freshly brewed espresso and top with sea salt flakes for a bitter‑sweet contrast reminiscent of my time in Brooklyn’s coffee shops.
For a Moroccan touch, sprinkle a pinch of toasted sesame seeds on top of each bar; the nutty aroma will lift the sweet mantle. A final touch is a dusting of powdered sugar, giving the bars that snowy look of a childhood campfire on a winter night.
| Pairing Type | Suggestions | Why It Works |
|---|---|---|
| Side Dish | Almond biscotti | Crunch balances gooey softness |
| Sauce / Dip | Caramel sauce | Sweet glue that enhances chocolate |
| Beverage | Cold milk or coffee | Cool contrast to warm bars |
| Garnish | Sea salt & espresso drizzle | Adds depth and aroma |
Make-Ahead, Storage & Reheating
I love prepping these bars for a New York brunch on a rainy Saturday. After baking, let them cool completely, then wrap each square tightly in parchment and zip them in an airtight bag. When you need them, just slice and serve.
| Method | Container | Duration | Reheating Tip |
|---|---|---|---|
| Refrigerator | Zip‑lock bag | 3–4 days | Room temp 15 min before serving |
| Freezer | Parchment wrap, then plastic wrap | 1–2 months | Heat 8 min at 350°F |
| Make‑Ahead | Flan dish | 24–48 hrs in fridge before baking | Dust with flour; finish baking at 325°F for 30 min |
Reheating preserves the luscious melt. For an indulgent treat, microwave on low for 20–30 seconds and watch the chocolate pool. If you’re in a hurry, a 5‑minute oven reheat at 300°F will bring the bars back to golden bliss.
Variations & Easy Swaps
| Variation | Key Change | Best For | Difficulty Impact |
|---|---|---|---|
| Almond Crumble | Add almond flour to base | Nut lovers | Easy, no extra step |
| Gluten‑Free | Use GF flour blend | Allergy friendly | Easy, just swap flour |
| Tropical Twist | Add dried pineapple bits | Summer vibe | Easy layering addition |
Almond Crumble
Substituting almond flour into the base gives a subtle nutty crisp that pairs beautifully with the sweet marshmallows. I always roast the almond flour lightly in the oven for a minute before mixing; it brings out a fragrant aroma that reminds me of the aromatic markets in Marrakesh.
Gluten‑Free
Swap the all‑purpose flour for a seasoned gluten‑free blend. The texture remains chewy, but the bars taste softer. I recommend a blend that contains xanthan gum; it holds the dough together without adding chewy leg.
Tropical Twist
Throw in a handful of dried pineapple or mango chunks for a sweet, juicy burst. The tropical bits caramelize slightly under the heat, giving a seasonal pop that our New York brunches adore.
How long can I store Gooey S’mores Bars?
These bars should be kept in the refrigerator for no more than 4 days. If you want to keep them longer, freeze them in an airtight container for up to 2 months. Thaw them at room temperature before serving to preserve the gooey center.
What can I use instead of graham crackers?
If you can’t find graham crackers, oat crumbs, crushed rye crisps, or even crushed shortbread cookies will work. They add a slightly different flavor but keep the base chewy and tasty. The key is a fine crumb that dries quickly to form a good crust.
Are these bars gluten‑free?
By default the recipe contains all‑purpose flour, so it’s not gluten‑free. Swap the flour for a certified gluten‑free blend and you’ll get a perfectly chewy, safe version that satisfies the same gooey cravings.
Can I make these bars smaller for a snack?
Absolutely. Reduce the oven temperature to 300°F and bake for 20–25 minutes to create smaller, bite‑sized squares. They’ll be slightly less firm, but still full of the indulgent center.
What icing would pair well with these bars?
A simple white chocolate ganache works beautifully, adding a silky layer that complements the cocoa. Use melted white chocolate, stir until glossy, then drizzle over the cooled bars. Sprinkle some sea salt or toasted cocoa nibs to balance sweetness.
Do I need to use real marshmallows or can I use marshmallow creme?
Real marshmallows give the authentic goo and chew that defines these bars. Marshmallow creme lacks the melt‑through texture and will produce a denser slice. If you prefer a low‑fat version, substitute only the mini marshmallows with low‑fat ones.
Should I bake at a higher temperature?
Higher temperatures risk drying out the cookies and causing the chocolate to seize. Keep the oven to 325°F to let the flavors bloom, allowing the center to stay soft while the edges develop a golden crust.
Can I use dark chocolate instead of semi‑sweet chips?
Yes! Swap out ½ cup of the semi‑sweet chips for dark chocolate chips (70–80% cacao) for a richer, slightly bitter profile. The process remains the same; just let the chocolate blend better with the sugar details.
What’s the best way to warm the bars for serving?
Place the cut bars on a baking sheet and warm in a 350°F oven for about 5 minutes. Alternatively, microwave for 15–20 seconds on medium power. The warmth brings out the chocolate’s silkiness and gives the marshmallows that classic, tucked‑in feel.
How do I steer clear of a soggy crust?
Press the graham base firmly into the pan and bake at a controlled, moderate temperature. Over‑browning is a danger; if the edges look too dark, reduce heat slightly or bake for a shorter time but keep the center moist.
Share Your Version!
If you enjoyed this Gooey S’mores Bars double‑layer gooeyness, drop a star rating and leave a comment below—your feedback is the best seasoning in my kitchen! If you capture the bar’s blissful melt while biting, upload a photo on Instagram or Pinterest and tag @spicemingle so I can see your heat‑and‑chew moments. Tell me: which garnish turned this classic into a personal favorite for you?
From my NYC kitchen to yours — I hope this recipe brings as much warmth to your table as it does to mine. — Pierre 🧡
Love This Recipe? Save It to Pinterest!
If you enjoyed this Gooey S’mores Bars recipe, don’t let it get lost in your browser tabs! 😄 Pin it now so you can find it again anytime — and explore hundreds more tried‑and‑tested recipes waiting for you on my Pinterest boards.
👉 Follow Pierre on Pinterest @exorecipe
📌 Pin this recipe · 🔁 Re-pin your favorites · 💬 Tag me when you make it — I love seeing your creations!
S’mores Bar Recipe
Description
These gooey smores bars have all the flavor of the classic campfire treat with a graham cracker crust, chocolate bar pieces and marshmallows in a soft chewy cookie bar!
Ingredients
- 1/2 cup butter (, melted )
- 1 1/2 cups graham cracker crumbs
- 2 cups light brown sugar
- 2/3 cup salted butter (, softened)
- 2 eggs
- 2 1/2 cups all-purpose flour
- 2 1/4 teaspoons baking powder
- 1/2 teaspoon salt
- 1 teaspoon vanilla extract
- 1 cup semi-sweet chocolate chips
- 1 cup mini marshmallows
- 1 milk chocolate candy bar (, broken into pieces)
- 1 graham cracker (, broken into pieces)
- 1/2 cup marshmallows
Instructions
- Prep. Preheat oven to 325°F and line a 9×13" baking dish with foil. Spray with nonstick spray.
- Combine 1/2 cup melted butter and 1 1/2 cups graham cracker crumbs into a small bowl with a fork. Then press down crust in baking dish on top of foil.
- Cream 2/3 cup butter and 2 cups brown sugar in a large bowl. Add in 2 eggs and 1 teaspoon vanilla and stir until combined. In a separate bowl, mix the 2 1/4 teaspoons baking powder and 1/2 teaspoon salt with 1 cup of flour. Pour flour mixture into the butter mixture and stir in the rest of the flour. Fold in 1 cup chocolate chips and 1 cup marshmallows.
- Press dough into pan with a spatula or flour on your hands. The dough goes right on top of the crust. Then add the candy bar pieces, graham cracker pieces and marshmallows on top.
- Bake for 30-35 minutes, or until lightly browned. Oven temps will vary. Test with a tooth pick. The dough should be soft in the center.
- Allow bars to cool and then enjoy with a scoop of ice cream or cold glass of milk!